
Connecting your own accounts
Some AdminSmith tools send email and messages for you. They do it with your own accounts: your mailbox, your AI key, your Twilio number and your WhatsApp Business number. This guide shows how to set up each one, step by step, and how to fix the most common problems. You find all of them under Connections in the top menu.
This guide shows 4 tasks step by step, as a short video and in pictures. Look for the sections marked “video”.
Why you connect your own accounts
Instead of sending everything through one shared account of ours, AdminSmith uses accounts that belong to you. That has real advantages for a small business:
- You pay each provider directly, at their own prices. We add nothing on top of what they charge you.
- Your customers see your name and your email address or phone number, and their replies come straight to you.
- Your sending reputation is your own. Other businesses on the platform cannot get your emails marked as spam.
- You stay in control. You can switch off our access at any time, either here or at the provider.
Which tools use which connection
- Your email for sending
- Used by Payment reminders and E-invoices to send reminders and invoices from your own mailbox.
- Your AI account
- Used by the AI receptionist to write its answers. You create an API key at OpenAI, Anthropic (Claude) or Google Gemini and pay that provider directly.
- Twilio, for missed-call text back
- Used by the AI receptionist to text back callers you missed and to answer their text messages.
- WhatsApp Business
- Used by the AI receptionist to answer messages sent to your WhatsApp Business number.
The Accessibility checker and the Subscription tracker need no connection. Emails that AdminSmith sends to you, such as alerts, new enquiries and password resets, come from us, not from your mailbox.
WhatsApp replies are included in the free trial and in the AI receptionist Pro plan. Missed-call text back is included in the free trial and in the Pro plan.
How to add a connection
- Open Connections in the top menu.
- Find the connection you want, for example Your email for sending, and fill in the fields. The sections below explain every field.
- Select Save. The status changes to Saved, not tested yet.
- Select Send me a test email (for email) or Test the connection (for the others). When the test works, the status shows Connected with the date of the test.
If you change any detail later, the status goes back to Saved, not tested yet, so test again. Choosing a different AI model is the only change that does not need a new test. You can run up to 10 tests in 10 minutes.
How we store your passwords and keys
We encrypt passwords, tokens and keys (AES-256) before we store them. After you save, we never show them again in full: you see only the last four characters, for example •••• 1234. To keep a saved password or key, leave its field empty when you save other changes. To replace it, type the new one.
Never send a password, token or key by email, not even to us.
How to remove a connection
Select Remove under the connection and confirm. We delete the saved details straight away, and the tools that used the connection stop sending.
Removing a connection here does not change anything at the provider. To cut off access completely, also delete the app password, API key or token at the provider, or create a new one there.
If you remove Twilio or WhatsApp and connect it again later, you get new webhook addresses and, for WhatsApp, a new verify token. Enter the new values in your Twilio console or Meta app dashboard.
Email: connect your mailbox (SMTP)
The same steps in pictures:
-
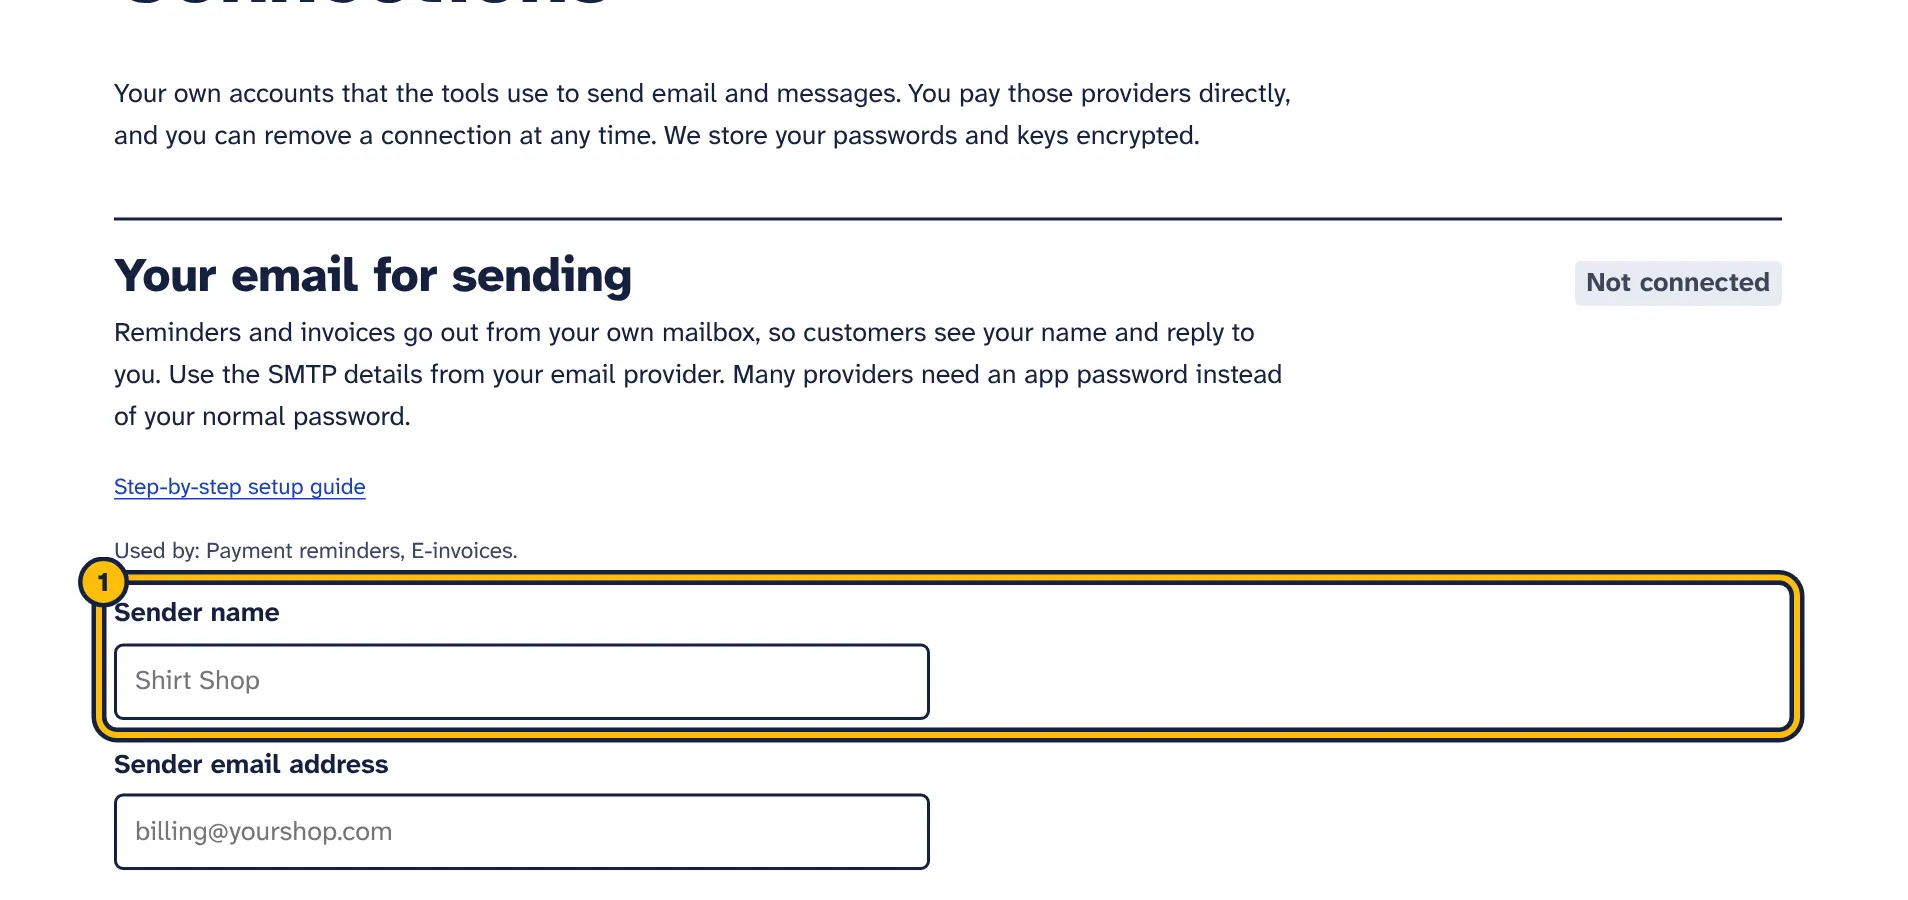
Step 1: Type the name your customers should see as the sender. -
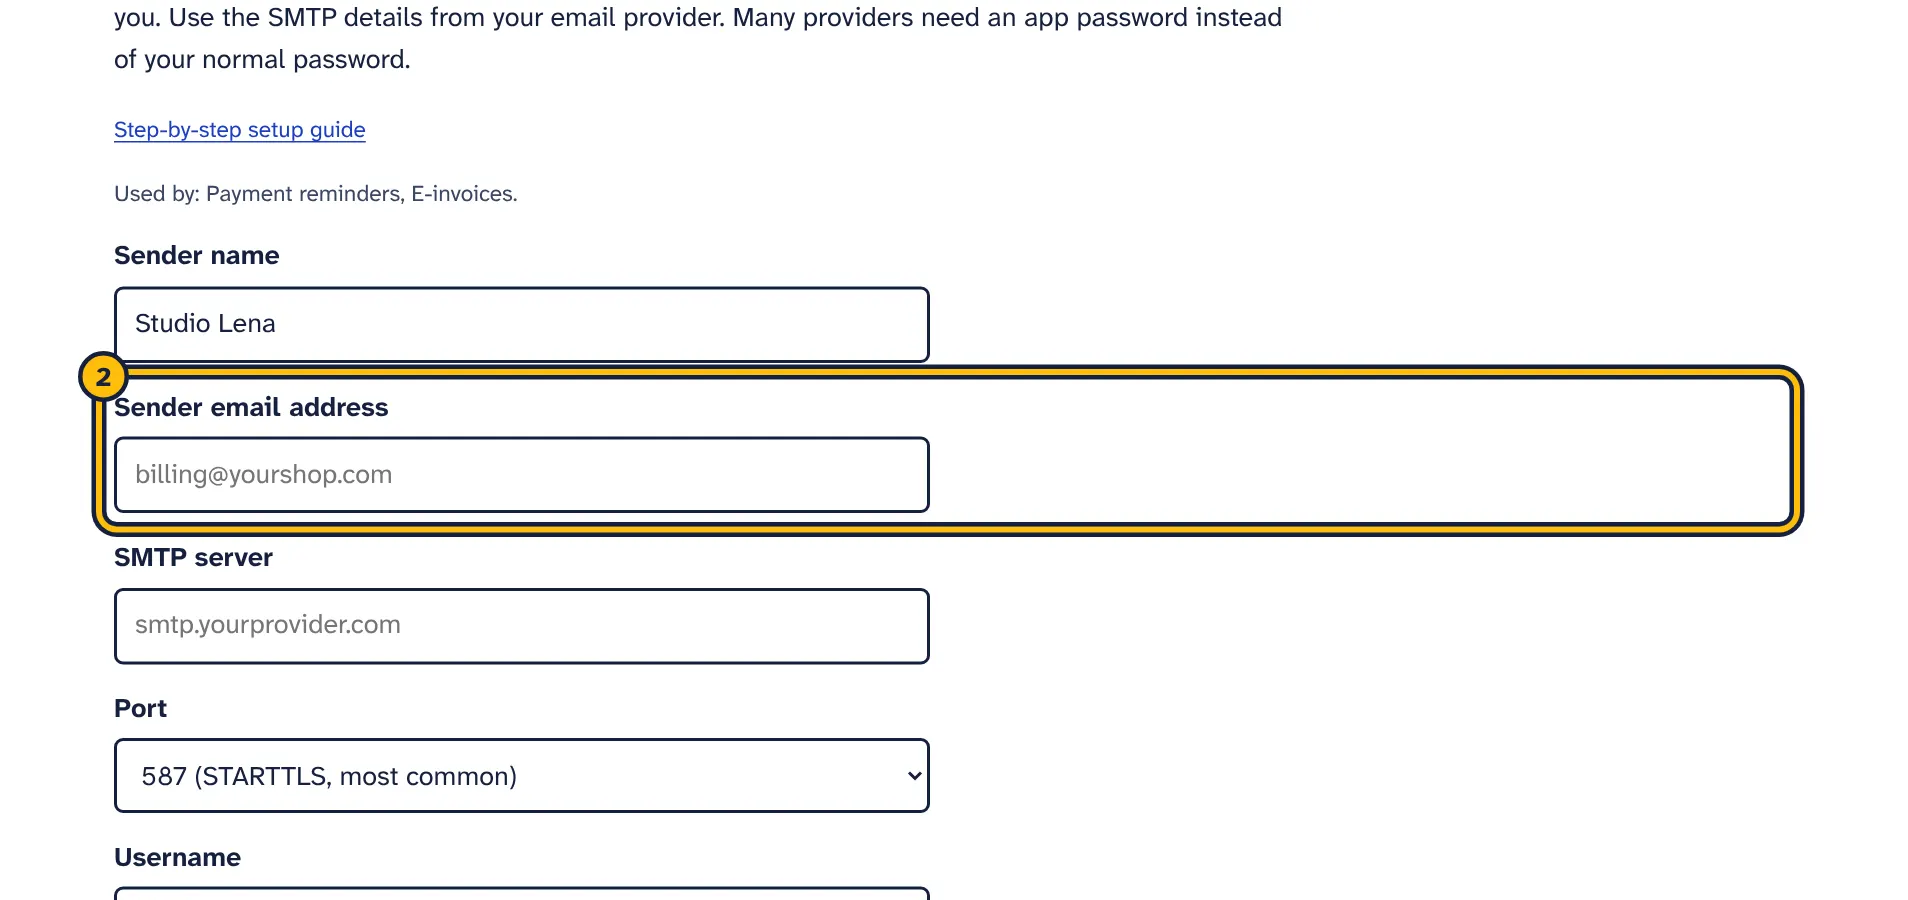
Step 2: Type the email address you send from. -
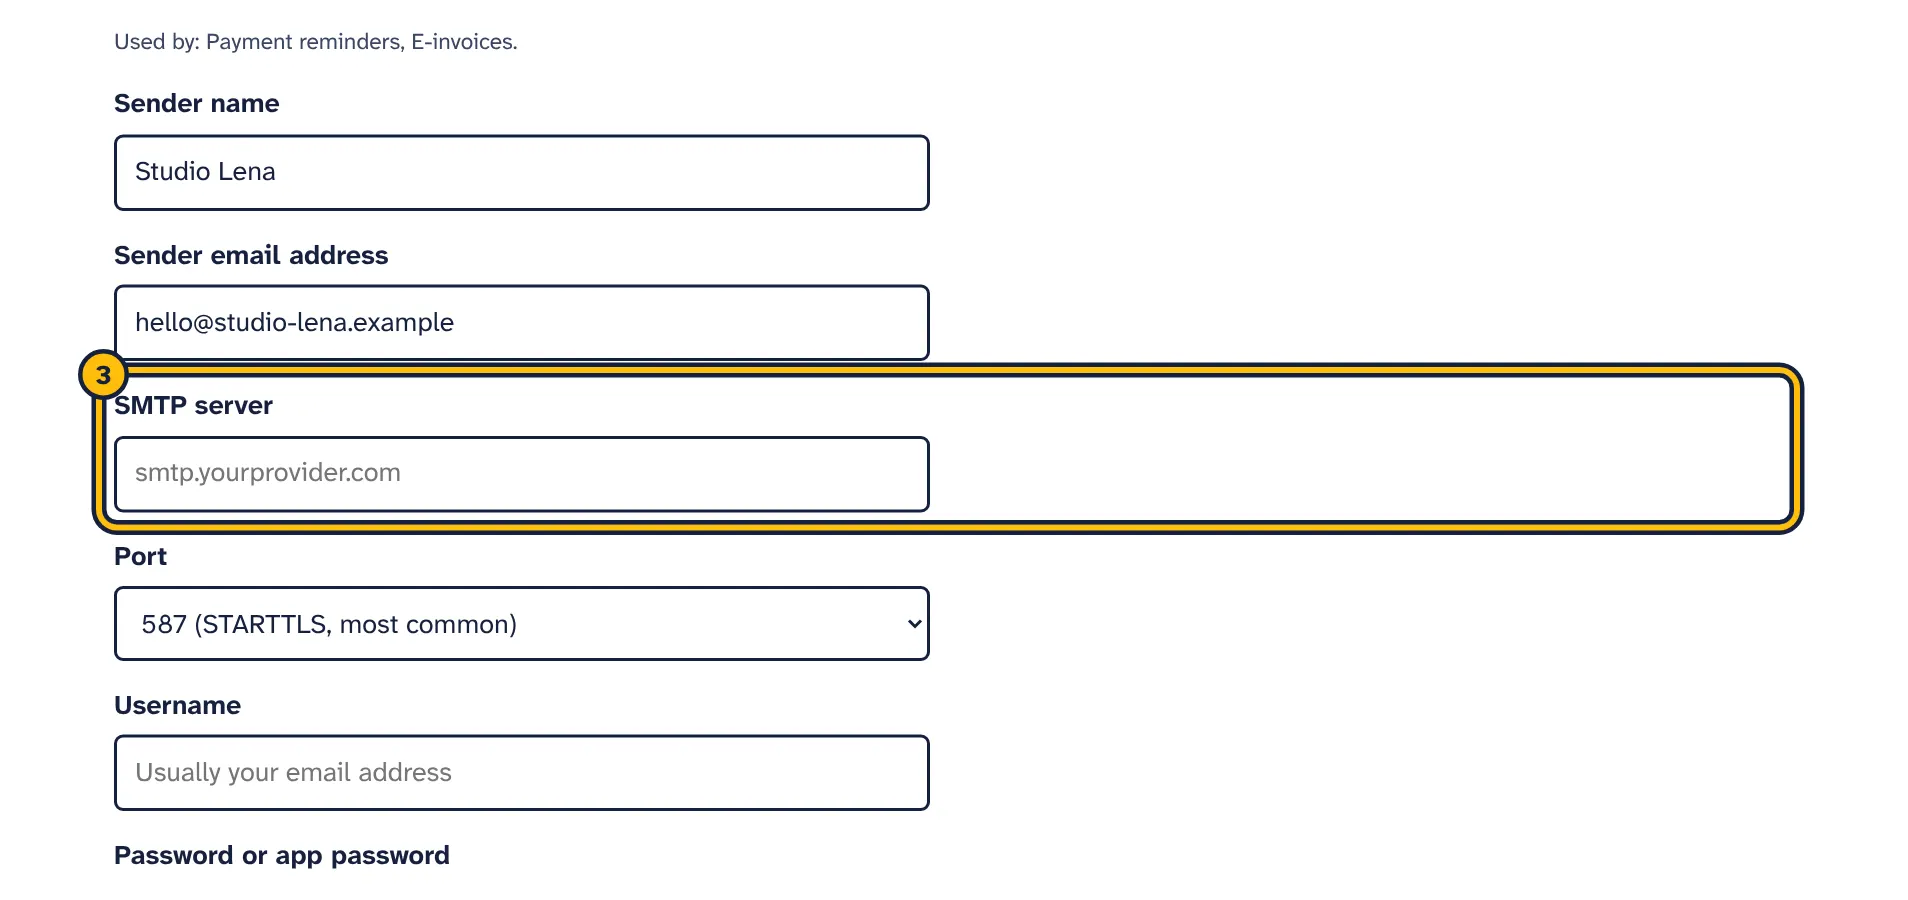
Step 3: Type your provider’s SMTP server. Your email provider’s help pages list it. -
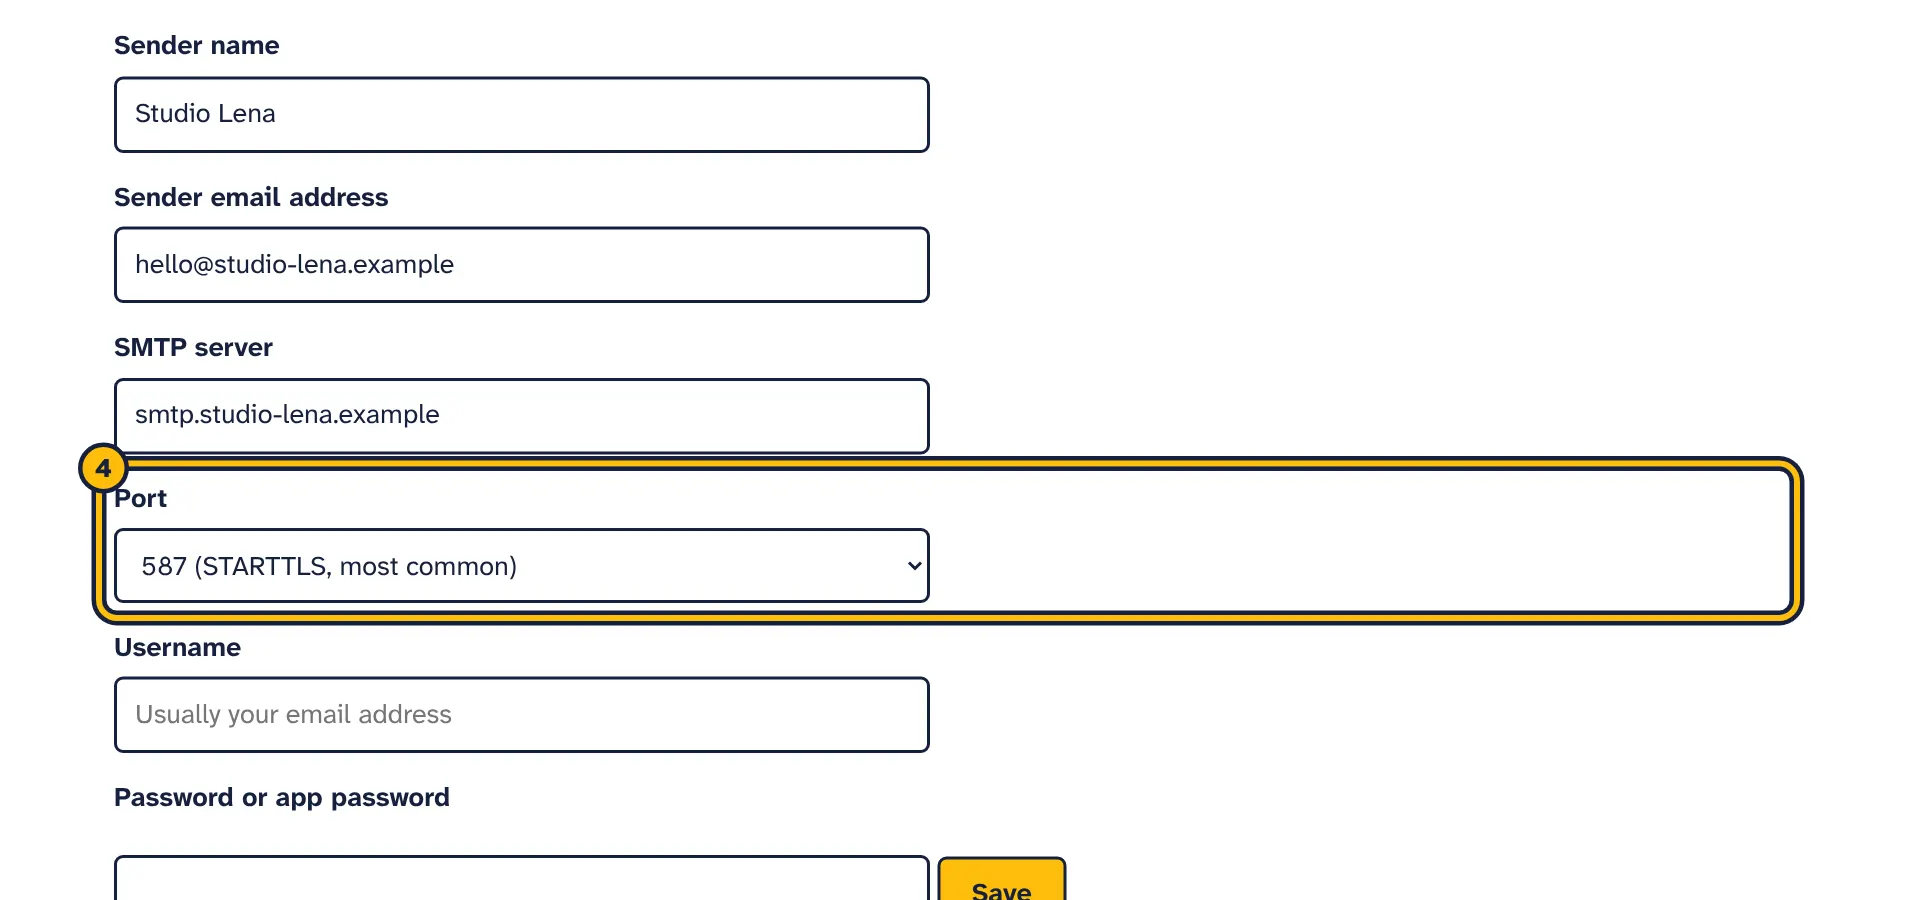
Step 4: Choose the port. 587 works for most providers. -
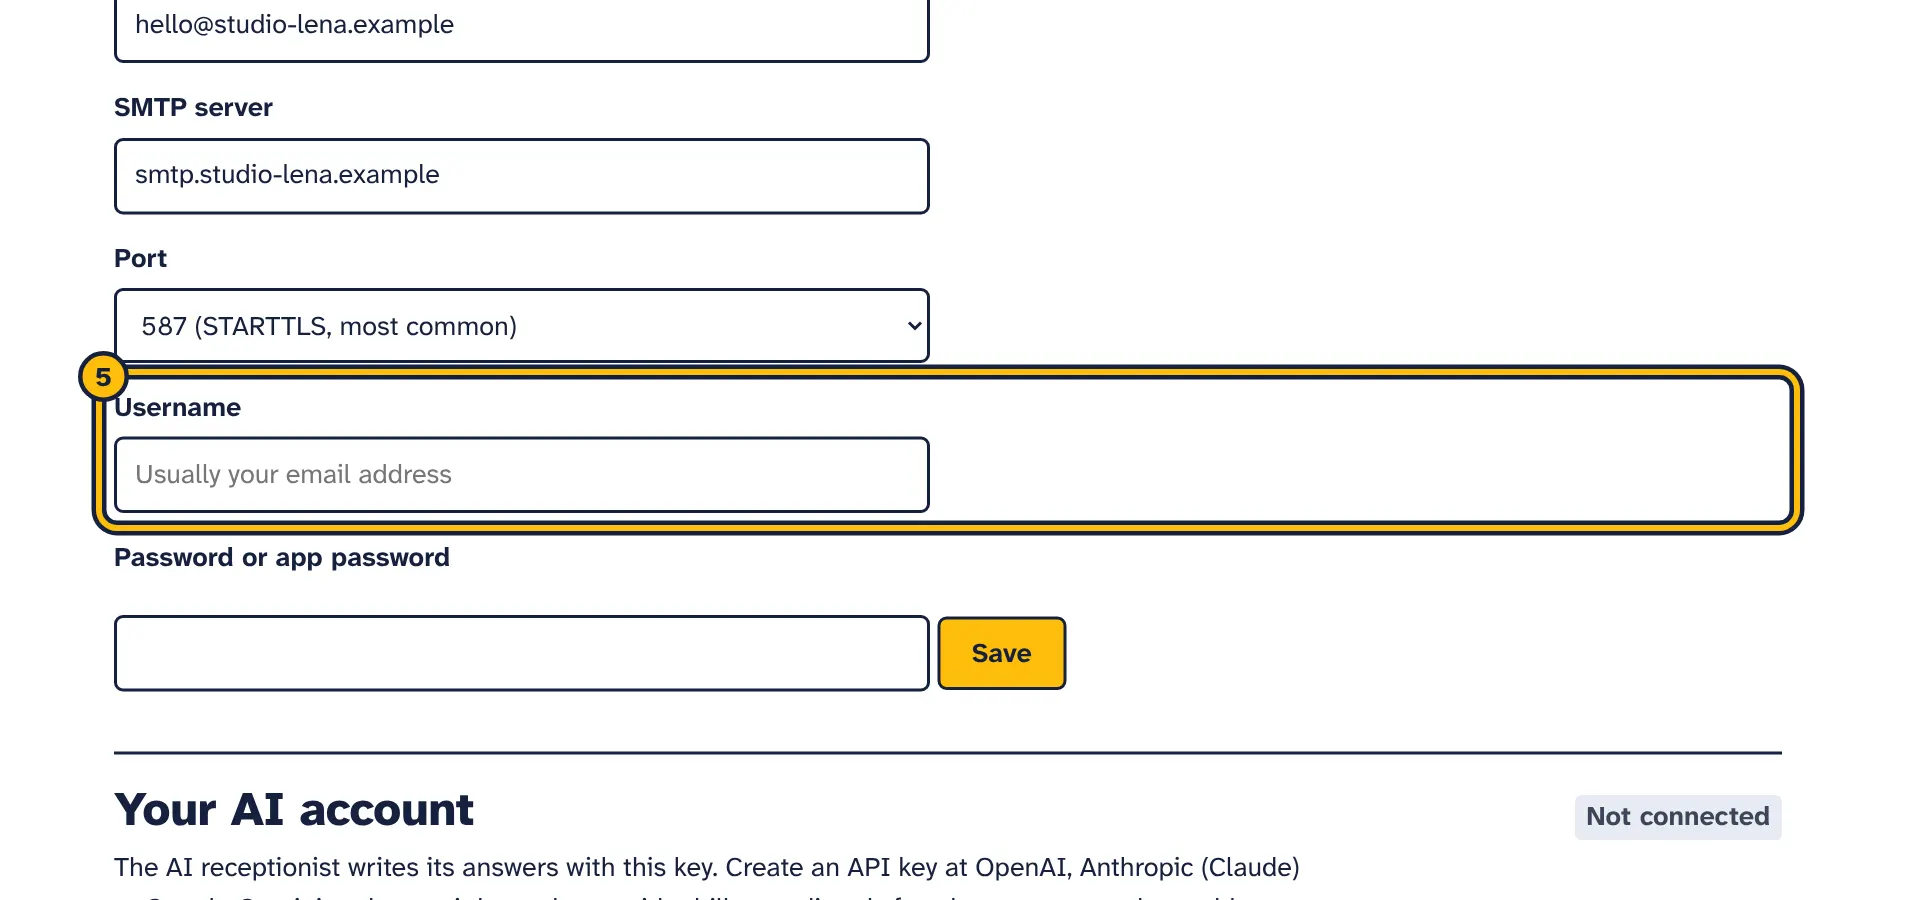
Step 5: Type your username, usually your full email address. -
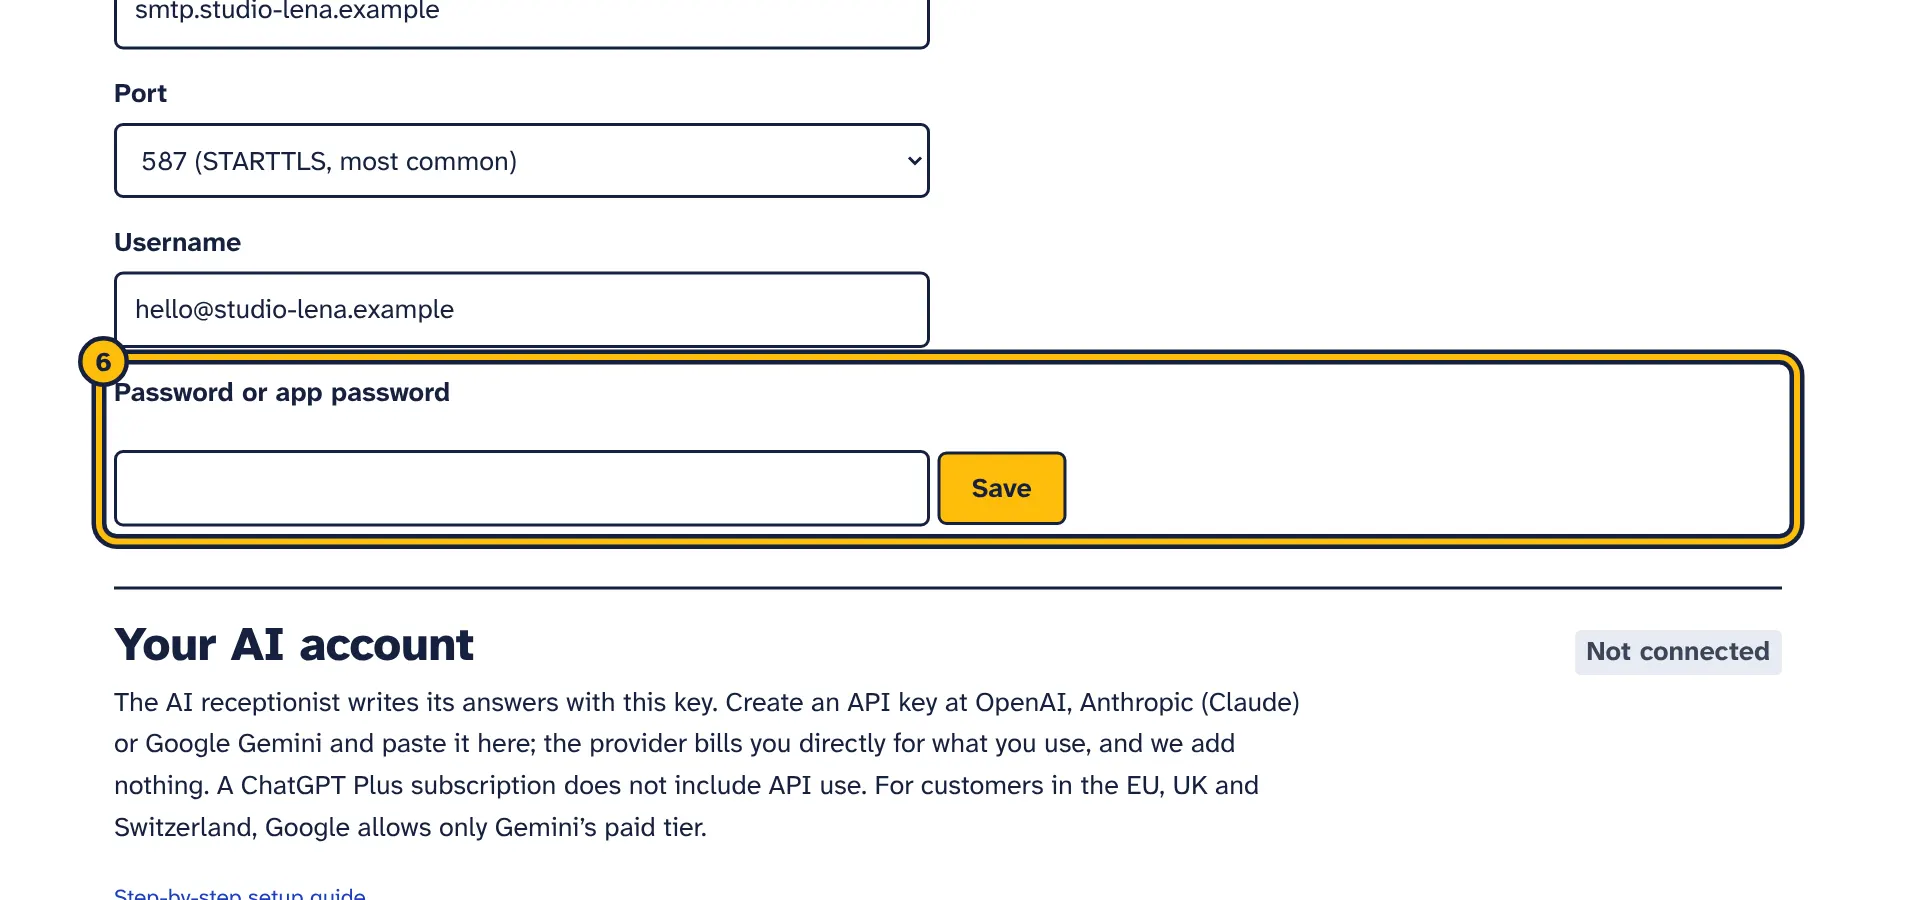
Step 6: Type your password, or an app password if your provider uses two-step login. -
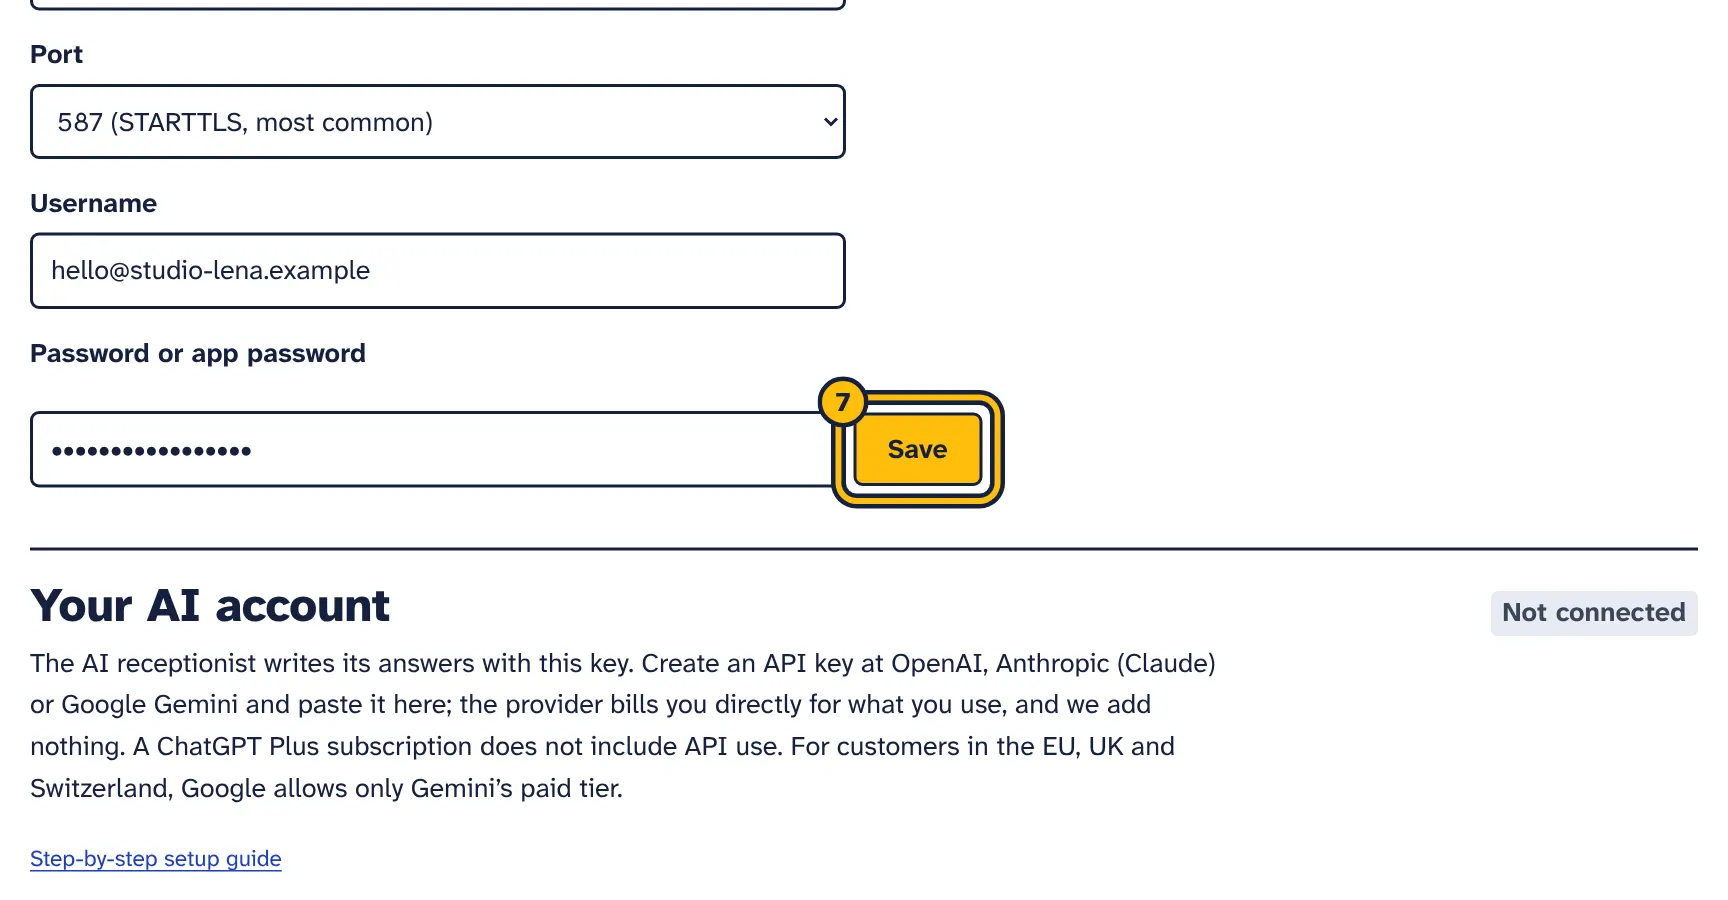
Step 7: Click Save. -
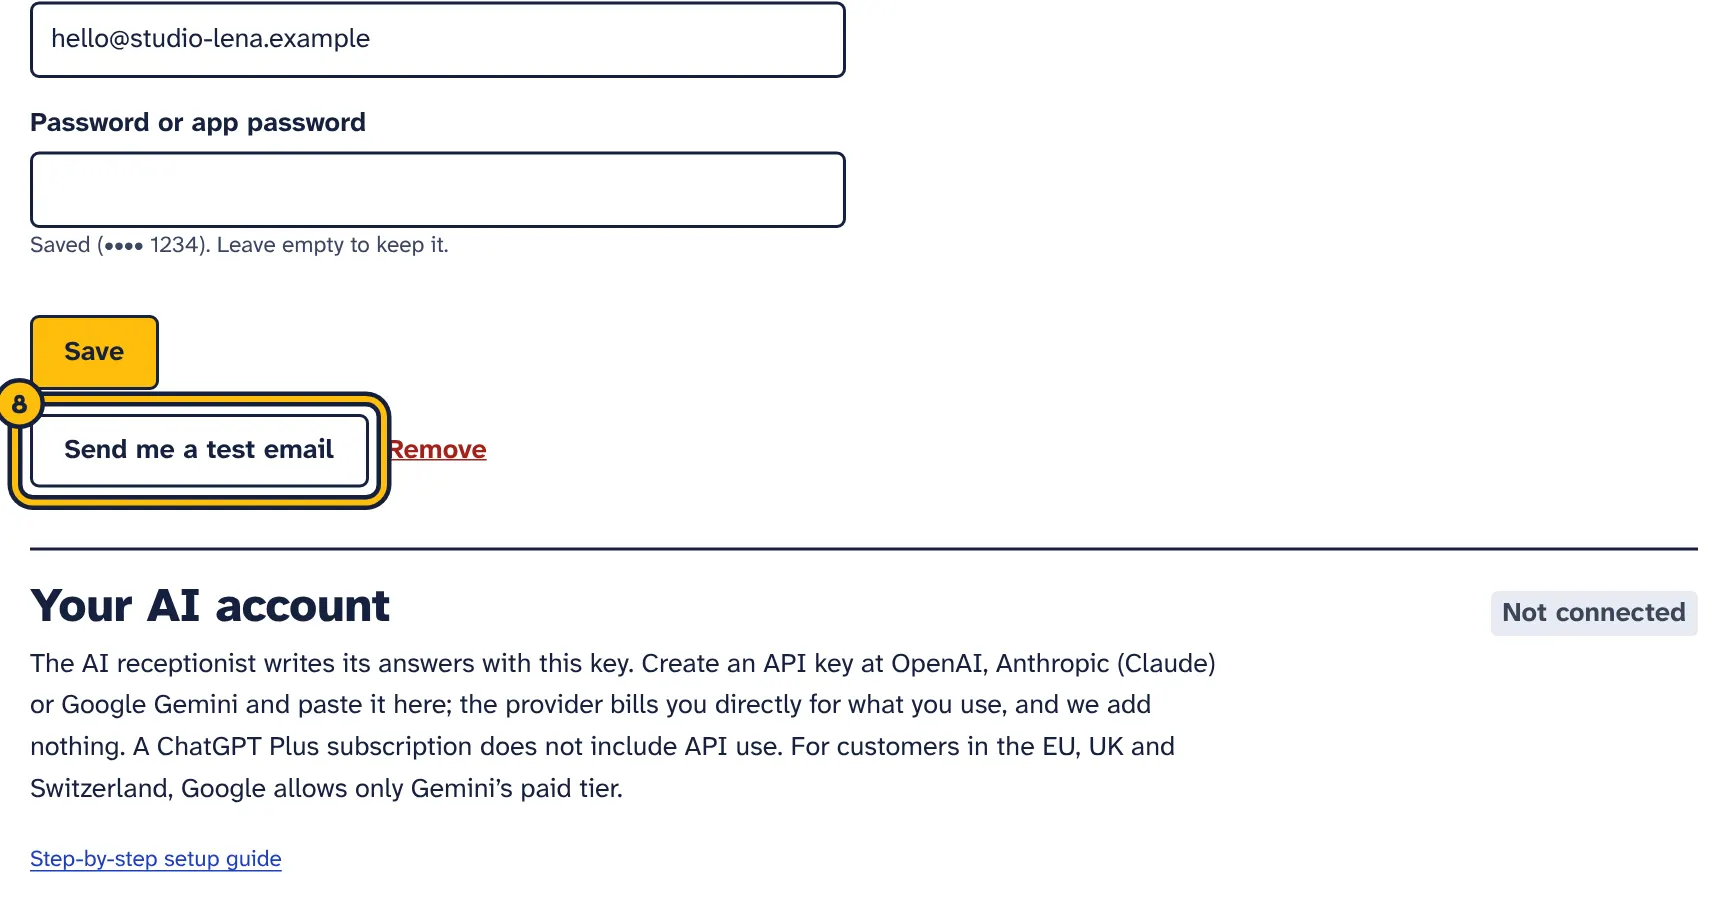
Step 8: Click Send me a test email to check that everything works. -
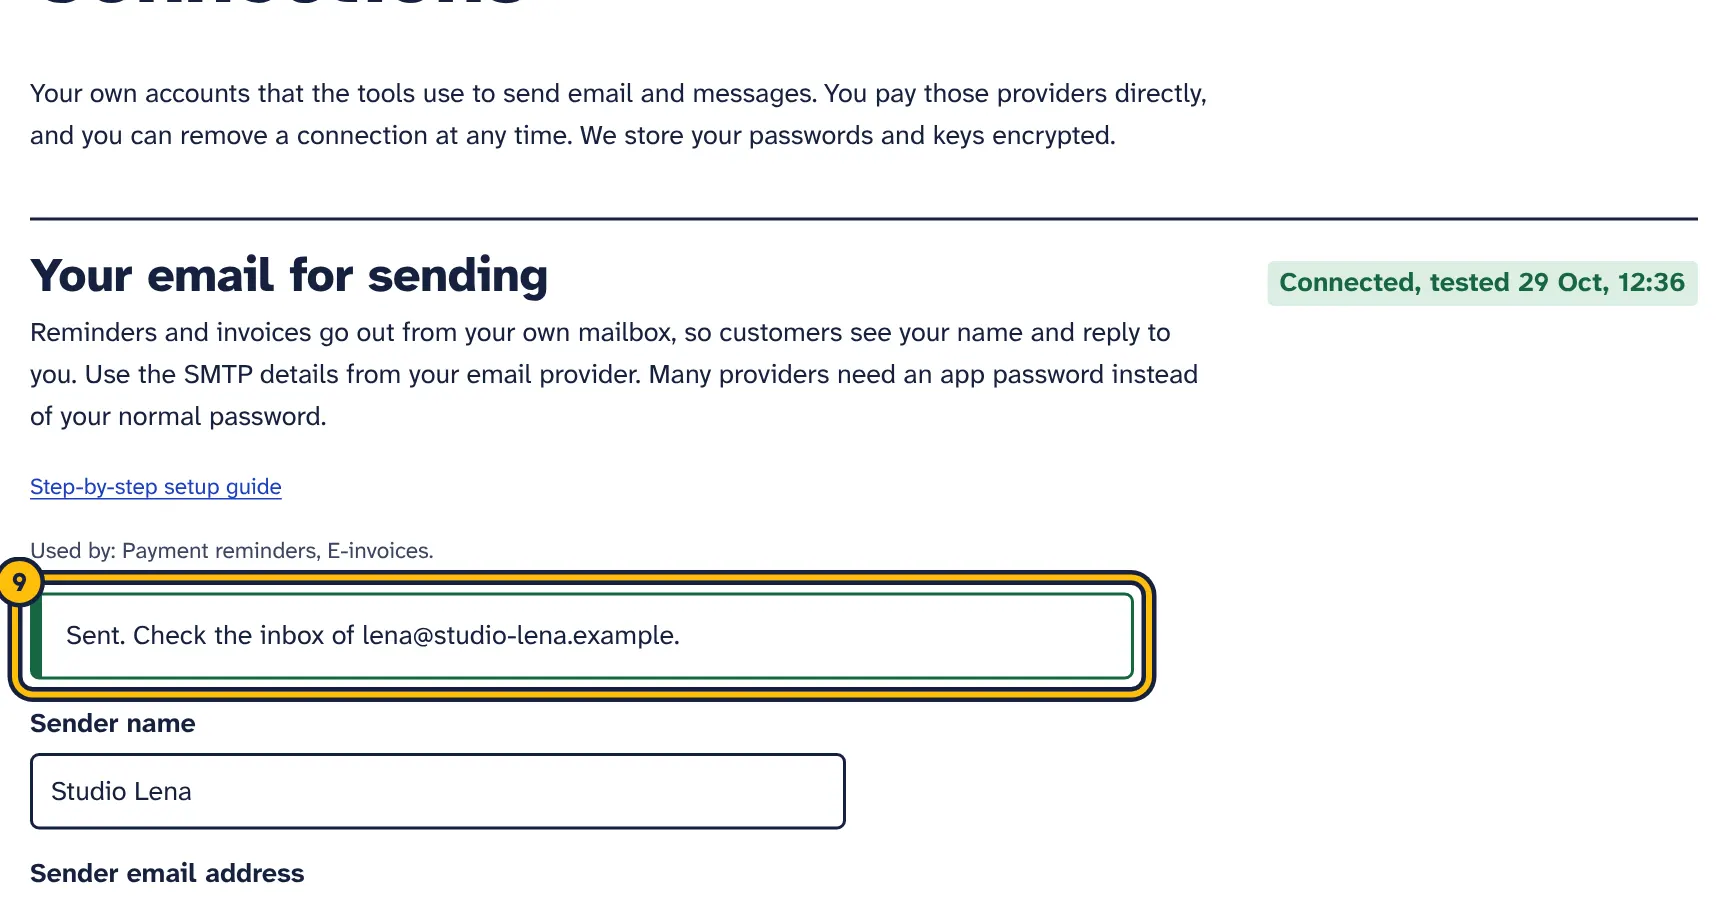
Step 9: A green message means the test email was sent. Check your inbox.
SMTP is the standard way for programs to send email through a mailbox. Your email provider gives every mailbox SMTP details: a server name, a port, a username and a password. When you enter them here, reminders and invoices go out from your own address, appear in your provider’s sent mail if your provider keeps a copy, and replies come back to you.
The fields
- Sender name
- The name your customers see, usually your business name, for example
Shirt Shop. - Sender email address
- The address emails come from and replies go to. Use the address of the mailbox you connect, or an alias your provider allows that mailbox to send from.
- SMTP server
- Your provider’s outgoing mail server, for example
smtp.gmail.com. See the provider steps below. - Port
- Usually 587 (STARTTLS, most common). See below for when to use 465.
- Username
- Usually your full email address.
- Password or app password
- Many providers do not accept your normal password from other programs. They ask you to create an app password instead, which is a separate password just for one program. You can delete it at any time without changing your normal password.
Port 587 or 465?
- 587 (STARTTLS, most common): the connection starts plain and is then switched to encryption. We insist on encryption on this port. Most providers recommend it.
- 465 (SSL/TLS): the connection is encrypted from the start. Use it if your provider lists 465, or if 587 does not work.
- 2525: an alternative some providers and sending services offer when 587 is blocked. We also insist on encryption here.
- 25: many networks block it. We only send on it when the server supports an encrypted connection (STARTTLS). Only use it if your provider tells you to.
Gmail and Google Workspace
Google only lets other programs send through Gmail with an app password, and app passwords need 2-Step Verification.
- Turn on 2-Step Verification in your Google Account, under Security, if it is not on yet.
- Open your Google app passwords page and sign in.
- Enter a name you will recognise, for example
AdminSmith, and create the password. - Copy the 16-character password that Google shows. You will not see it again.
- In AdminSmith, fill in SMTP server
smtp.gmail.com, Port 587 (or 465), and your full Gmail or Workspace address as Username. - Paste the app password into Password or app password. Type it without spaces.
- Use the same address as Sender email address, or an address you have added in Gmail under “Send mail as”. Gmail may replace any other sender address with your own.
- Select Save, then Send me a test email.
If you do not see the app passwords option, Google gives these reasons: 2-Step Verification is not on, it is set up only for security keys, your account uses Advanced Protection, or it is a work, school or other organisation account. For a Google Workspace account, ask your Workspace administrator.
Google cancels all app passwords when you change your Google Account password. After a password change, create a new app password and paste it here. Google Workspace allows up to 2,000 messages a day through smtp.gmail.com.
Microsoft 365 (Exchange Online) and Outlook.com
- Ask your Microsoft 365 administrator to turn on Authenticated SMTP for the mailbox: Microsoft 365 admin center, Users, Active users, select the user, Mail, Manage email apps, tick Authenticated SMTP, Save changes.
- In AdminSmith, fill in SMTP server
smtp.office365.com, Port 587, and the full email address as Username. - Enter the mailbox password in Password or app password.
- Use the mailbox’s own address as Sender email address, or an address the mailbox has permission to send as.
- Select Save, then Send me a test email.
If your organisation uses Microsoft’s “security defaults”, or a policy that blocks basic authentication, SMTP sign-in is switched off and the test will fail. Microsoft explains the setting in Enable or disable SMTP AUTH in Exchange Online.
AdminSmith signs in to your mailbox with a username and password, which Microsoft calls basic authentication. In January 2026 Microsoft announced that Exchange Online will switch basic authentication for SMTP off by default for existing organisations at the end of December 2026. Administrators can switch it back on for now. Organisations created after December 2026 will not have it, and Microsoft plans to announce a final removal date in the second half of 2027. For a long-term setup, consider a mailbox from another provider that offers SMTP passwords or app passwords.
Personal Outlook.com, Hotmail and Live addresses: Microsoft says basic authentication is no longer available for these accounts since 16 September 2024. Use a different mailbox for sending.
Zoho Mail
- If two-factor authentication is on for your Zoho account, create an application-specific password in your Zoho account security settings.
- In AdminSmith, fill in SMTP server:
smtp.zoho.comfor personal and free organisation accounts, orsmtppro.zoho.comfor paid organisation accounts with your own domain. - Choose Port 465 or 587, and enter your Zoho email address as Username.
- Enter your password, or the application-specific password, in Password or app password.
- Use your Zoho address or one of its aliases as Sender email address. Zoho refuses other addresses with “Relaying disallowed”.
- Select Save, then Send me a test email.
The server name can be different depending on the region where your Zoho account is hosted. Zoho shows the exact server details for your account in its mail settings, so check there if the test cannot reach the server.
Any other provider
Most email providers and website hosts offer SMTP. Search their help pages for “SMTP settings” or “outgoing mail server”, then check:
- The SMTP server name, for example
smtp.yourprovider.comormail.yourdomain.com. - The port: 587 with STARTTLS, or 465 with SSL/TLS.
- The username: usually the full email address.
- The password: if you use two-step sign-in, create an app password.
- Whether SMTP access has to be switched on for the mailbox first. Some providers turn it off by default.
- Which sender addresses the mailbox may use. Most providers only allow the mailbox’s own address and its aliases.
What the test does
Send me a test email connects to your server with the details you saved and sends a short email, “Test email from AdminSmith”, from your sender address to the email address you log in with. If it works, you see “Sent. Check the inbox of …”. Check that the email arrived, and look in the spam folder too.
Common errors
- Your email provider did not accept the username or password
- Check that the username is the full email address. Most providers need an app password instead of your normal password, and Google cancels app passwords when you change your account password. For Microsoft 365, check that Authenticated SMTP is on for the mailbox.
- We could not reach your email server
- The connection timed out or the server was not found. Check the server name for typos, then try the other port (587 or 465). Use the server name from your provider’s help page, not the address of its webmail.
- The secure connection to your email server failed
- The port does not match the kind of encryption the server expects. Switch between 587 and 465 and test again.
- Your email server refused the sender address
- The sender email address is not allowed for this mailbox. Use the mailbox’s own address, or add the address as an alias at your provider first.
Keep your emails out of spam: SPF, DKIM and DMARC
If you send from your own domain, for example billing@yourshop.com, three settings in your domain’s DNS tell other mail servers that your emails are genuine. Your email provider’s help pages give the exact values to add. Your domain registrar or website host can add them for you.
- SPF lists the servers that may send email for your domain. Add your email provider to it. A domain should have only one SPF record, so add to the existing one rather than creating a second.
- DKIM adds a digital signature to every email. Switch it on in your email provider’s settings and add the DNS record it gives you.
- DMARC tells receiving servers what to do with emails that fail SPF and DKIM. A common first step is a record that only reports problems, such as
v=DMARC1; p=none.
Gmail requires anyone sending more than 5,000 messages a day to Gmail addresses to use all three. Smaller senders also land in the inbox more often with them. If you send from an address like name@gmail.com, your provider handles this for you.
AI: connect OpenAI, Anthropic or Google Gemini
The same steps in pictures:
-
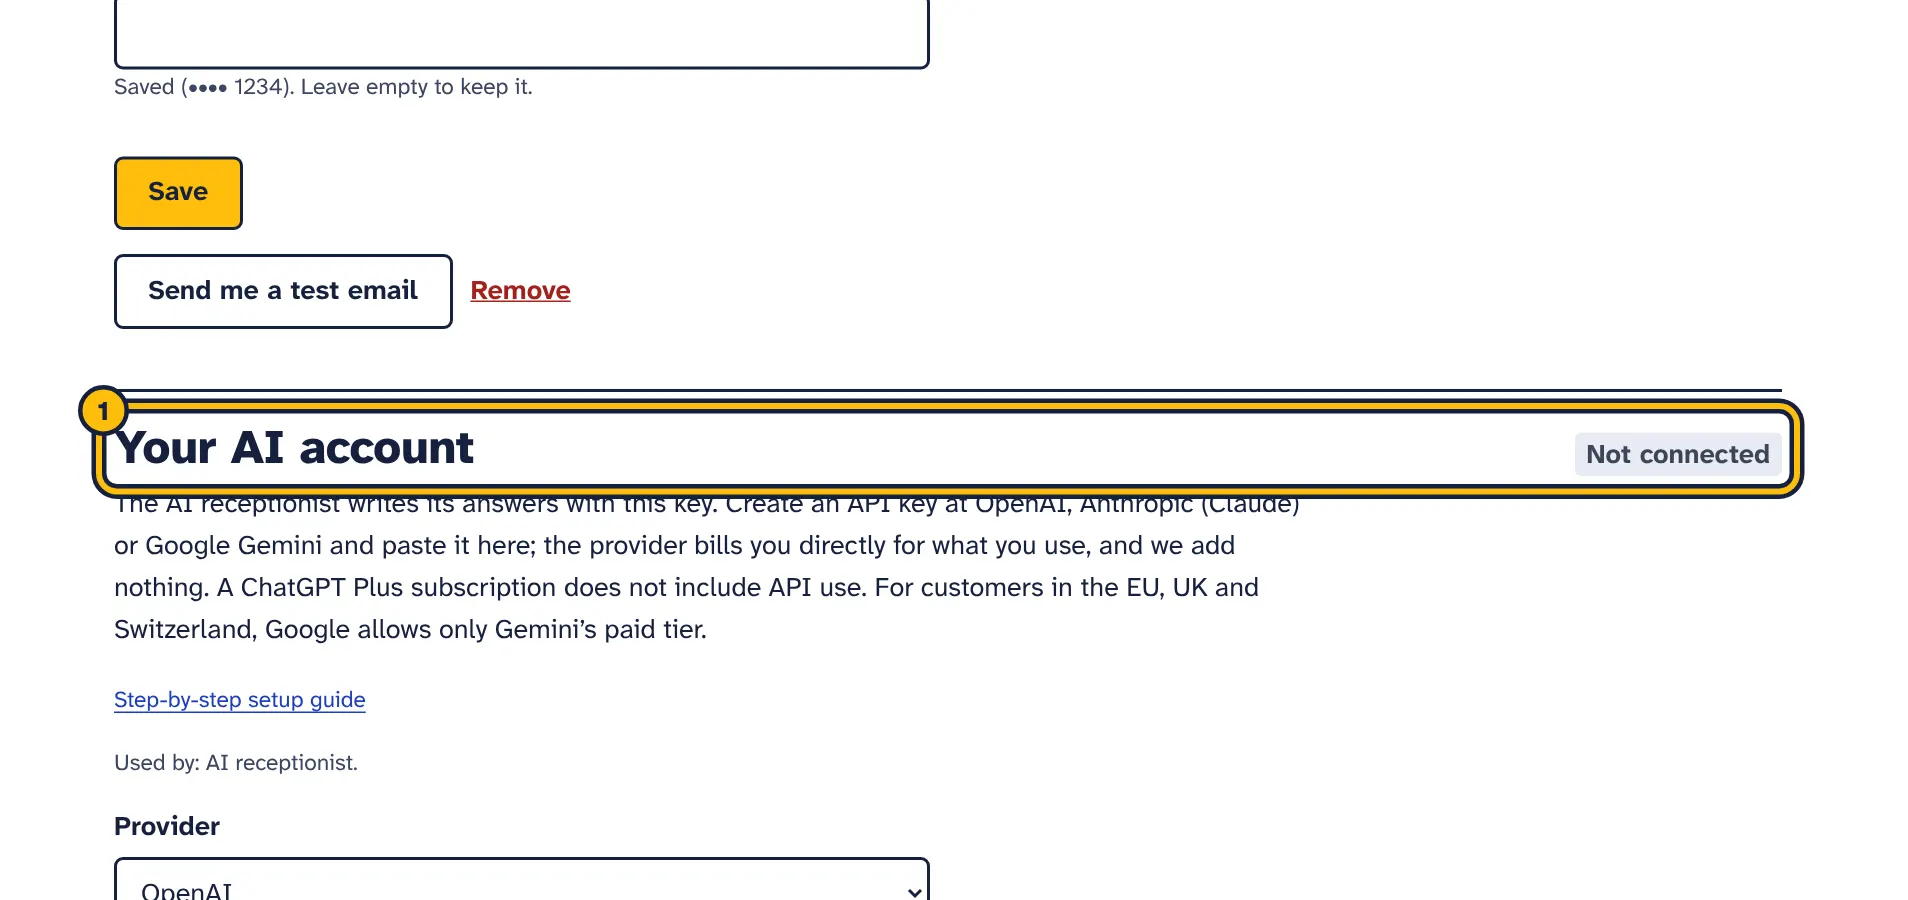
Step 1: First create an API key at OpenAI, Anthropic or Google Gemini. The guide shows where. -
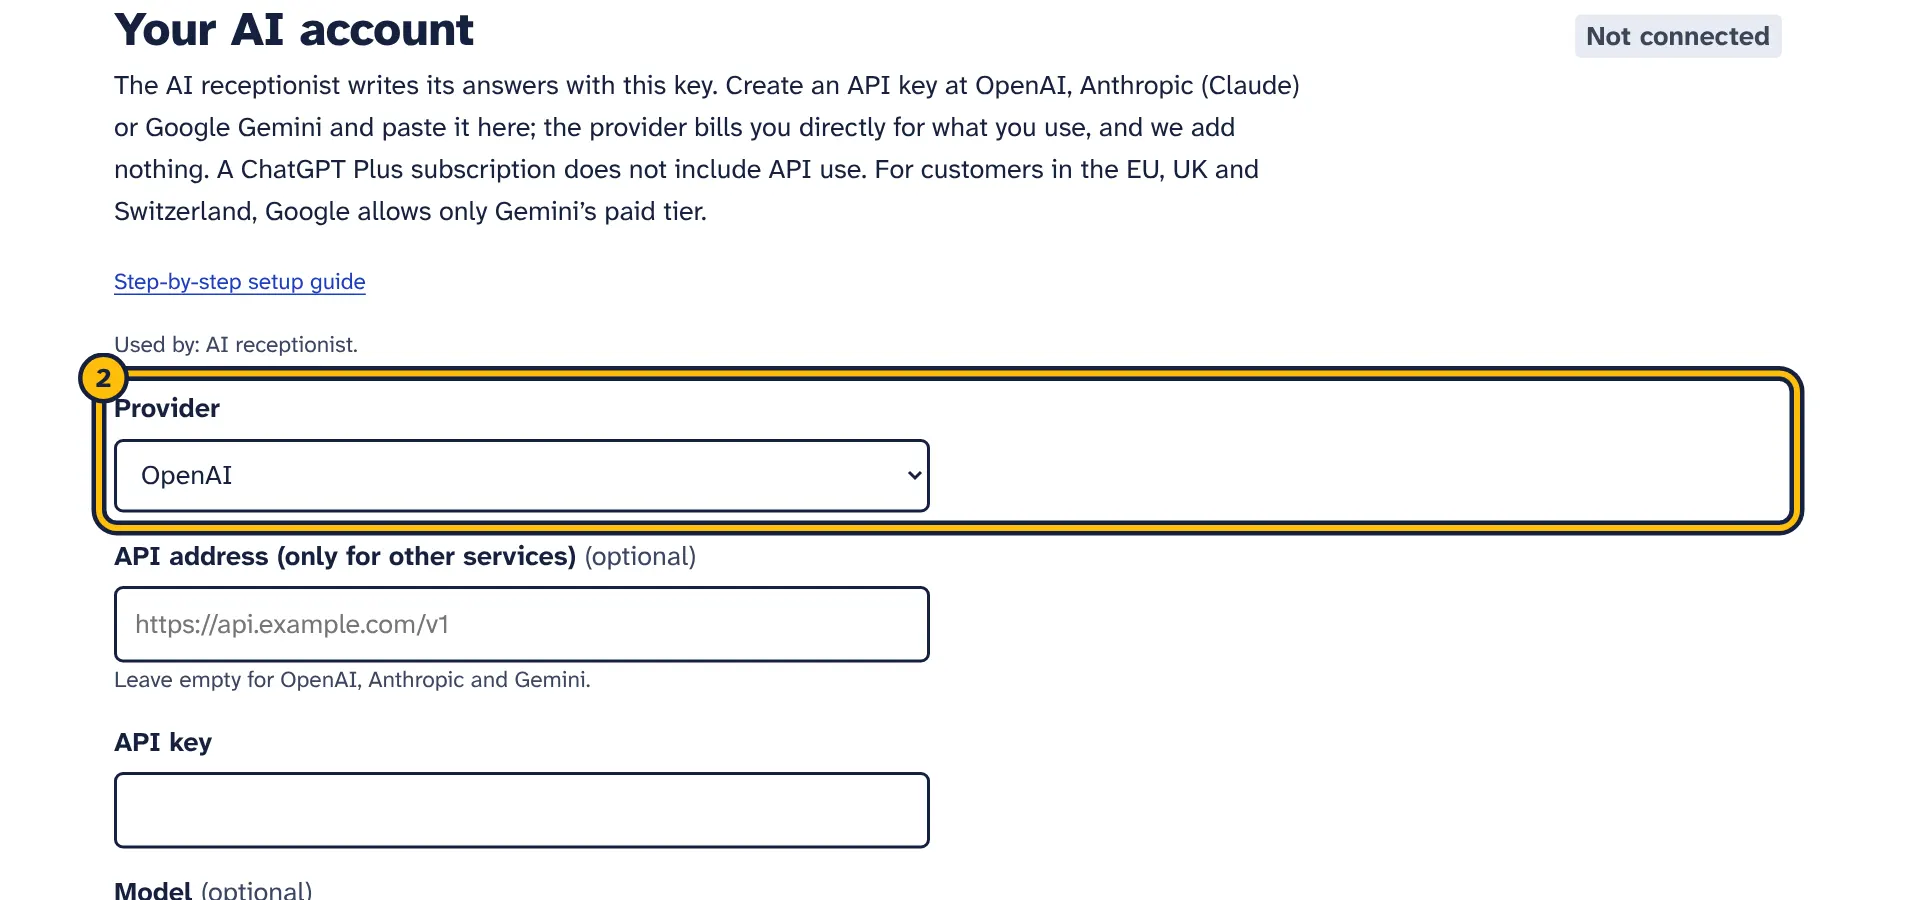
Step 2: Choose your AI provider, for example OpenAI. -
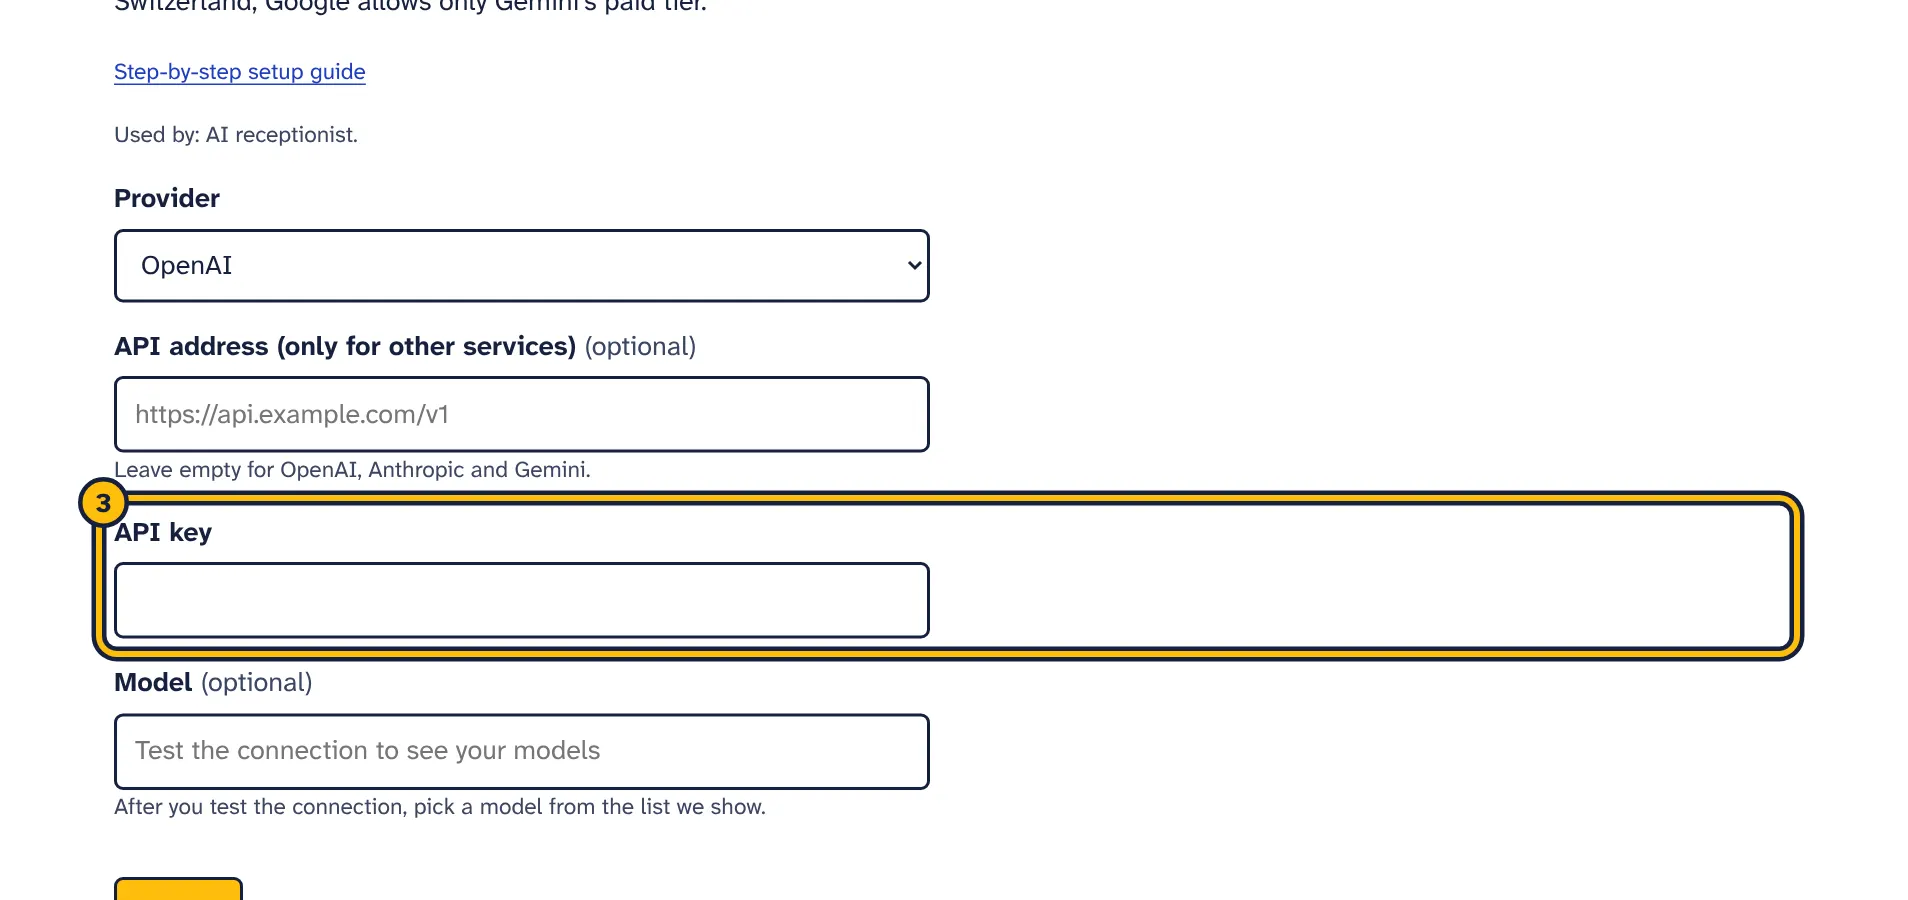
Step 3: Paste the API key you created at your provider. -
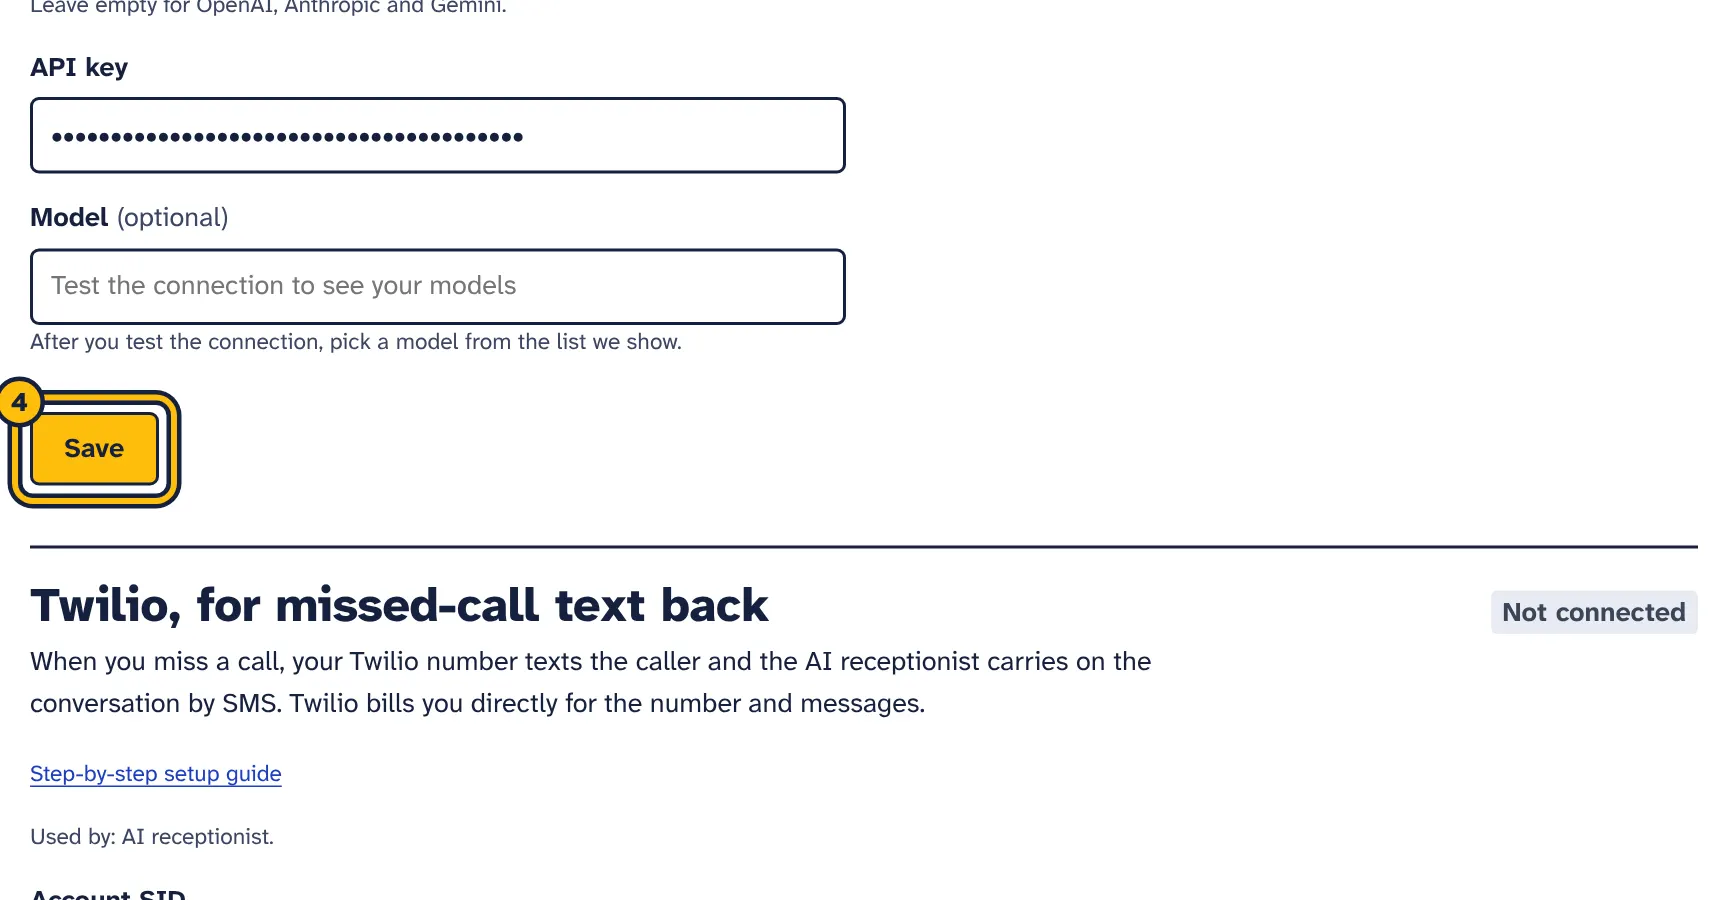
Step 4: Click Save. -
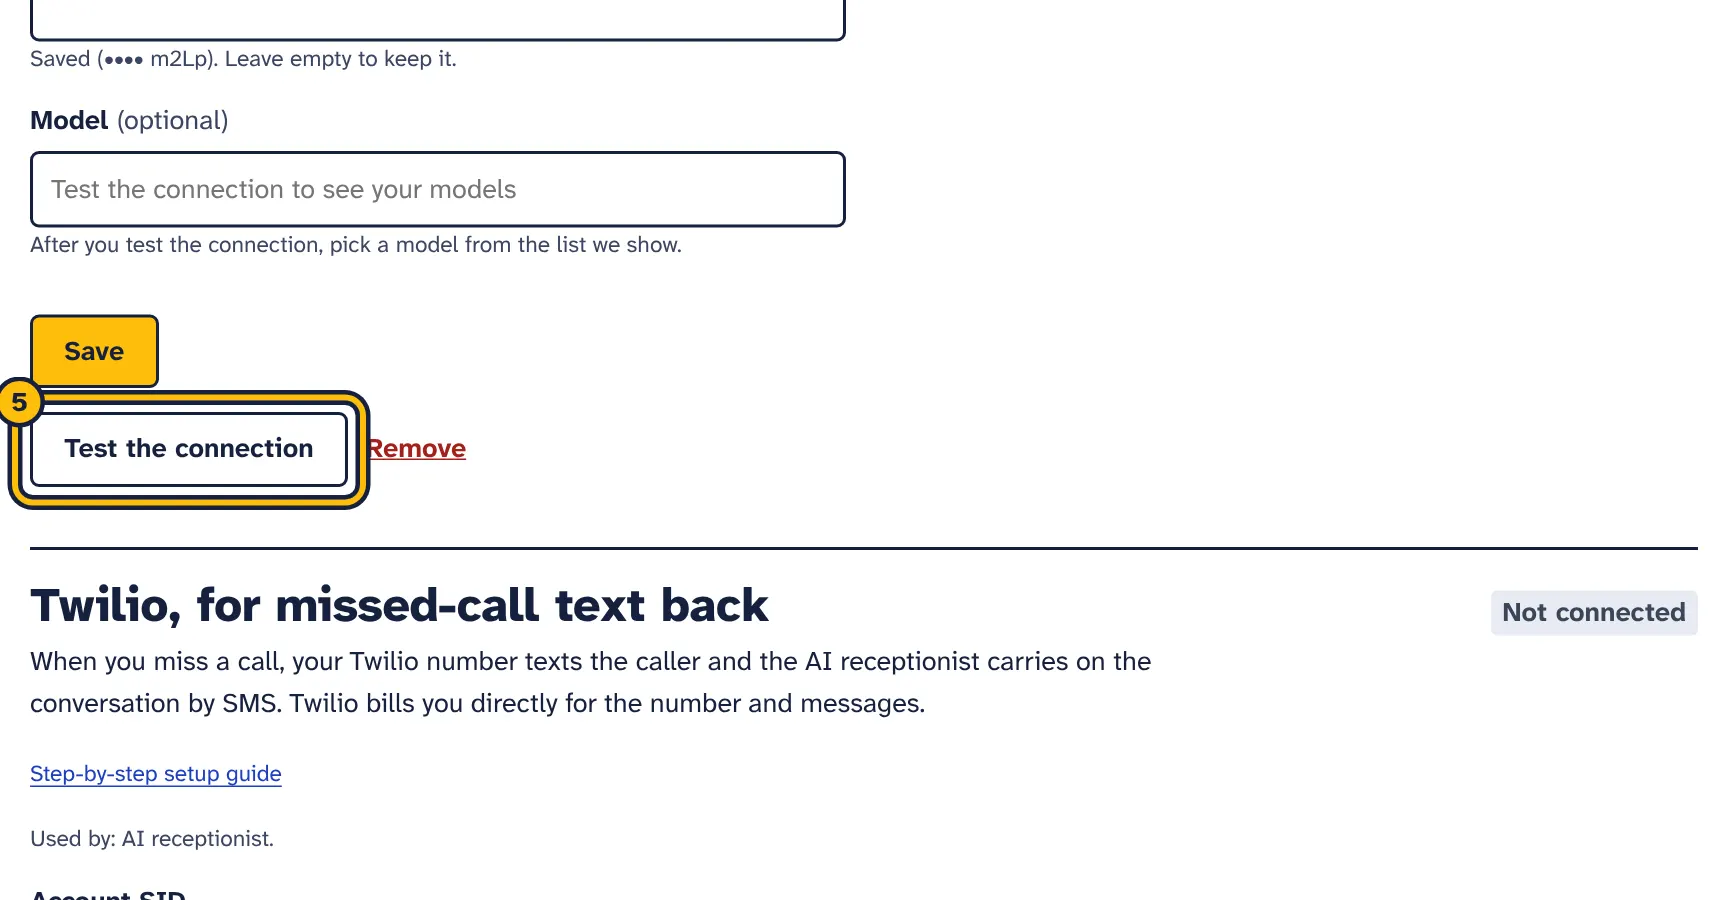
Step 5: Click Test the connection. -
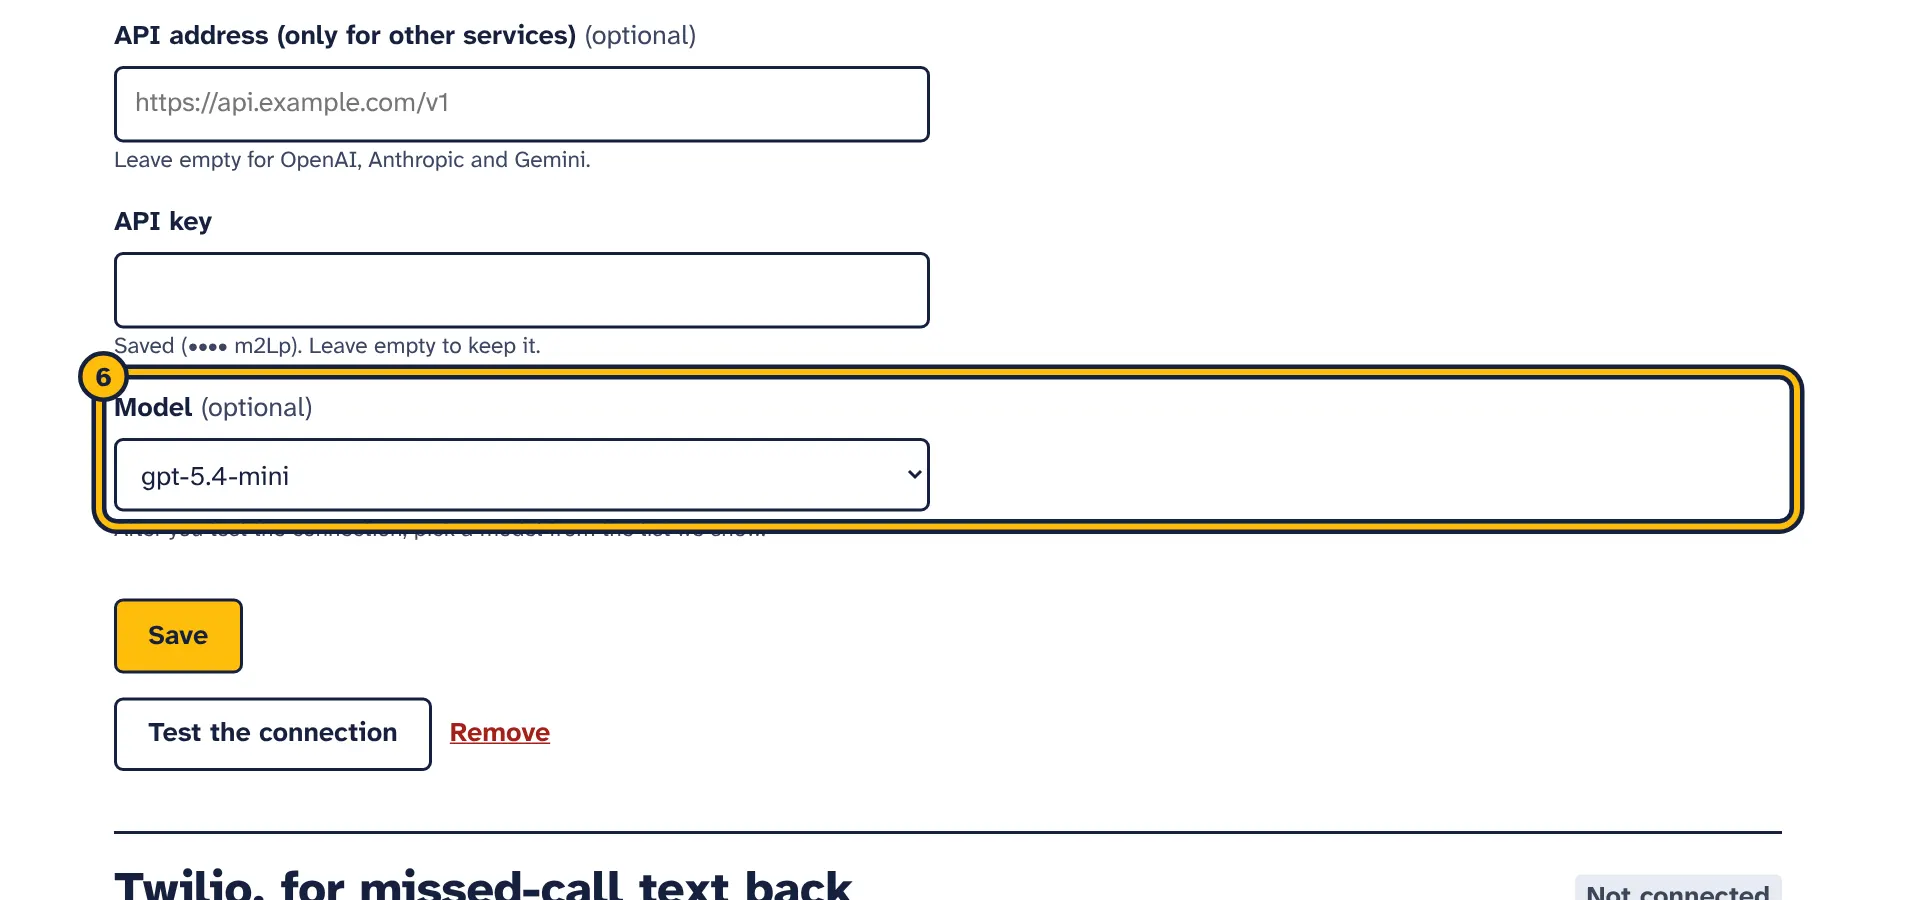
Step 6: Your key works. A small, fast model is picked for you; you can choose another one here.
The AI receptionist writes every answer with your own AI key. You choose the provider, pay it directly at its own prices and set your own spending limit there. We add nothing on top, and you can see every answer on the Usage page.
Each answer is written by sending the conversation and your business information to your AI provider. An API key is a long secret code that lets a program use your account. The provider charges you for what you use, usually by the amount of text (tokens) that goes in and out.
A ChatGPT Plus, Claude Pro or Gemini app subscription is not the same as API access and does not include it. The receptionist needs an API key from the developer platform of OpenAI, Anthropic or Google, which is billed separately, per use.
Which provider to choose
- OpenAI
- Pay as you go with prepaid credit, which you top up at platform.openai.com. Small models such as the “mini” family are fast and cheap for a receptionist.
- Anthropic (Claude)
- Pay as you go with prepaid credits in the Claude Console at platform.claude.com. Haiku models are the fast, low-cost ones.
- Google Gemini
- Has a free tier to try it out, with low limits. On the free tier Google may use what you send to improve its products, and its terms allow only the paid tier for customers in the EU, the UK and Switzerland. For real customer chats, set up billing.
All three work well for a receptionist. If you have no preference, start with the provider you already have an account with.
The fields
- Provider
- OpenAI, Anthropic (Claude), Google Gemini, or Other OpenAI-compatible service.
- API address (only for other services)
- Leave it empty for OpenAI, Anthropic and Gemini. For another service, enter the address its documentation gives for OpenAI-compatible access. It must start with
https://, for examplehttps://api.example.com/v1. - API key
- The key you create at your provider, as described below.
- Model
- Leave it empty at first. After you test the connection, it becomes a list of the models your key can use, and you pick one.
OpenAI
- Sign in at platform.openai.com or create an account.
- Open Billing (Settings, Billing) and add credit. OpenAI works with prepaid credit, and API requests fail when your balance is used up.
- Check the automatic top-up (auto recharge) setting. OpenAI switches it on by default when you set up billing; set an amount you are comfortable with, or turn it off.
- Open the API keys page and select Create new secret key. Give it a name you will recognise, such as the name of this platform.
- Copy the key straight away. OpenAI shows it only once.
- In AdminSmith, choose OpenAI as Provider, paste the key into API key, select Save, then Test the connection.
OpenAI’s prepaid credit expires one year after you buy it, so buy small amounts to start.
Anthropic (Claude)
- Sign in to the Claude Console at platform.claude.com or create an account. It used to be at console.anthropic.com.
- Open the Billing page and select Buy credits. Anthropic works with prepaid credits: when they run out, the API stops answering until you add more. You can set up auto-reload there, which buys credits when your balance gets low.
- Open the API keys page and select Create key. Give it a name you will recognise.
- Copy the key, which starts with
sk-ant-. The Console shows it only once. - In AdminSmith, choose Anthropic (Claude) as Provider, paste the key into API key, select Save, then Test the connection.
Anthropic’s credits expire one year after purchase.
Google Gemini
- Open Google AI Studio’s API keys page and sign in with a Google account.
- Select Create API key. New users get a Google Cloud project and a key automatically after accepting the terms.
- Copy the key.
- To use the paid tier, select Set up billing on the API keys or Projects page, choose or create a Cloud Billing account, and prepay. When a prepaid balance reaches zero, every key linked to that billing account stops working until you add more.
- In AdminSmith, choose Google Gemini as Provider, paste the key into API key, select Save, then Test the connection.
New Gemini accounts start on a free tier, with lower limits and access to some models only. On the free tier, Google uses what you send to improve its products, and human reviewers may read it. Google’s terms tell you not to send sensitive, confidential or personal information to the free tier.
Google’s Gemini API terms allow only the paid tier when your app is available to people in the European Economic Area, Switzerland or the United Kingdom. If your customers are there, set up billing before you put the assistant on your website or WhatsApp. Customer conversations often contain personal details, so we recommend the paid tier everywhere. See the Gemini API terms. General information, not legal advice.
Other OpenAI-compatible services
Many AI services accept the same requests as OpenAI. Choose Other OpenAI-compatible service, enter the service’s API address (from its documentation, usually ending in /v1) in API address (only for other services), paste your key and test. The address must be a public https address. If the test cannot list any models, the service may not support the model list that the test uses.
What the test does and how models are chosen
Test the connection asks your provider for the list of models your key can use. This proves that the key works. For OpenAI we leave out models that are not for chat, such as image, audio and embedding models.
If you have not picked a model yet, we choose one from the provider’s smaller, faster family: a name with “mini” for OpenAI, “haiku” for Anthropic, or “flash” for Gemini. You see a message like “Your key works. We picked the model …; you can choose another one below.” The Model field is now a list. Choose another model and select Save to change it. No new test is needed for that.
Choosing a small, fast, low-cost model
A receptionist answers short questions from the information you gave it. A small, fast model does this well, answers quickly and costs much less per answer than the largest models.
- OpenAI: models with “mini” or “nano” in the name are the smaller, cheaper ones. Avoid models made for research, images, audio or real-time voice, and models with “pro” in the name.
- Anthropic: Haiku models have the lowest latency and price. Sonnet and Opus are larger and cost more.
- Google Gemini: Flash and Flash-Lite models are the fast, low-cost ones. Prefer a model without “preview” or “exp” in its name, because those can change or be withdrawn.
Check the model we picked against this list. Then use Test the assistant in the AI receptionist with the questions your customers really ask. If answers miss things that are in your business information, try the next larger model. Prices change often, so check your provider’s pricing page.
Your business information is sent with every answer, so a shorter text costs less. In each assistant’s settings, Most AI answers per day limits how much the assistant can spend in one day.
Keep your key safe
- Treat the key like a password. Paste it only into Connections in AdminSmith, never into emails, chats or your website’s code.
- Create a separate key just for AdminSmith. Then you can delete it at any time without affecting other programs.
- Set spending limits or alerts at your provider, and keep automatic top-ups modest.
- If you think a key has leaked, delete it at the provider, create a new one, paste it here, select Save and test again.
Common errors
- … did not accept your API key
- The key was not copied completely, was deleted, or belongs to a different provider than the one chosen in Provider. Create a new key and paste it again. With OpenAI, a key with restricted permissions may not be allowed to list models; create one with full permissions.
- … says you hit a usage limit or ran out of credit
- Add credit at your provider, check its spending limits, or wait a minute if you sent many requests at once. Gemini’s free tier has low limits; the paid tier allows more.
- … does not know this model
- The model was renamed or retired. Select Test the connection to load the current list, choose a model and select Save.
- Your key works, but no chat models are available to it
- The key cannot use any chat model yet. This usually means billing is not set up at the provider, or the key belongs to a project without access to models.
- We could not reach …
- For other OpenAI-compatible services, check the API address. Otherwise the provider may be having trouble; try again in a few minutes.
- … returned an empty answer
- Some models spend their answer allowance on internal reasoning. Choose a different small model from the list and test again.
When the assistant cannot answer a customer because of one of these problems, it asks the customer for their contact details instead, and we email you the reason. The Usage page shows every AI reply by day and by model, also when you use your own key, so you can compare it with your provider’s bill.
Twilio: text back missed calls
The same steps in pictures:
-
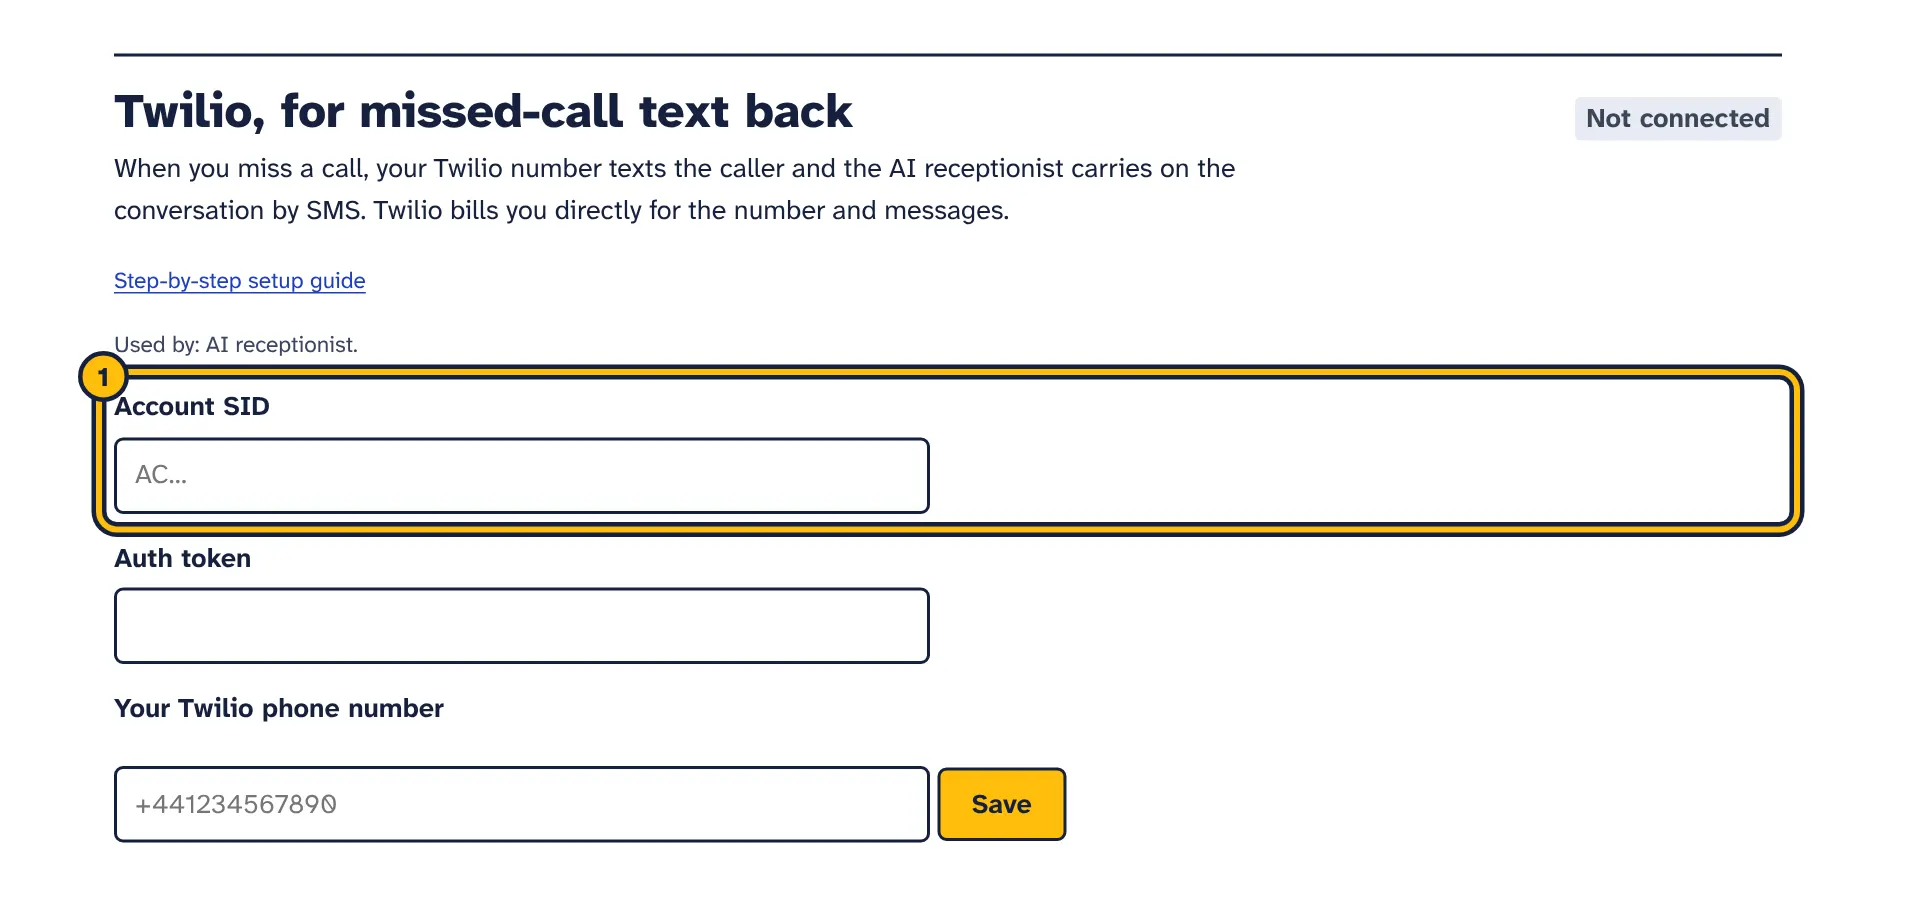
Step 1: Copy the Account SID from your Twilio Console and paste it here. -
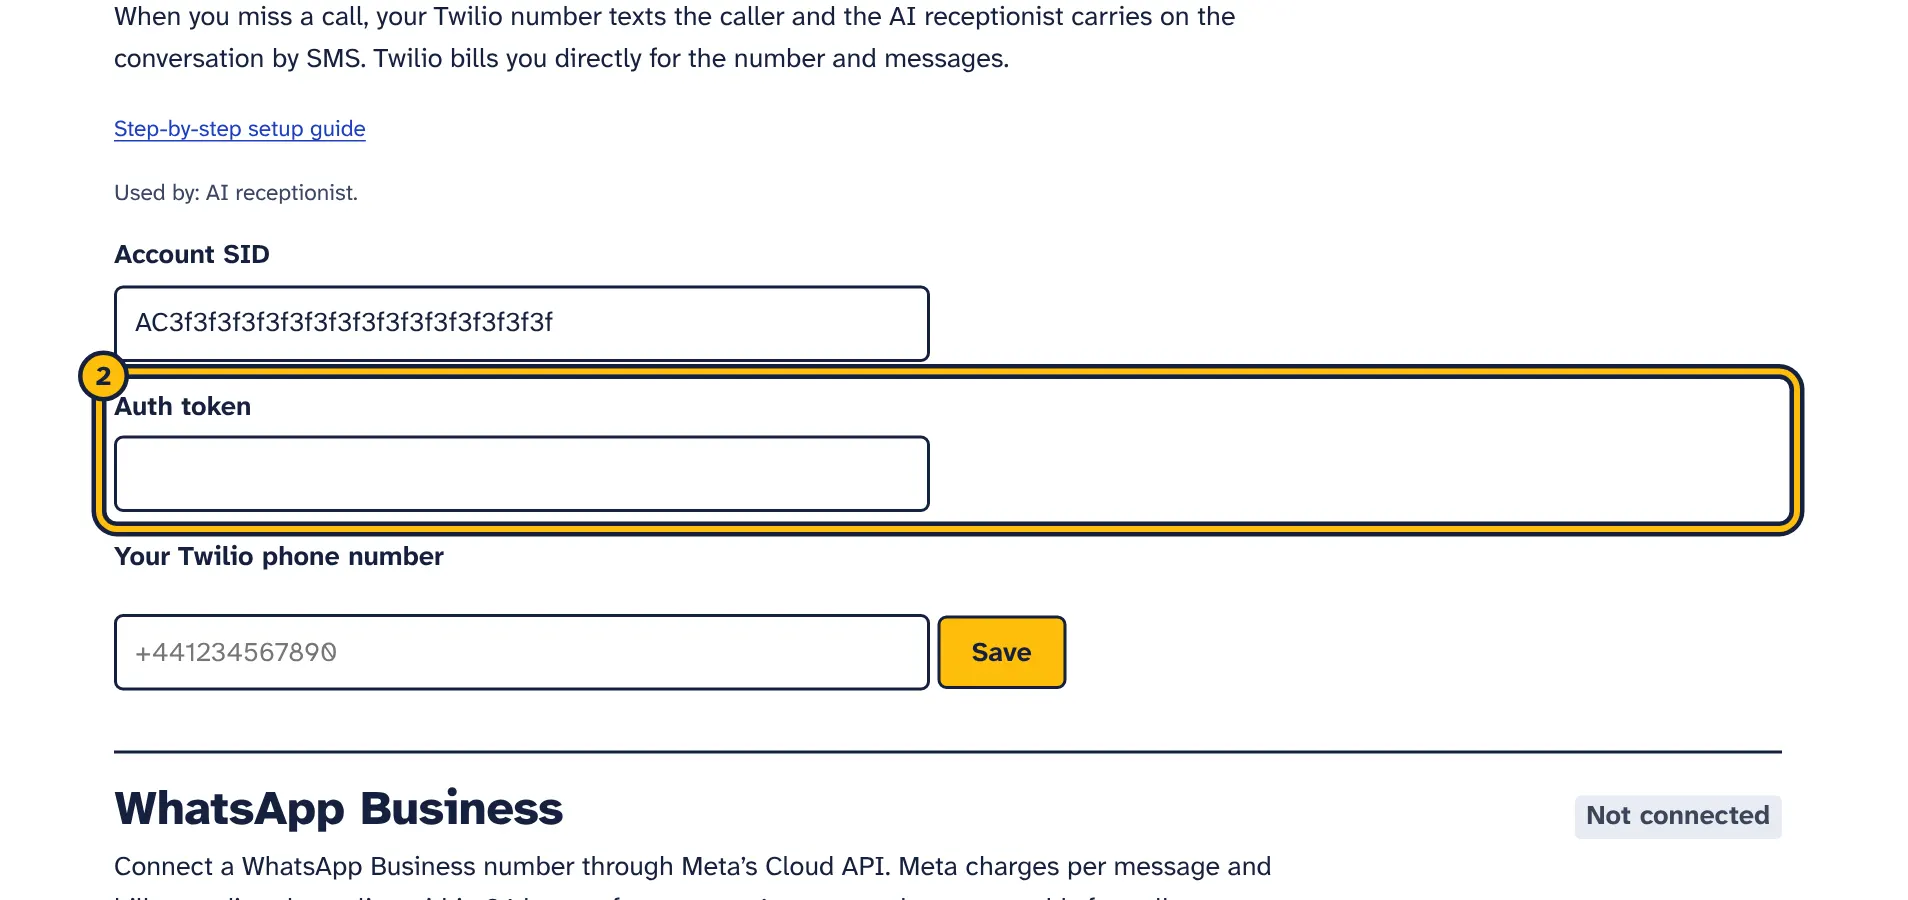
Step 2: Paste the Auth token from the same page. -
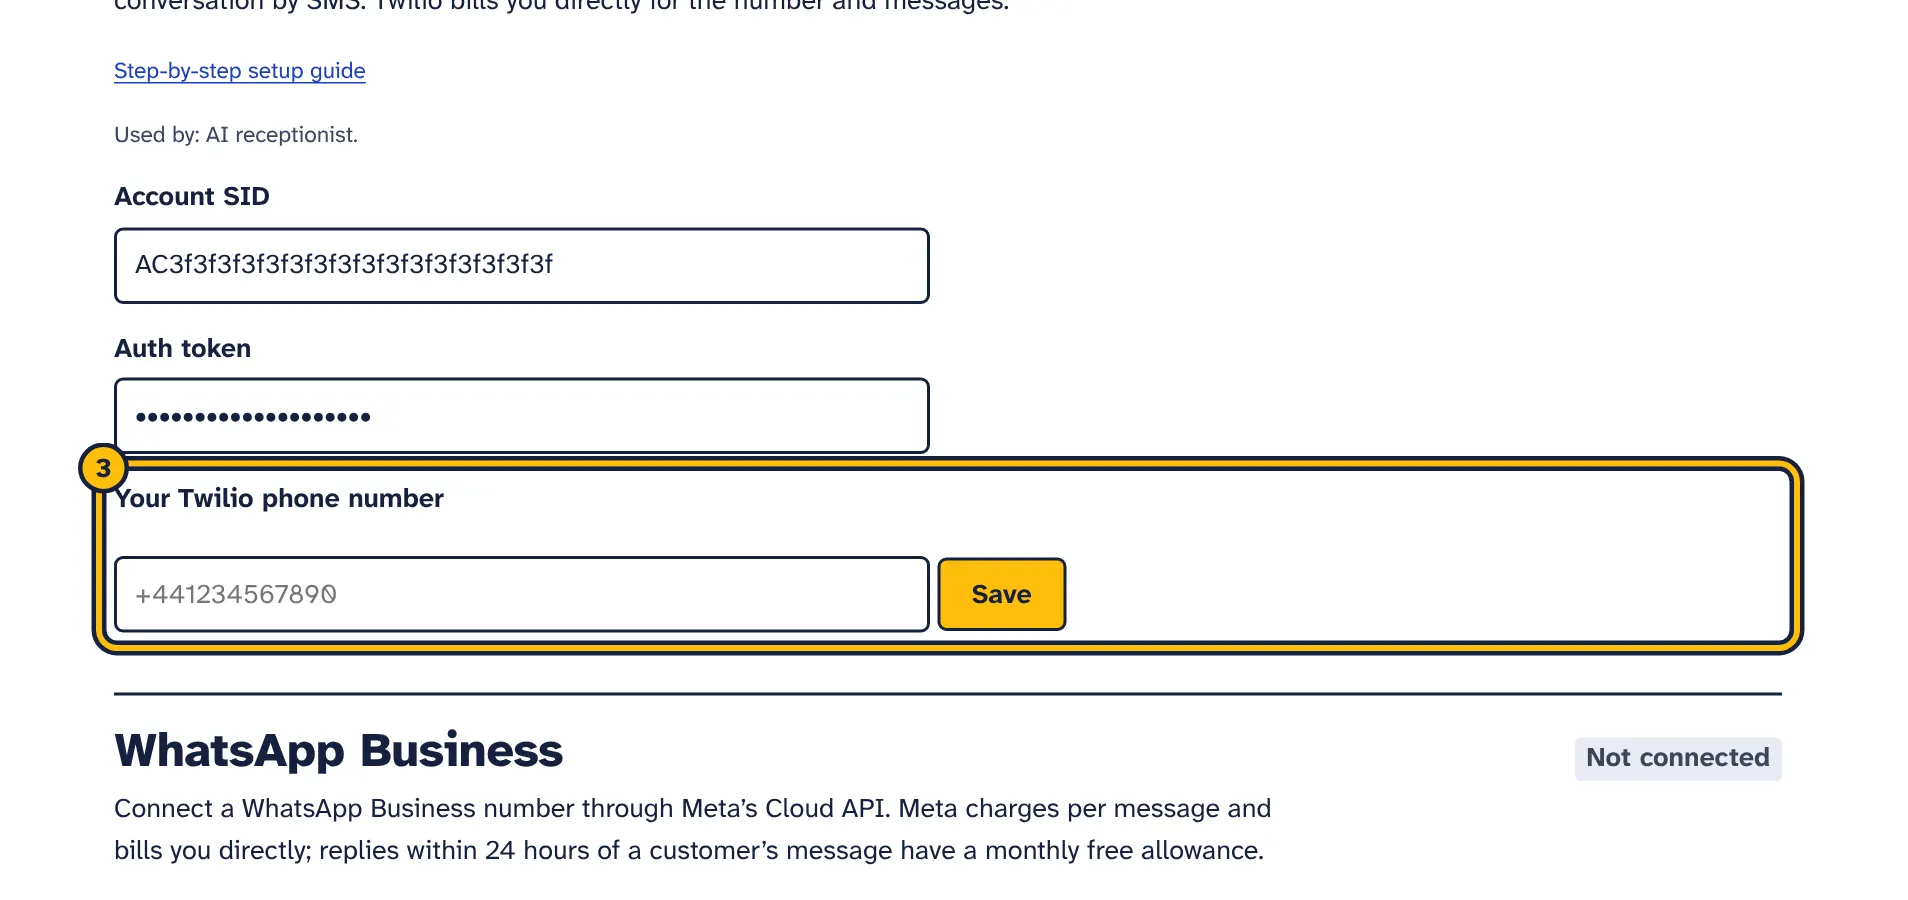
Step 3: Type your Twilio phone number with the country code. -
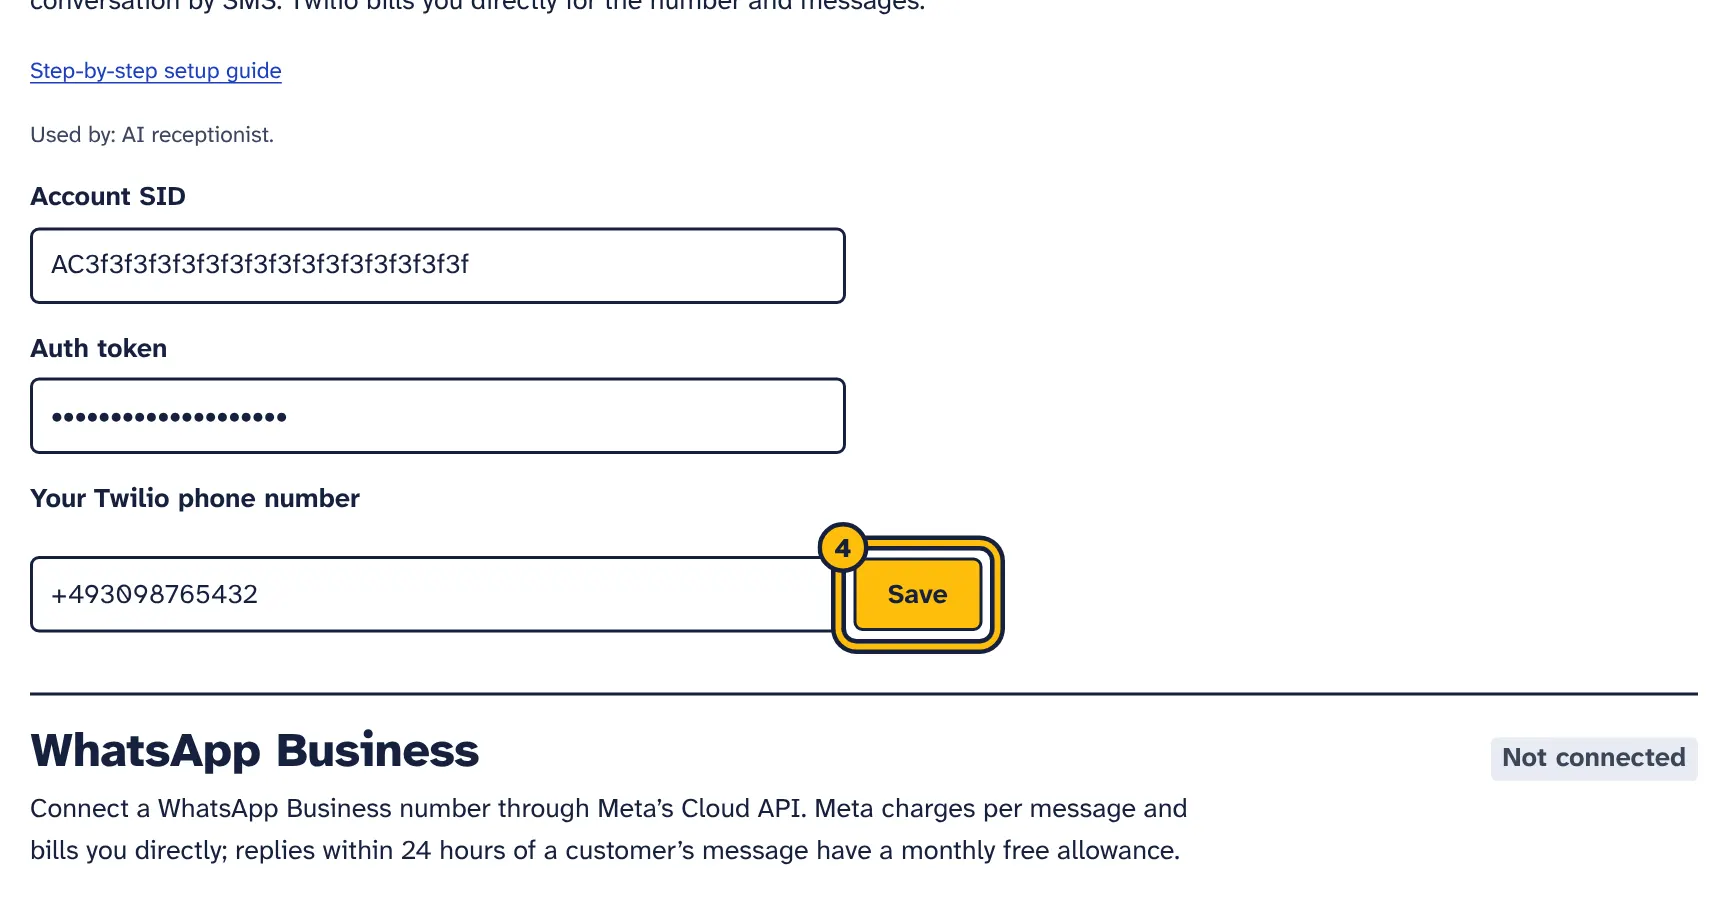
Step 4: Click Save. -
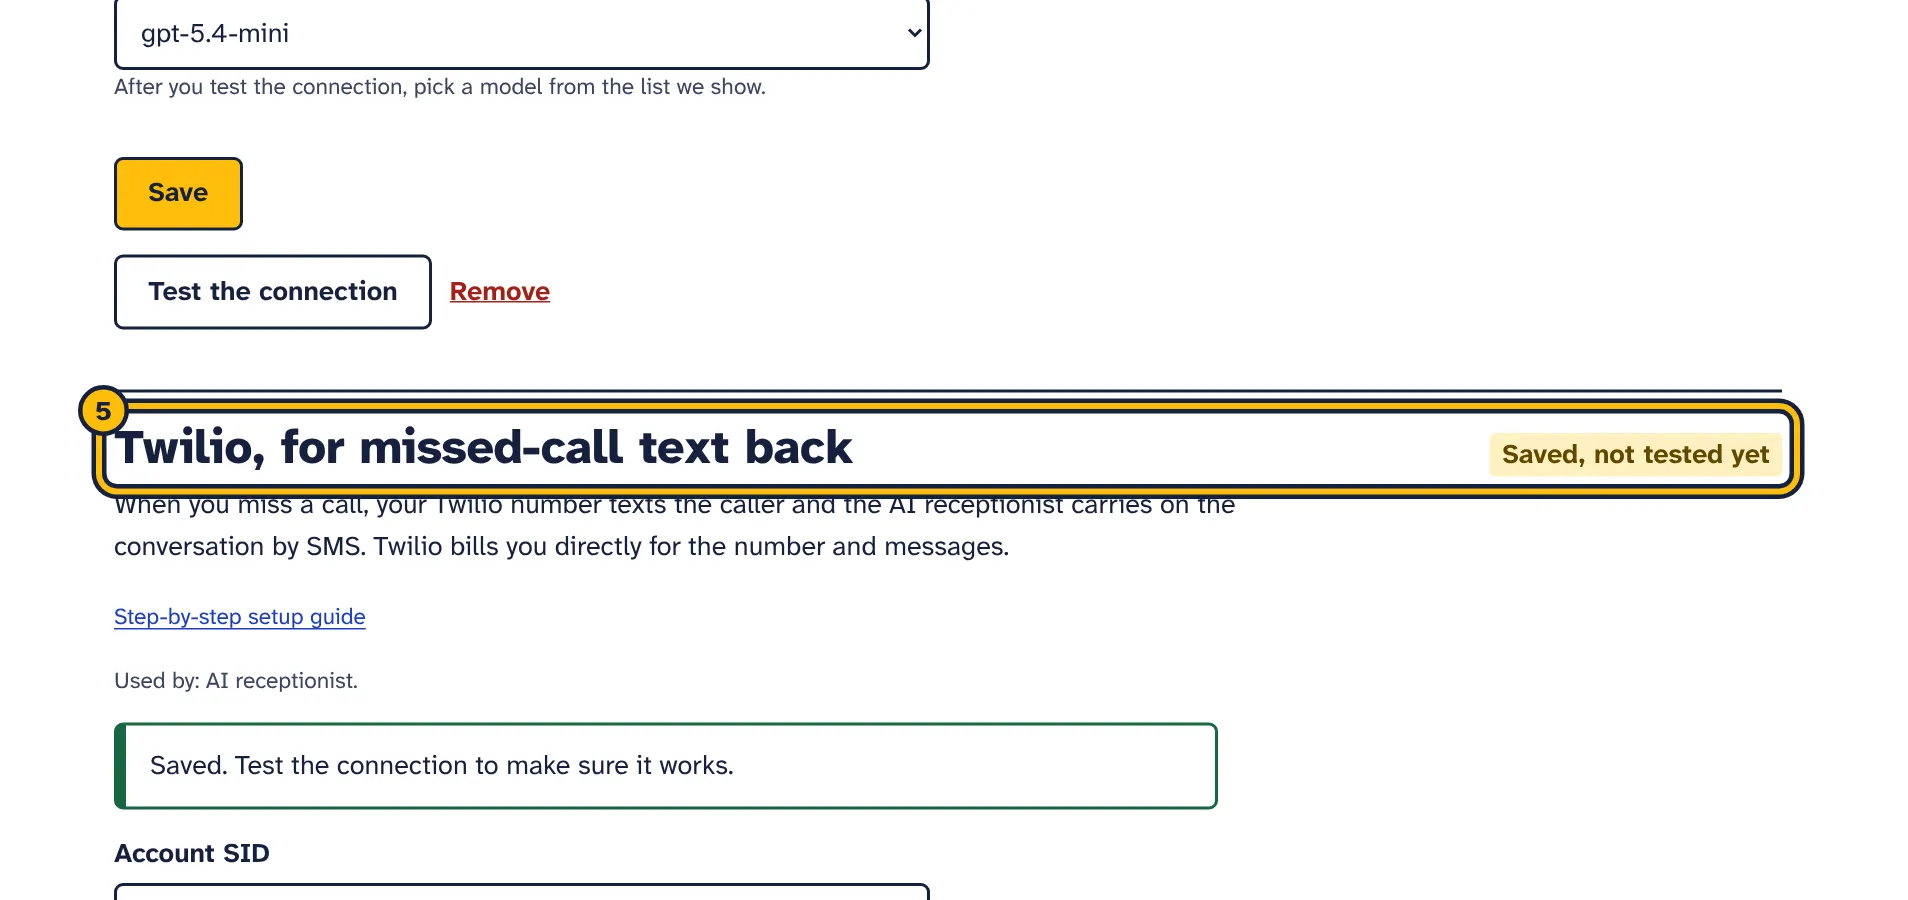
Step 5: Saved. Now copy the webhook addresses shown here into your Twilio phone number settings.
Twilio is a company that rents out phone numbers that programs can use. With a Twilio number, the AI receptionist can text back callers you could not answer, and carry on the conversation by text message. Twilio bills you directly for the number, the calls it receives and the texts it sends and receives.
How missed-call text back works
- A customer calls your business phone and you do not answer.
- Your phone forwards the unanswered call to your Twilio number.
- Twilio asks AdminSmith what to do. The caller hears your short message, if you set one, and the call ends.
- We text the caller from your Twilio number, with the text you set in the assistant’s settings. The same caller gets at most one such text an hour.
- When the caller replies, the AI receptionist answers by text, and the conversation appears in your conversations list.
Callers who hide their number cannot be texted back.
Create a Twilio account and buy a number
- Sign up at twilio.com and verify your email address and phone number.
- Upgrade from the free trial by adding a payment method. A trial account can only text and call numbers you have verified, adds “Sent from a Twilio Trial account” to texts, and allows one number.
- In the Twilio Console, open Phone Numbers, Manage, Buy a number.
- Choose your country and make sure the number you pick lists both Voice and SMS under its capabilities.
- If Twilio asks for documents, provide them. Depending on the country, Twilio asks for proof of address, identity or business registration before you can buy a number. For Australian numbers, for example, businesses give details such as an ABN or ACN.
UK: Twilio does not support texting UK numbers from numbers of other countries, so buy a UK number. Rules differ by country; Twilio publishes them in its country guidelines.
Find your Account SID and Auth token
On the Twilio Console dashboard, in the Account Info box, you find your Account SID and your Auth Token. Copy the Account SID, then show and copy the Auth Token.
- Account SID
- Starts with
ACfollowed by 32 letters and numbers. - Auth token
- A secret, like a password. If it ever leaks, create a new one in Twilio and paste it here.
- Your Twilio phone number
- The number you bought, in international format with a plus sign and no spaces, for example
+441234567890.
Save and test
Save, then select Test the connection. We check that Twilio accepts the Account SID and Auth token, and that the number belongs to this Twilio account. If it works, you see “Connected to Twilio. Messages will come from …”.
Set the two webhooks in Twilio
A webhook is an address that Twilio calls when something happens. After you save, a box called “Finish in your Twilio console” appears under the connection with two addresses. They contain a secret code for your account, so do not share them.
- In the Twilio Console, open Phone Numbers, Manage, Active numbers, and select your number.
- In the voice settings, set A call comes in to Webhook, paste the address shown next to “A call comes in (webhook, POST)”, and choose HTTP POST.
- In the messaging settings, set A message comes in to Webhook, paste the address shown next to “A message comes in (webhook, POST)”, and choose HTTP POST.
- Select Save configuration.
Copy each address exactly. We check Twilio’s signature on every request, and even a small change, such as an extra slash at the end, makes the check fail.
Forward unanswered calls to your Twilio number
Set up conditional call forwarding on your business phone: calls you do not answer, calls while you are busy, and calls when your phone is off go to your Twilio number. How you do this depends on your phone company.
- On many mobile networks you can dial a code. For example,
**61*followed by your Twilio number and#forwards unanswered calls,**67*forwards when busy,**62*forwards when unreachable, and**004*sets all three at once.##004#cancels them. - These codes differ between phone companies and countries. Many US carriers use other codes; Verizon, for example, uses
*71for conditional forwarding. Check your carrier’s help pages first. - For a landline, a VoIP service or an office phone system, look for “forward when no answer” in its settings, or ask your provider.
- Your phone company may charge for forwarded calls.
Then test it: call your business number from another phone, let it ring, and check that the text arrives. If the text goes to your own number instead of the caller’s, your phone company replaces the caller’s number when it forwards calls; ask them whether they can pass it on.
Alternative: ring this phone first
If customers call your Twilio number directly, for example because you publish it, open the AI receptionist, select your assistant and open WhatsApp and missed calls. In Ring this phone first, enter your business phone. We then ring it for 20 seconds and only text back when nobody answers. Leave the field empty if your phone already forwards unanswered calls to your Twilio number, because using both can send calls round in a loop. The AI receptionist guide explains the other settings.
USA: register before you text US numbers
- Local US numbers (10DLC): since 1 September 2023, Twilio blocks all texts to US numbers from local numbers that are not registered for A2P 10DLC. Twilio shows this as error 30034. Register your business (a Brand) and what you send (a Campaign) in the Twilio Console, and add your number to the Messaging Service linked to the approved campaign. Campaigns are checked by hand, so allow time. Twilio also offers a simpler Sole Proprietor registration for some very small businesses.
- Toll-free numbers: texts to US and Canadian mobiles are blocked until the number passes toll-free verification (error 30032). Submit it in the Twilio Console; you see the status under the number’s Regulatory Information tab.
- Registration can have its own fees, which Twilio bills.
Until your registration is approved, missed callers will not get a text. Twilio explains the rules in Shutdown of Unregistered 10DLC Messaging.
What Twilio charges
Twilio bills you for the number every month, for each call your number receives, and for each text sent and received. A long text is split into several parts, and each part counts as a text. Keep your missed-call text under 160 characters, using only plain letters, to pay for one text. Check Twilio’s pricing page for your country.
WhatsApp Business: connect through Meta’s Cloud API
The same steps in pictures:
-
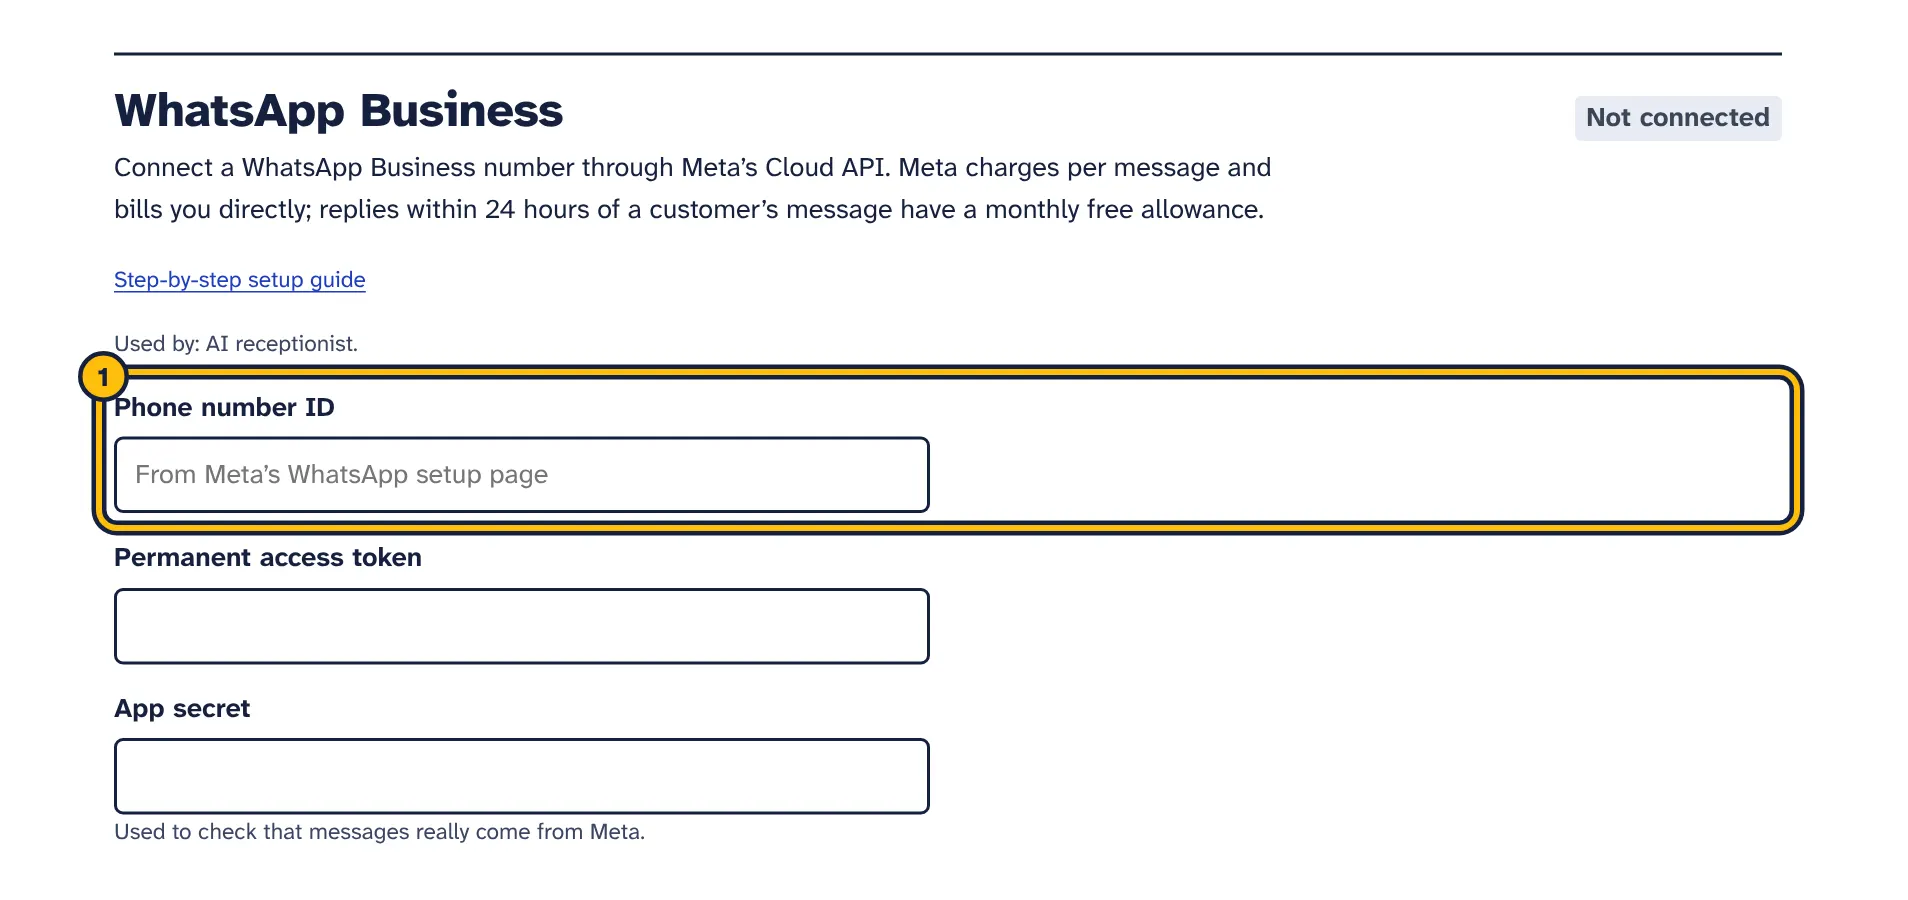
Step 1: Paste the Phone number ID from your Meta app, under WhatsApp, API setup. -
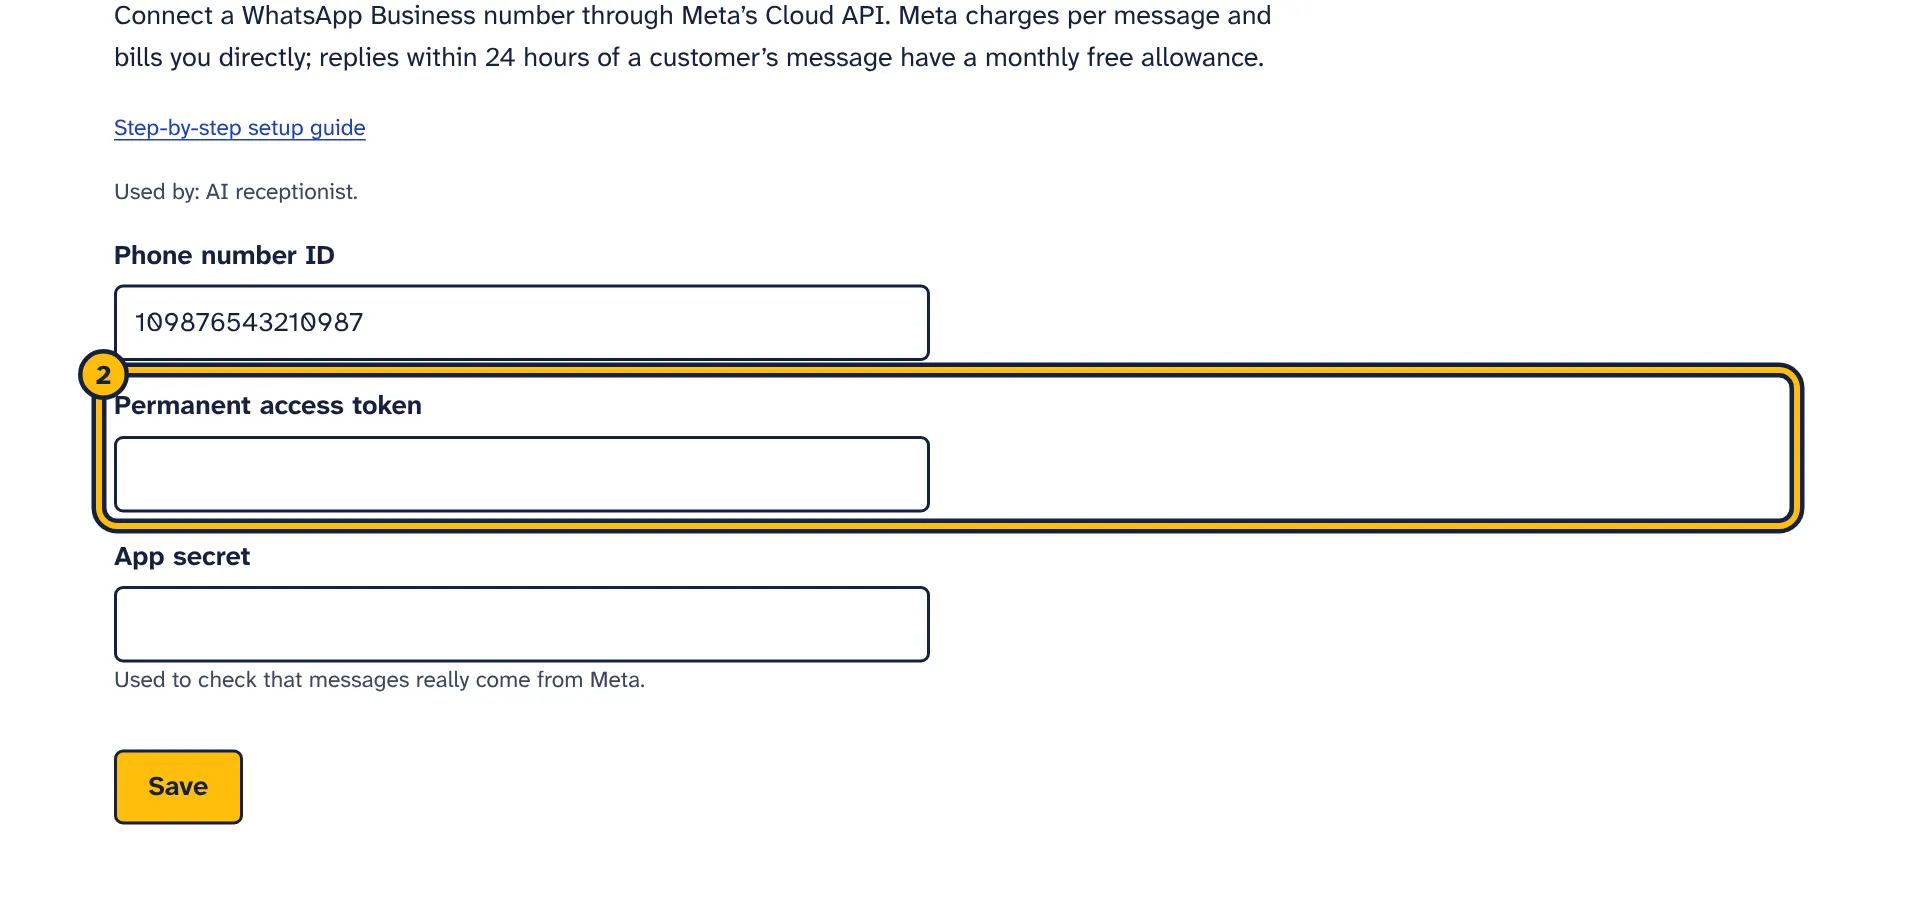
Step 2: Paste your permanent access token. -
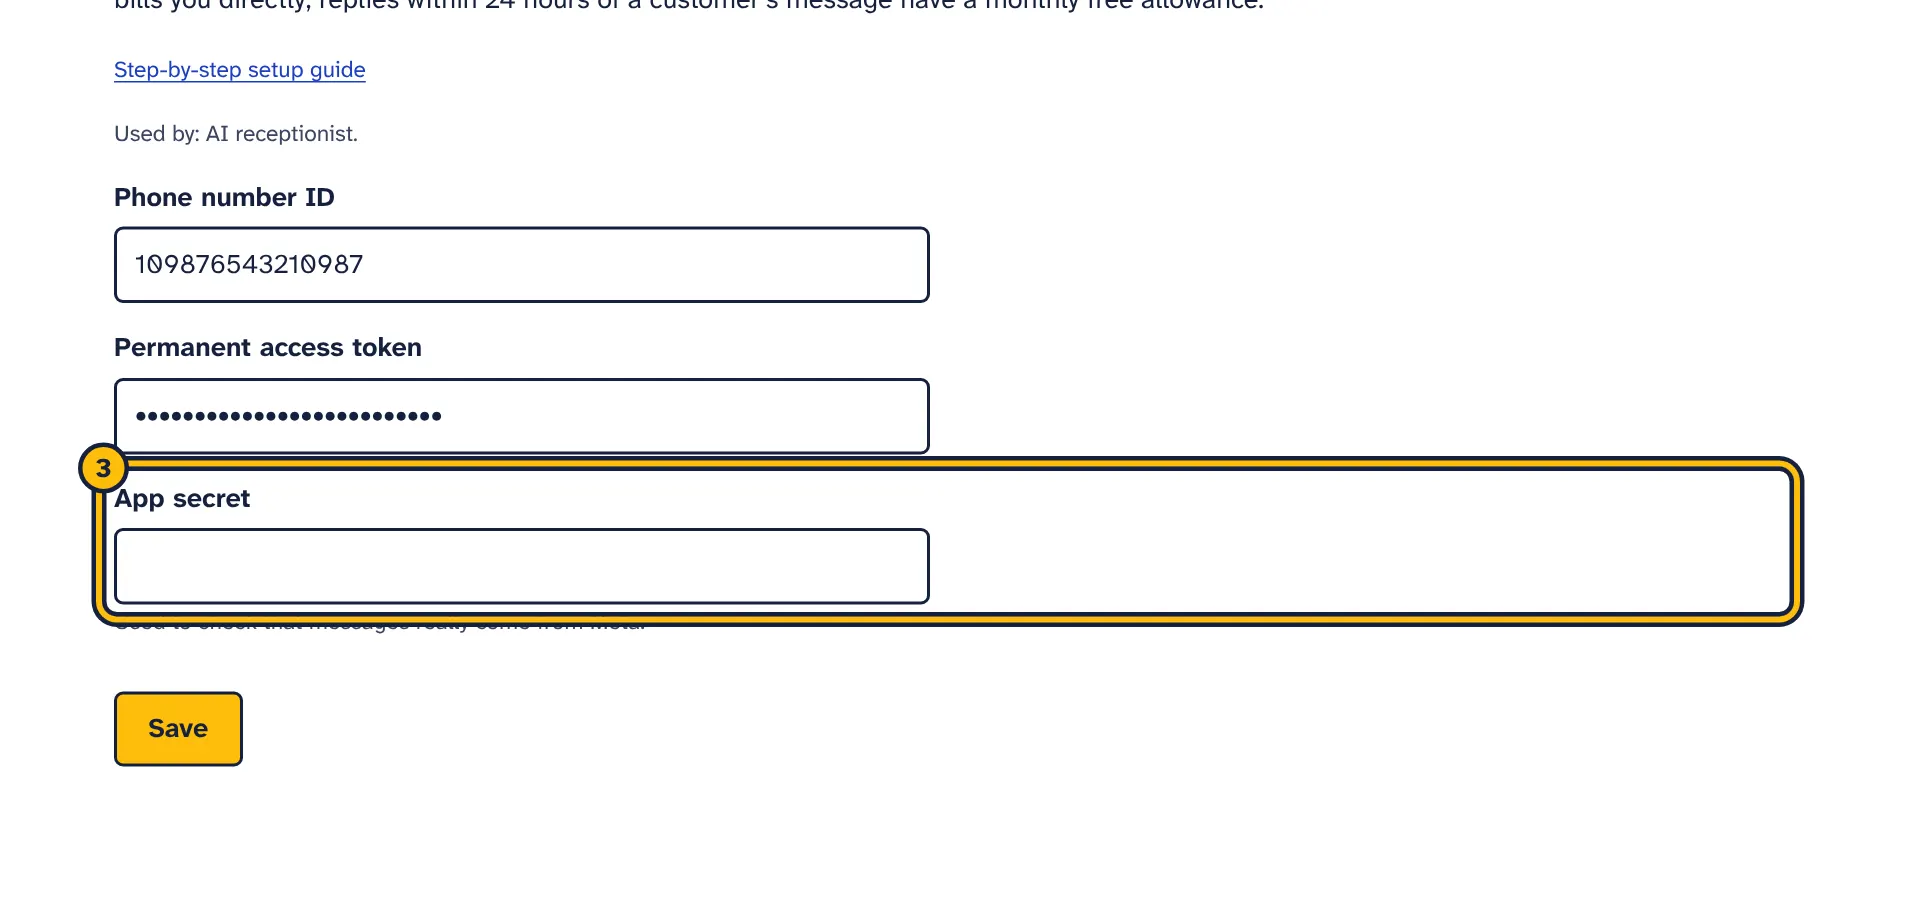
Step 3: Paste the App secret from App settings, Basic. -
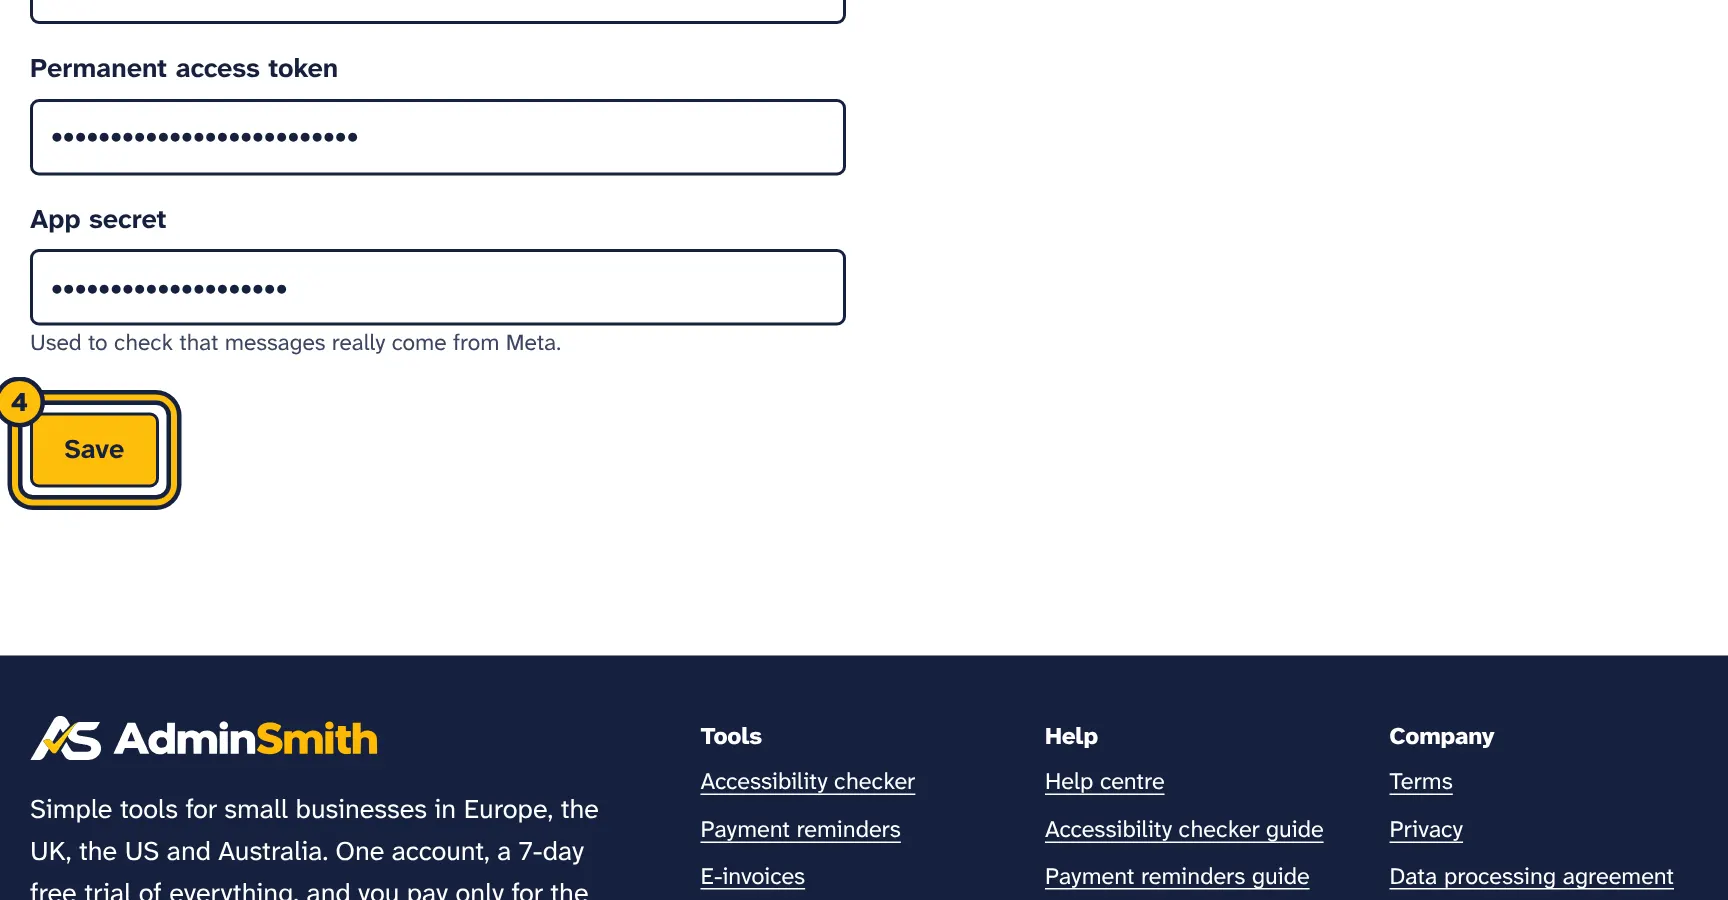
Step 4: Click Save. -
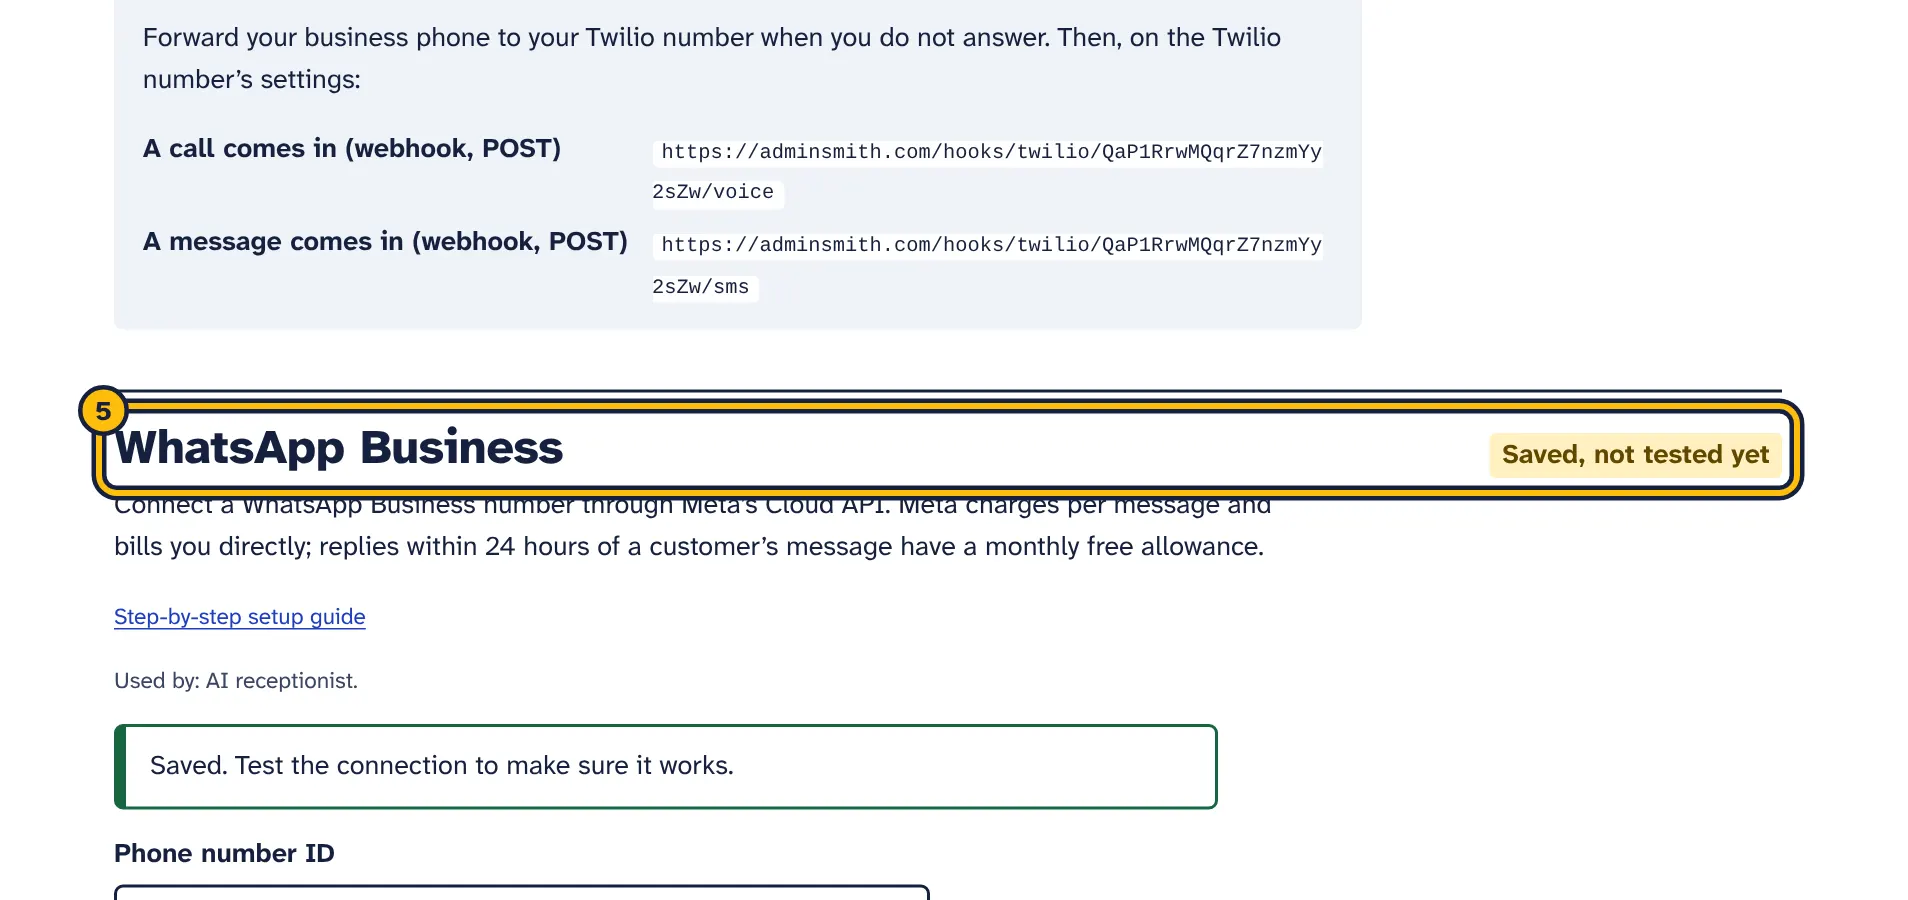
Step 5: Copy the callback URL and verify token shown here into the Webhooks settings of your Meta app.
The AI receptionist can answer messages that customers send to your WhatsApp Business number. It uses the WhatsApp Business Platform (Cloud API) from Meta, which is different from the WhatsApp Business app on your phone. Setting it up takes about an hour, mostly in Meta’s dashboards.
Before you start
- A Facebook account, registered as a Meta developer (free).
- A Meta business portfolio (formerly Business Manager). You can create one during the setup.
- A phone number for WhatsApp that can receive a text message or voice call with a code. A mobile number works best; Meta’s automated call cannot get through a phone menu.
- The number must not be in use on WhatsApp. Meta says numbers already in use with WhatsApp cannot be registered unless they are deleted first. Once the number is on the Cloud API, you cannot use it in the WhatsApp app, but it still works for normal calls and texts.
- A payment method in Meta’s Billing Hub, for messages beyond the free allowance.
Step 1: create a Meta app
- Open Meta for Developers and select Create App.
- Enter an app name and your email address.
- Choose “Connect with customers through WhatsApp” and continue.
- Select your business portfolio, or create one, and finish creating the app.
- Select “Start using the API”. On the API Setup page, connect a WhatsApp Business account, or create one.
Step 2: add and verify your phone number
- On the API Setup page, add your own phone number. Meta also gives you a test number; it is only for trying things out.
- Enter the display name customers will see. Meta reviews display names.
- Verify the number with the code Meta sends by text message or voice call.
- Copy the Phone number ID shown for your number. It is a long number that is different from the phone number itself.
Step 3: create a permanent access token
The access token shown on the API Setup page is only for testing and expires. For a permanent token, create a system user, which is an account for a program rather than a person.
- Open Business settings for your business portfolio and go to System users.
- Select Add, enter a name, and choose the Admin role.
- Select the system user, then Assign assets. Choose your app and give it full control (Manage app).
- Also give the system user full control of your WhatsApp account (Manage WhatsApp Business accounts).
- Select Generate token and choose your app. Choose the longest expiry offered, ideally one that never expires.
- Tick the permissions
whatsapp_business_messagingandwhatsapp_business_management. Meta’s guide also addsbusiness_management. - Generate the token and copy it.
Step 4: find your App secret
In the App dashboard, open App settings, Basic. Next to App secret, select Show, confirm your Facebook password, and copy it. We use the App secret to check that incoming messages really come from Meta.
Step 5: save and test
- Phone number ID
- The ID from step 2.
- Permanent access token
- The system user token from step 3.
- App secret
- The App secret from step 4.
Select Save, then Test the connection. We ask Meta for your number’s details with your token. If it works, you see “Connected to WhatsApp number …” with your verified name, or “name pending” while Meta is still reviewing it.
The test checks the token and Phone number ID, but not the App secret. If the test works but customers get no answers, check the App secret first.
Step 6: connect the webhook
After you save, a box called “Finish in Meta’s app dashboard” appears under the connection, with a Callback URL and a Verify token.
- In the App dashboard, open WhatsApp, Configuration. For apps created with the WhatsApp use case, you find it under Use cases, Customize, Configuration.
- Under Webhook, select Edit. Paste the Callback URL and the Verify token exactly as shown, then verify and save. Meta checks the address with us at that moment.
- In the list of webhook fields, subscribe to
messages. - In AdminSmith, open the AI receptionist, select your assistant, open WhatsApp and missed calls, tick Answer WhatsApp messages with this assistant and select Save.
- Send a WhatsApp message to your business number from another phone and check that the assistant replies.
The 24-hour customer service window
WhatsApp only lets a business send normal messages while the customer service window is open: for 24 hours after the customer’s last message. The assistant answers straight away, so its replies are inside the window.
When you reply yourself from a conversation in AdminSmith, the same rule applies. After 24 hours without a message from the customer, WhatsApp only allows pre-approved template messages, which AdminSmith does not send. Contact the customer another way, or wait until they write again.
What Meta charges
- Since 1 July 2025, Meta charges per delivered message. Messages customers send to you are free.
- Replies inside the 24-hour window are service messages. Each business phone number gets 1,000 free delivered service messages a month. The allowance does not roll over.
- Since 1 October 2026, Meta charges for service messages from the 1,001st each month, except for eligible government and non-profit organisations.
- Without a payment method in Meta’s Billing Hub, Meta stops delivering service messages once the free allowance is used up.
- Rates depend on the customer’s country. See Meta’s pricing page.
Meta’s rules for AI on WhatsApp
Since 15 January 2026, the WhatsApp Business Solution Terms bar companies that offer general-purpose AI assistants, where the AI itself is the main product, from using the WhatsApp Business Platform. Meta has said this does not affect businesses that use AI to serve their own customers.
The AI receptionist is built for that: it answers only from your business information, about your opening hours, services, bookings and support, and hands over to you when a customer wants a person. Keep it that way, and read Meta’s WhatsApp Business Solution Terms yourself. General information, not legal advice.
Troubleshooting: common problems and fixes
All connections
- The status says “Saved, not tested yet”
- You saved new details. Run the test again.
- “Too many tests. Wait a few minutes and try again.”
- You can run up to 10 tests in 10 minutes. Wait, then test once more.
- A password or key field looks empty
- That is normal. We never show saved secrets; the hint under the field shows the last four characters. Leave it empty to keep the saved value.
- Everything worked before and stopped
- Passwords, tokens and keys can expire or be deleted at the provider, and credit can run out. Create a new one, paste it, select Save and test.
- The test fails with “did not accept the username or password”
- Use an app password and your full email address as the username. For Microsoft 365, ask your administrator to turn on Authenticated SMTP for the mailbox.
- The test fails with “could not reach your email server”
- Check the server name and try the other port (587 or 465).
- The test email never arrives
- Look in the spam folder. If you send from your own domain, set up SPF, DKIM and DMARC.
- Customers find reminders or invoices in spam
- Set up SPF, DKIM and DMARC, use your real business name as Sender name, and keep the sender address the same over time.
- A reminder could not be sent
- Payment reminders emails you when an automatic reminder fails, and tries again later. Run Send me a test email to see the exact error.
AI
- The assistant asks customers for their contact details instead of answering
- It could not write an answer. The email we sent you and the note in the conversation give the reason, such as a rejected key, no credit left at your provider, or a model that was retired.
- The assistant says to connect your AI account
- No AI key is saved yet, or it was removed. Add it under Connections, select Test the connection and choose a model.
- The model list is empty or out of date
- Select Test the connection again to reload it.
- Answers are slow or costly
- Choose a smaller model, shorten your business information, and set Most AI answers per day.
Twilio
- Missed callers get no text
- Check that missed-call text back is ticked under WhatsApp and missed calls, that your plan includes it, that both webhooks are set in Twilio exactly as shown, and that your phone forwards unanswered calls to your Twilio number.
- Texts to US numbers fail with error 30034 or 30032
- Register the number for A2P 10DLC, or complete toll-free verification, in the Twilio Console.
- “The number … is not in this Twilio account”
- Enter the number exactly as shown in Twilio, with a plus sign and country code, and check that the Account SID belongs to the account that owns the number.
- Texts start with “Sent from a Twilio Trial account”
- Upgrade your Twilio account from the trial.
- Calls ring round in a loop
- Use either conditional call forwarding or Ring this phone first, not both with the same phone.
- “Meta did not accept the access token or phone number ID”
- Use the permanent system user token, not the temporary one from the API Setup page, and the Phone number ID of your own number rather than the test number.
- Meta cannot verify the Callback URL
- Save the connection here first, then copy the Callback URL and Verify token again, exactly as shown.
- The test works, but customers get no answer
- Check the App secret, check that the webhook is subscribed to
messages, and check that WhatsApp is switched on for an assistant under WhatsApp and missed calls. If your WhatsApp account was used with another Meta app before, use the same app for the token, App secret and webhook. - Your own reply is not delivered
- More than 24 hours have passed since the customer’s last message. Wait until they write again, or contact them another way.
- The number cannot be registered
- It is still in use on the WhatsApp or WhatsApp Business app. Delete it there first, or use another number.
Still stuck? Use the Contact link at the bottom of every page. Tell us which connection, what you tried and the exact message you see, but never send a password, token or key.
Still stuck? Email support@adminsmith.com and tell us what you tried. See all guides.