
Accessibility checker guide
Everything the accessibility checker does, screen by screen: how to check your website, read the results, fix the problems, share a PDF report, publish your accessibility statement and keep your site checked automatically.
Open Accessibility checker How it works and plans
This guide shows 3 tasks step by step, as a short video and in pictures. Look for the sections marked “video”.
Quick start
- Log in and open the checker: click Open next to Accessibility checker on your dashboard, or Accessibility in the row of tools at the top.
- Under Add a website, type your address in Website address, for example
yourshop.com, and click Add and check now. - Wait for the check to finish. The page shows how many pages are done and reloads with the score when it is ready.
- Click Open latest report and work through the problems from the top: critical and serious ones first.
- Click Download PDF to send the report to your web developer.
- Click Accessibility statement to create the statement for your website.
- On a paid plan, click Turn on under Automatic re-checks so the checker keeps an eye on your site.
New here? You can also check one page for free without an account.
Check one page for free
On the home page, anyone can check one page without an account.
- Type the address of the page in Your website address. It can be any public page, such as your home page or a product page.
- Click Check my website.
- Wait while the page says it is checking. This usually takes 10 to 40 seconds. The result appears by itself.
The result shows the page’s score out of 100 with its rating, the number of problem types by severity, and The top problems: the three most serious. Below it, a box offers the free trial, also when no problems were found, because one clean page says little about the rest of your site. Click Start free trial to see every problem with where it is and how to fix it. When you have created your account, the checker opens with your address already filled in under Website address; click Add and check now to check your site.
The free check covers exactly one page and does not follow links. There is a daily limit on free checks from the same internet connection; when you reach it, the page tells you. The free result is not saved to an account. Its link works for 30 days, then the result is deleted.
If the page could not be checked, you see the reason and a link to Try again with another address. Troubleshooting explains each message. Use Check another site to start again.
Add your website
The same steps in pictures:
-
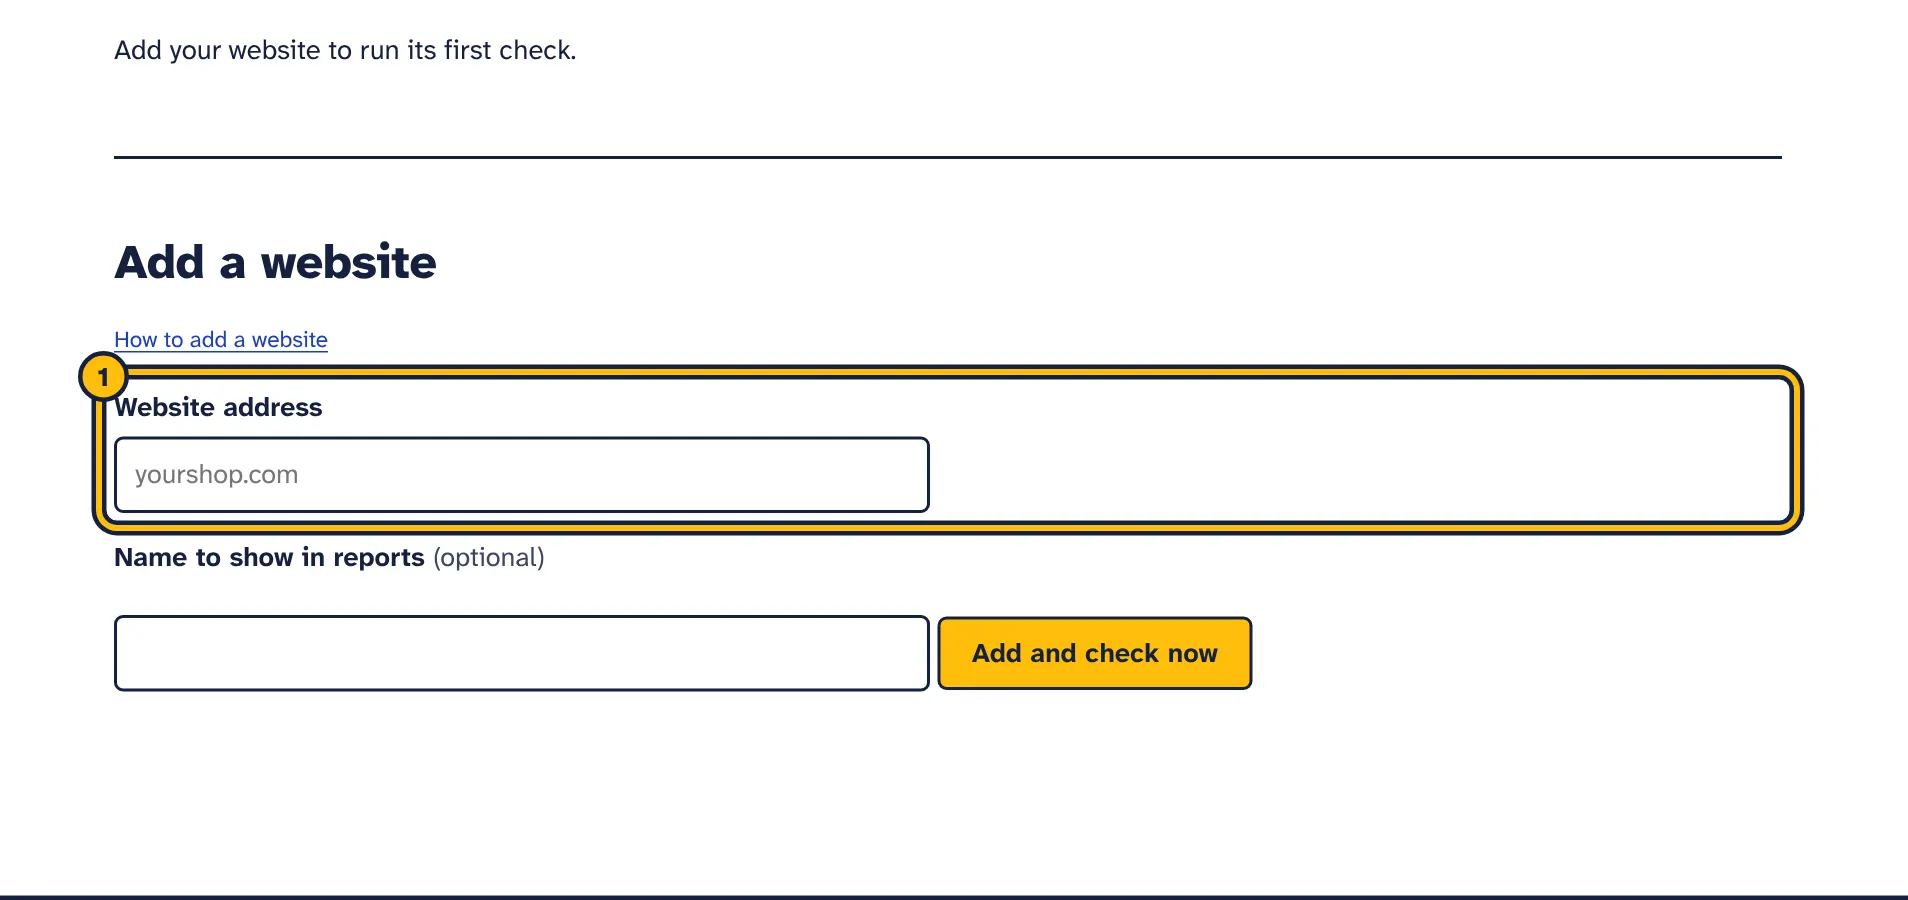
Step 1: Type your website address. -
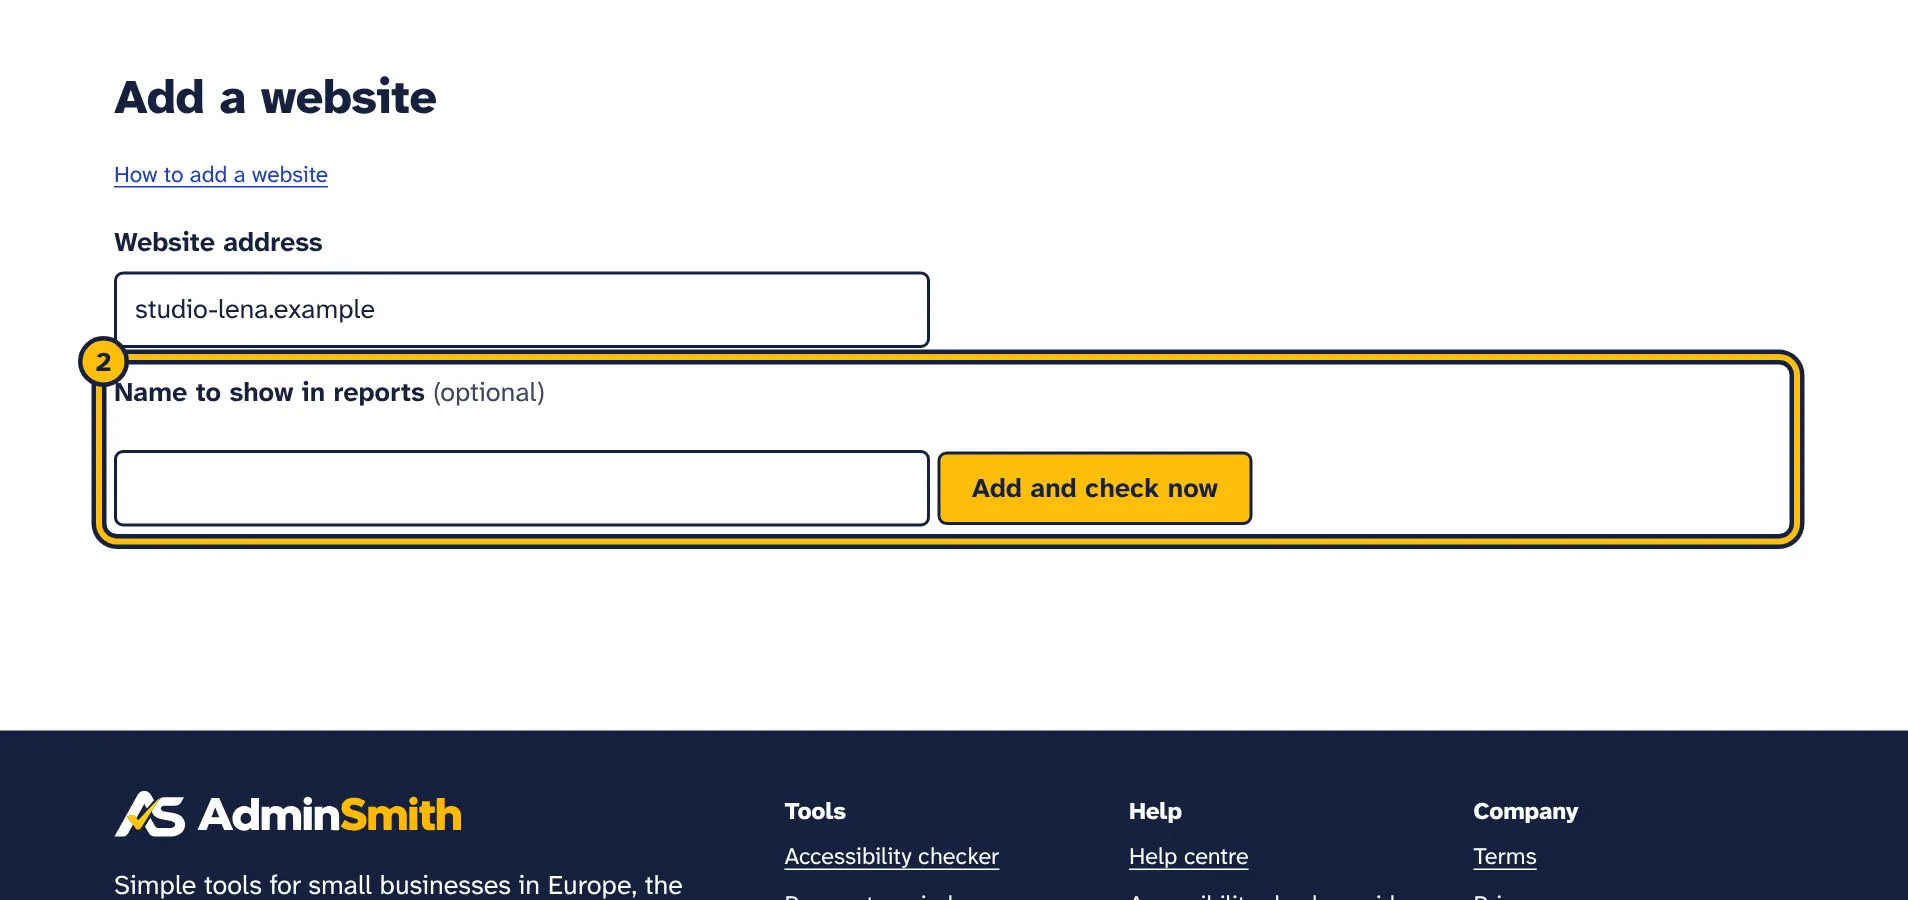
Step 2: Give it a name for your reports, if you like. -
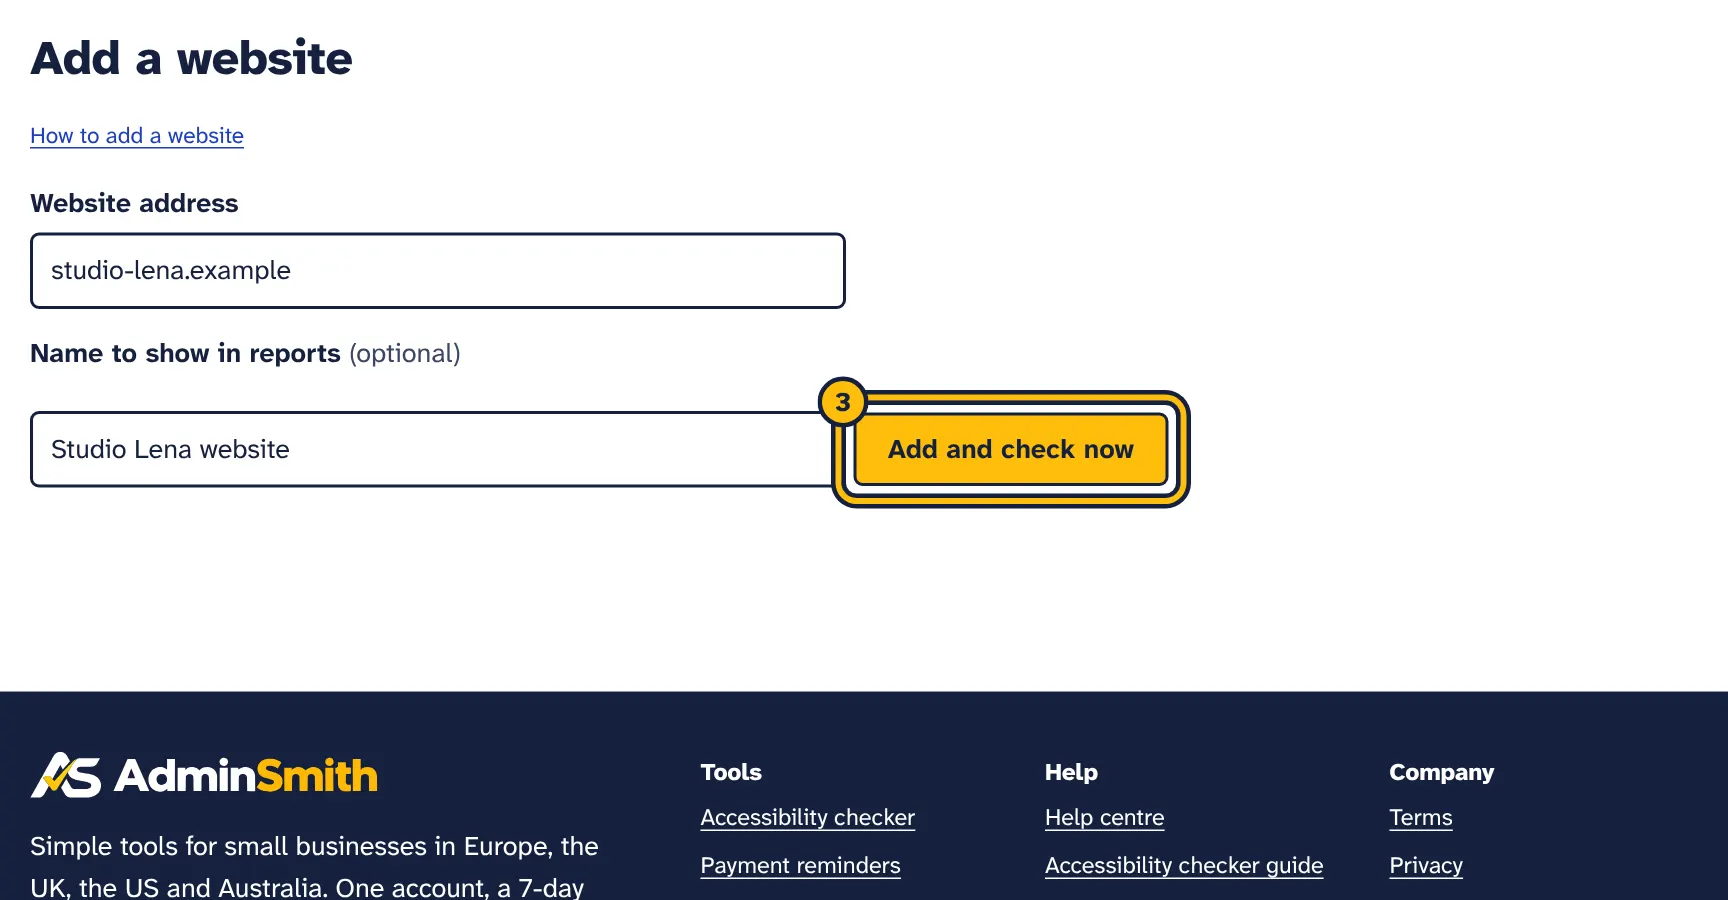
Step 3: Click Add and check now. -
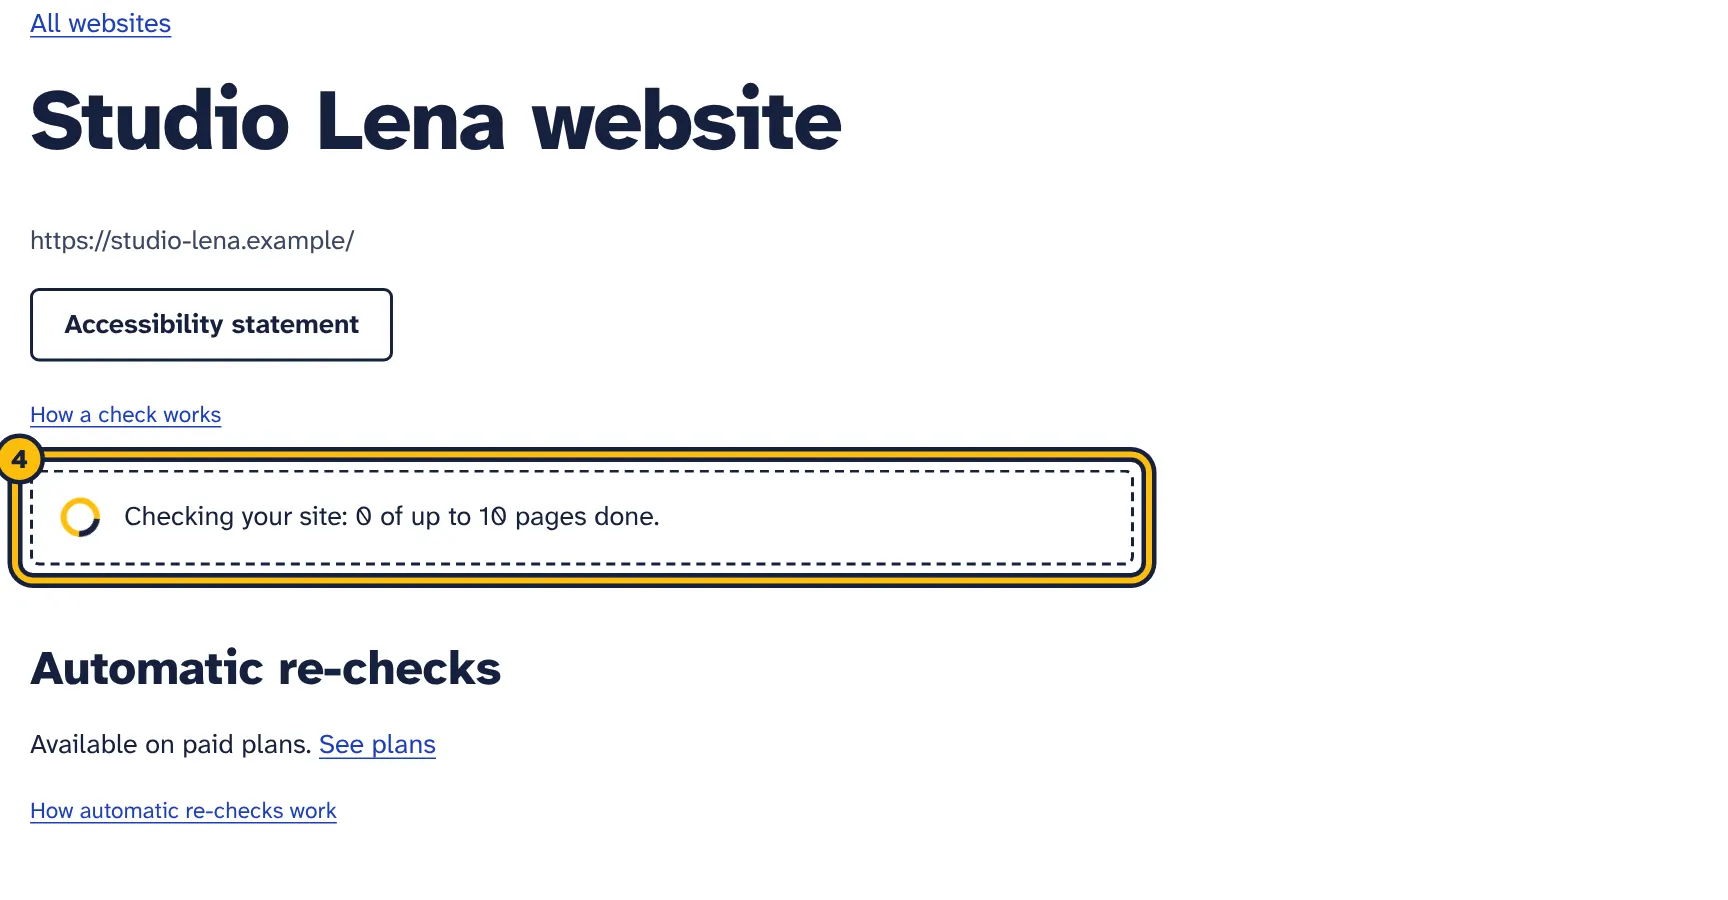
Step 4: The check runs on its own. You can close the page; we email you when it is done. -
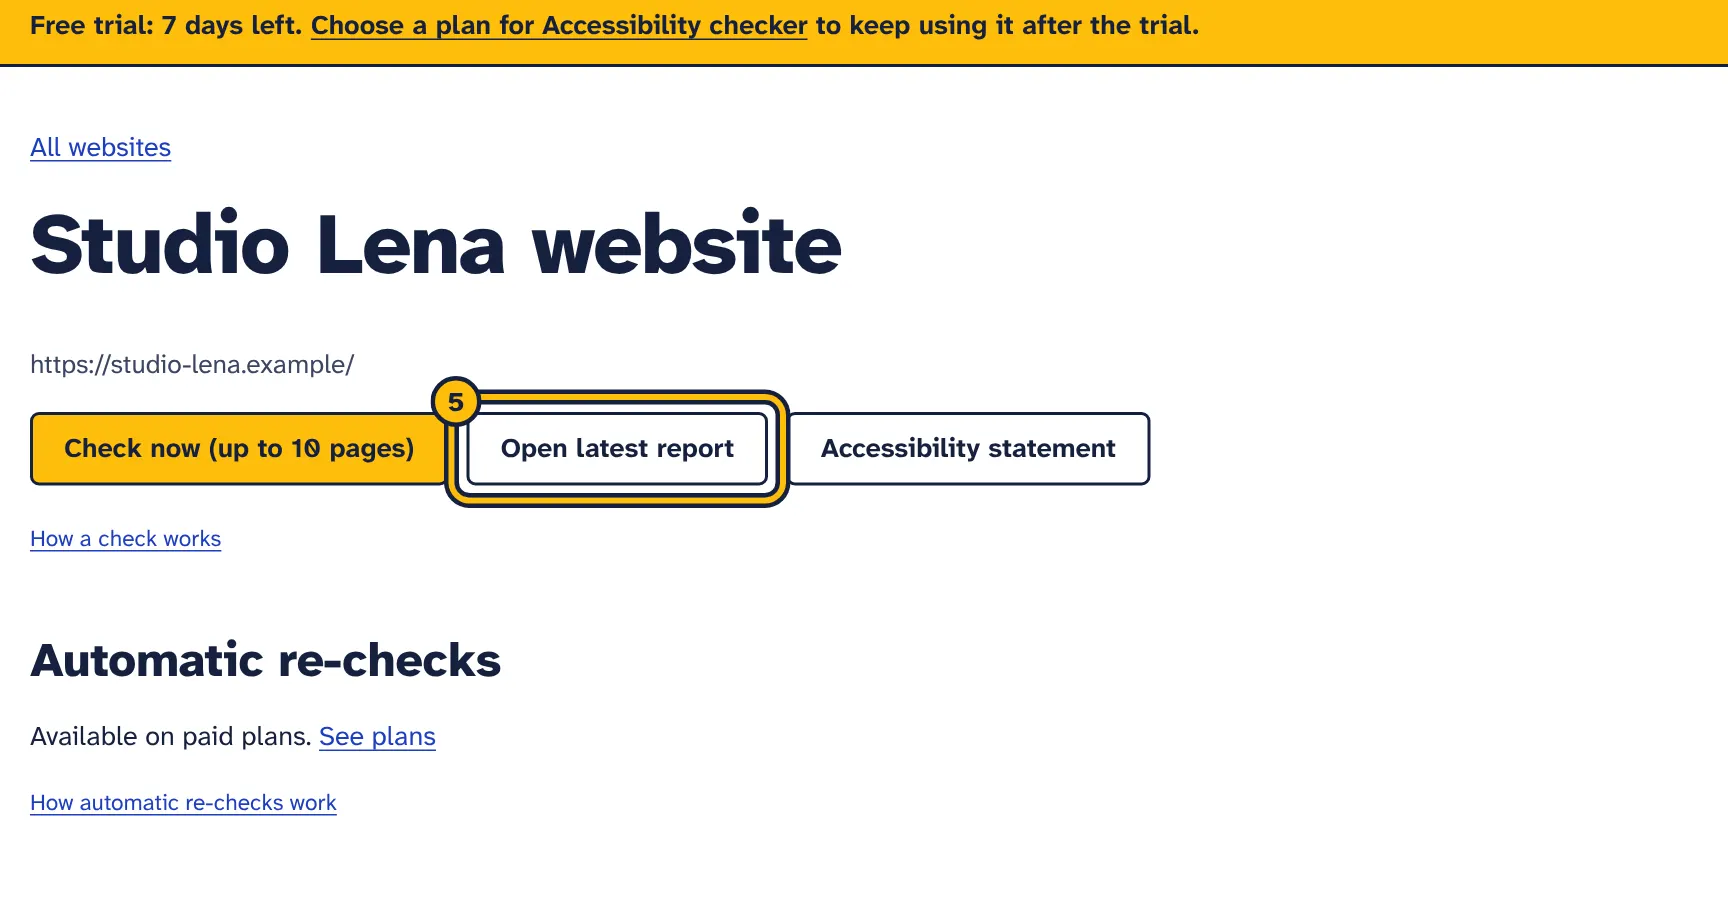
Step 5: When the check is done, click Open latest report. -
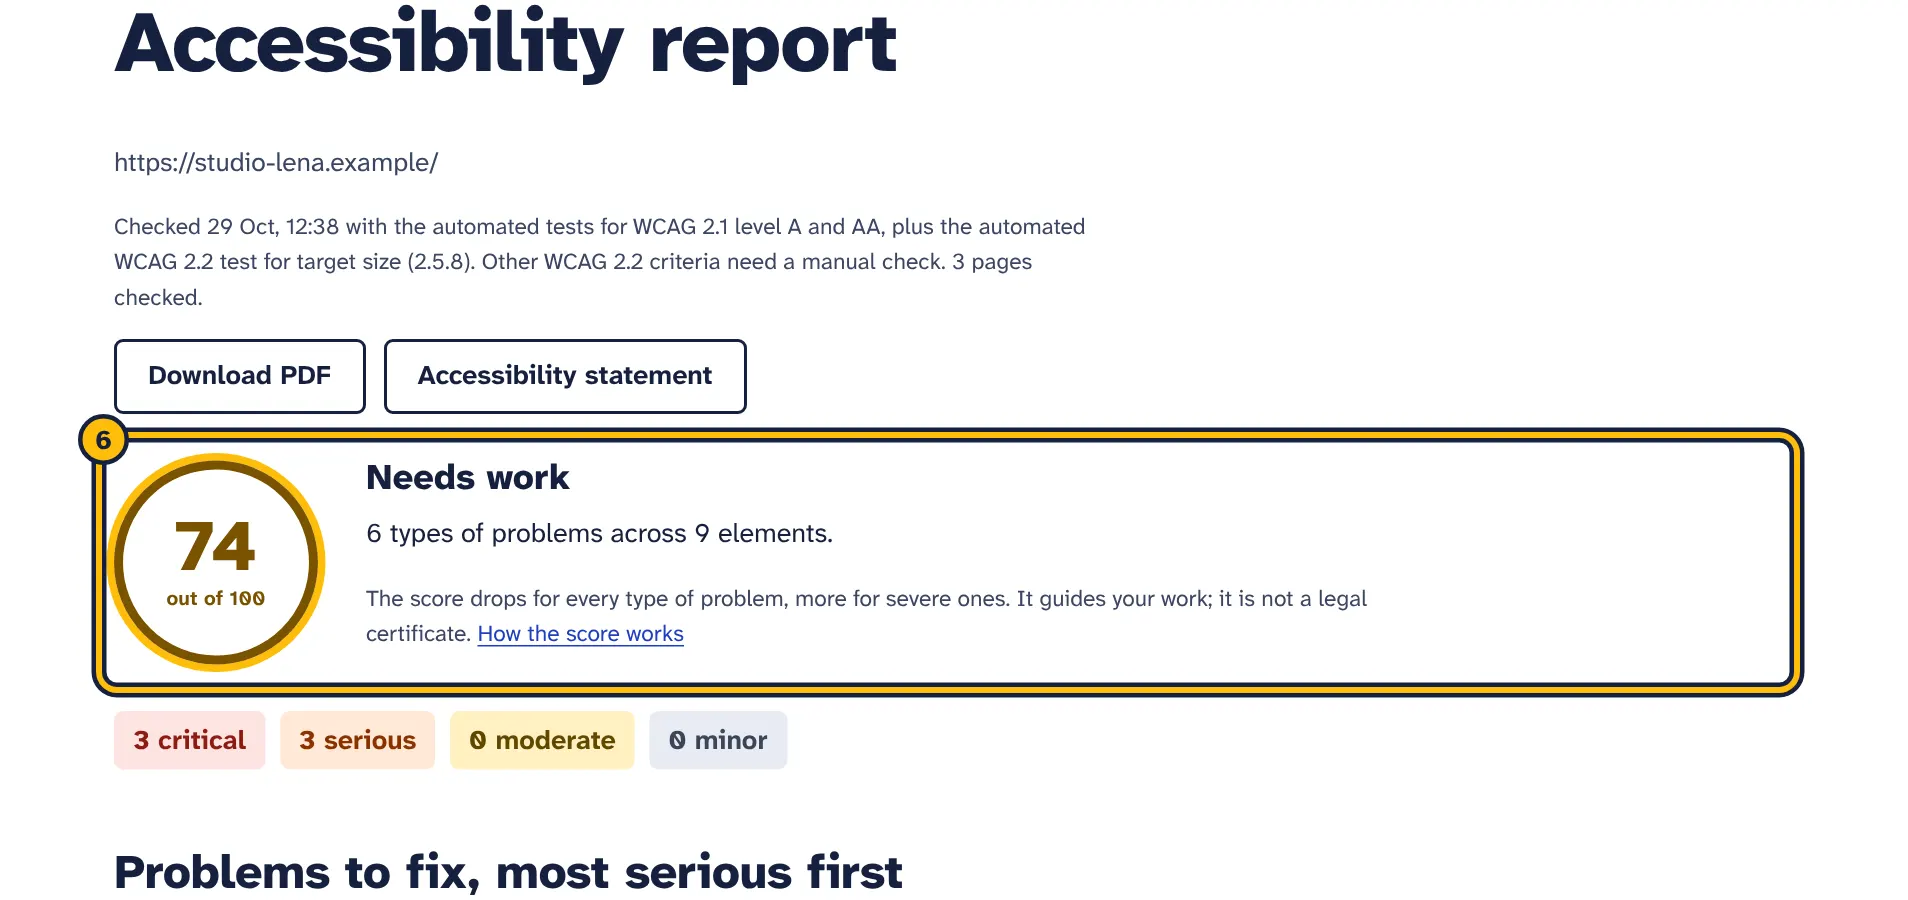
Step 6: You see the score and how many problems were found, most serious first.
Open the checker. Under Add a website you see two fields:
- Website address
- The page where the check starts, usually your home page, for example
yourshop.comorhttps://www.yourshop.com/. If you leave outhttps://, it is added for you. It must be a public address on the internet: addresses on your own network, such aslocalhostor a staging site behind a password or VPN, cannot be checked. Do not include a username or password in the address. - Name to show in reports (optional)
- The name shown in your list of websites, on reports, in PDF file names and in emails, up to 80 characters. If you leave it empty, the domain is used without
www.
Click Add and check now. The website’s page opens and the first check starts straight away. If no pages are left in your plan, the website is added without a check.
Messages you may see
- “Enter your website address, for example example.com.”: the field is empty.
- “That does not look like a website address. Try something like example.com.” or “Enter a full domain name, for example example.com.”: check the spelling, including the ending such as
.comor.de. - “Only http and https website addresses can be checked.”: remove other prefixes such as
ftp://. - “Remove the username and password from the address.”: the address contains login details.
- “This address cannot be checked. Use the public address of your website.”: the address points to a private network, or the domain cannot be found.
- “Your plan has no room for another website. Upgrade to add more.”: the trial and Starter include one website, Pro five.
- “Your trial has ended. Choose a plan to add websites.”
Your list of websites
The first page of the checker shows your plan, how many pages you have used, the most pages per check, and a table of your websites:
- Website
- The name and address. Click the name to open the website’s page.
- Latest score
- The score of the last finished check, coloured by rating, or “Not yet”.
- Last checked
- When the last finished check started.
- Automatic re-checks
- On, Off or Paused. Paused means re-checks are switched on but your plan does not include them, for example after a paid subscription ended; they start again by themselves when you choose a paid plan. See automatic re-checks.
Change or delete a website
You cannot edit a website’s address or name after adding it. To change them, delete the website and add it again. At the bottom of the website’s page, click Delete this website and its reports and confirm. This deletes the website, all its reports and its saved accessibility statement for good. Pages you have already used are not given back.
Run a check
Click a website in your list to open its page. At the top are the buttons:
- Check now (up to 50 pages)
- Starts a new check. The number is the most pages this check can use: your plan’s pages per check, or the pages you have left if that is fewer. The button is hidden while a check is running, when no pages are left or when your trial has ended without a plan.
- Open latest report
- Opens the report of the last finished check.
- Accessibility statement
- Opens the statement generator.
While a check runs, the page shows “Checking your site: 12 of up to 50 pages done.” and updates by itself. When the check is finished, the page reloads with the new result. If JavaScript is switched off in your browser, reload the page yourself. If many checks are running at the same time, yours waits its turn and shows 0 pages until it starts.
What the checker does
- It opens your start address in a Chrome browser at desktop size, like a first-time visitor who has not logged in and has not clicked the cookie banner.
- It waits up to 30 seconds for the page to load, then up to 10 seconds more for images and scripts to finish.
- It runs the automated rules of axe-core 4.14 for WCAG 2.0 and 2.1 level A and AA, plus its WCAG 2.2 rule for target size, on the whole page.
- It collects the links on the page and adds those on your own domain to its list. Addresses with and without
wwwcount as the same site; other subdomains, such asshop.yourshop.com, do not. - It moves on to the next page in the list, nearest pages first, until it reaches the page limit or runs out of pages.
Links to files such as PDF, image, Office, ZIP, audio and video files are skipped. The part of an address after # and tracking parameters starting with utm_, fbclid, gclid or mc_ are ignored, so the same page is not checked twice. Other parameters, such as ?sort=price, make a separate page. The checker does not click buttons, open menus, fill in forms, log in or add anything to a basket, and it does not download video or audio.
Check history
Below the buttons, the website’s page lists its last 30 checks with the Date, the Score (or “Failed” or “In progress”), the number of Pages, the Type (Manual for checks you started, Automatic for re-checks) and a View link to the report.
Understand your results
The report starts with the date of the check and what was tested: the automated tests for WCAG 2.1 level A and AA, plus the automated WCAG 2.2 test for target size (2.5.8). The other WCAG 2.2 criteria need a manual check. Then come the number of pages checked and, if any, how many could not be opened. Pages that could not be opened are left out of the score and listed at the bottom with the reason.
If your address redirected to another domain or subdomain, a note at the top says so and names the address to add instead. See troubleshooting.
The score
Every page checked starts at 100. For each type of problem found on that page, points are taken off:
- Critical: 15 points.
- Serious: 8 points.
- Moderate: 4 points.
- Minor: 1 point.
A page never goes below 0. The site score is the average of all pages checked, rounded. The score counts types of problems, not elements: one image without a description costs a page as much as forty. Fixing a problem type completely is what moves the score.
- Good
- 90 to 100.
- Needs work
- 70 to 89.
- Poor
- Below 70.
The score helps you see progress. It is not a legal certificate, and 100 does not mean your site is fully accessible: automated tests cannot judge everything. See what automated checks miss.
Impact levels
The row of four numbers shows how many problem types there are at each impact level. The level comes from axe-core and describes how much the problem gets in the way:
- Critical
- Blocks some people completely, for example an image without a description, a button with no name or a form field without a label.
- Serious
- Makes important content or features very hard to use, for example text with too little contrast or links that do not say where they go.
- Moderate
- Causes difficulty but usually does not stop people, for example blocking zoom on phones.
- Minor
- An annoyance worth fixing when you are working on that part anyway.
WCAG criteria
Each problem shows the WCAG success criteria it fails, such as “WCAG 1.4.3”. That is the number of the requirement in the Web Content Accessibility Guidelines; 1.4.3, for example, is contrast. Your developer or an auditor can look up the number in the WCAG documents. All criteria tested are level A or AA.
The list of problems
Under Problems to fix, most serious first, each line shows the impact, the problem in plain words, how many elements on how many pages are affected, and the WCAG criteria. Problems with the same impact are sorted by the number of elements. Click a line or Show how to fix to open it and Hide to close it. Fix the problems explains what you see inside.
Pages checked
At the bottom, Pages checked lists every page with its title, address and number of problem types, or the reason it could not be opened.
Fix the problems
The same steps in pictures:
-
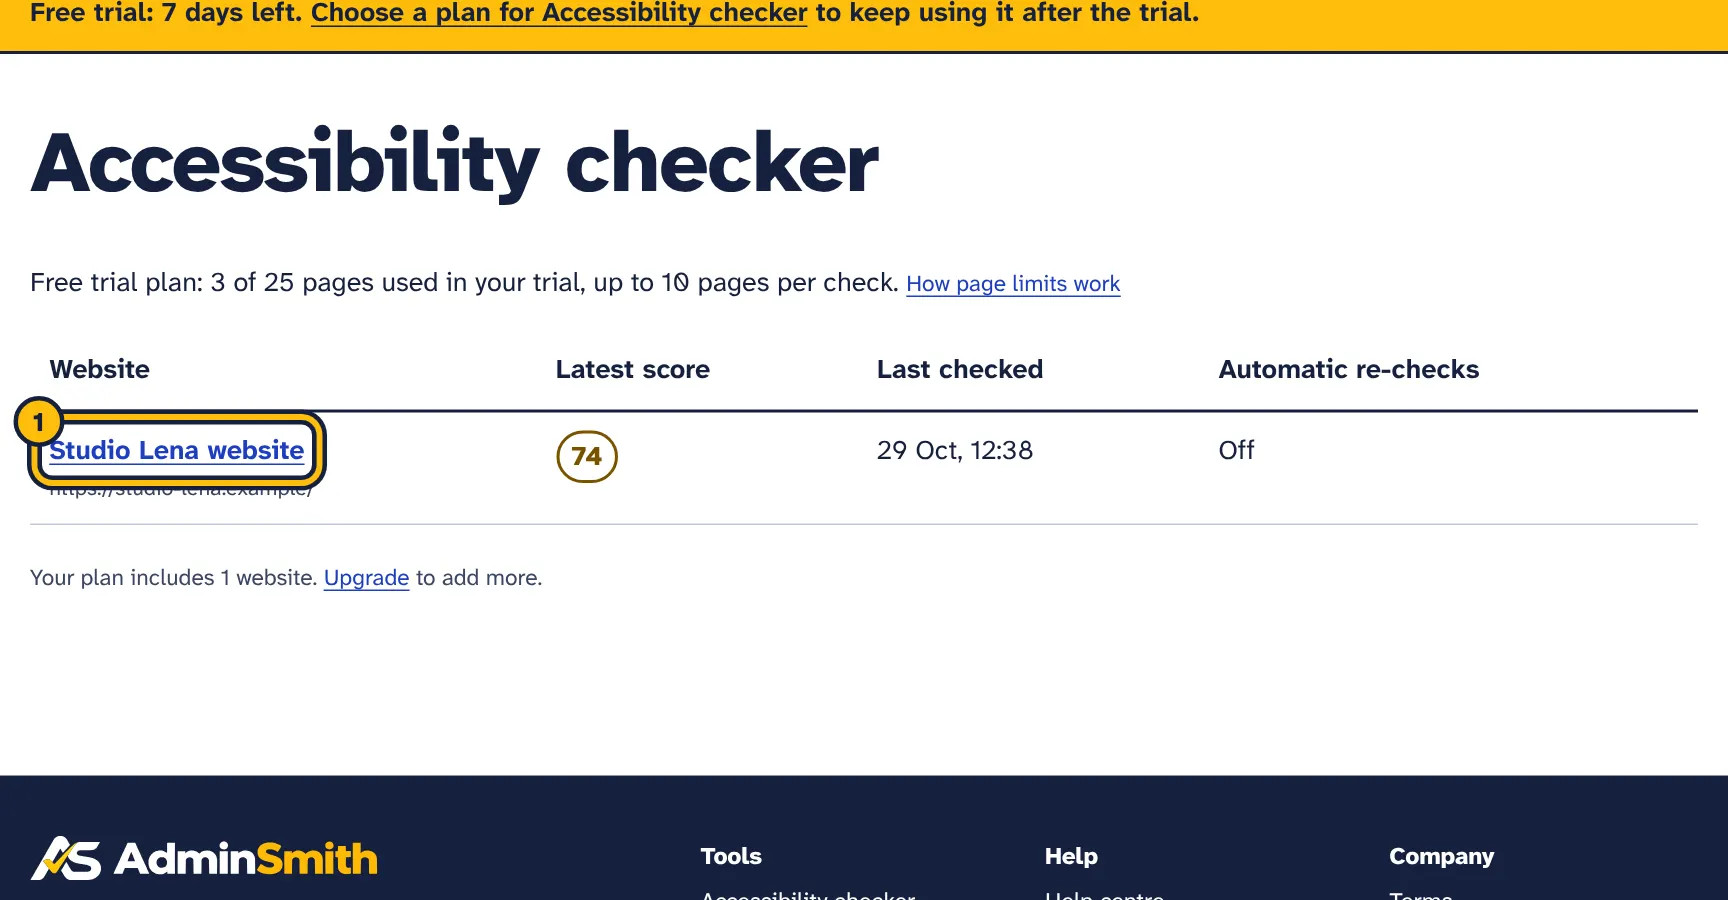
Step 1: Open your website. -
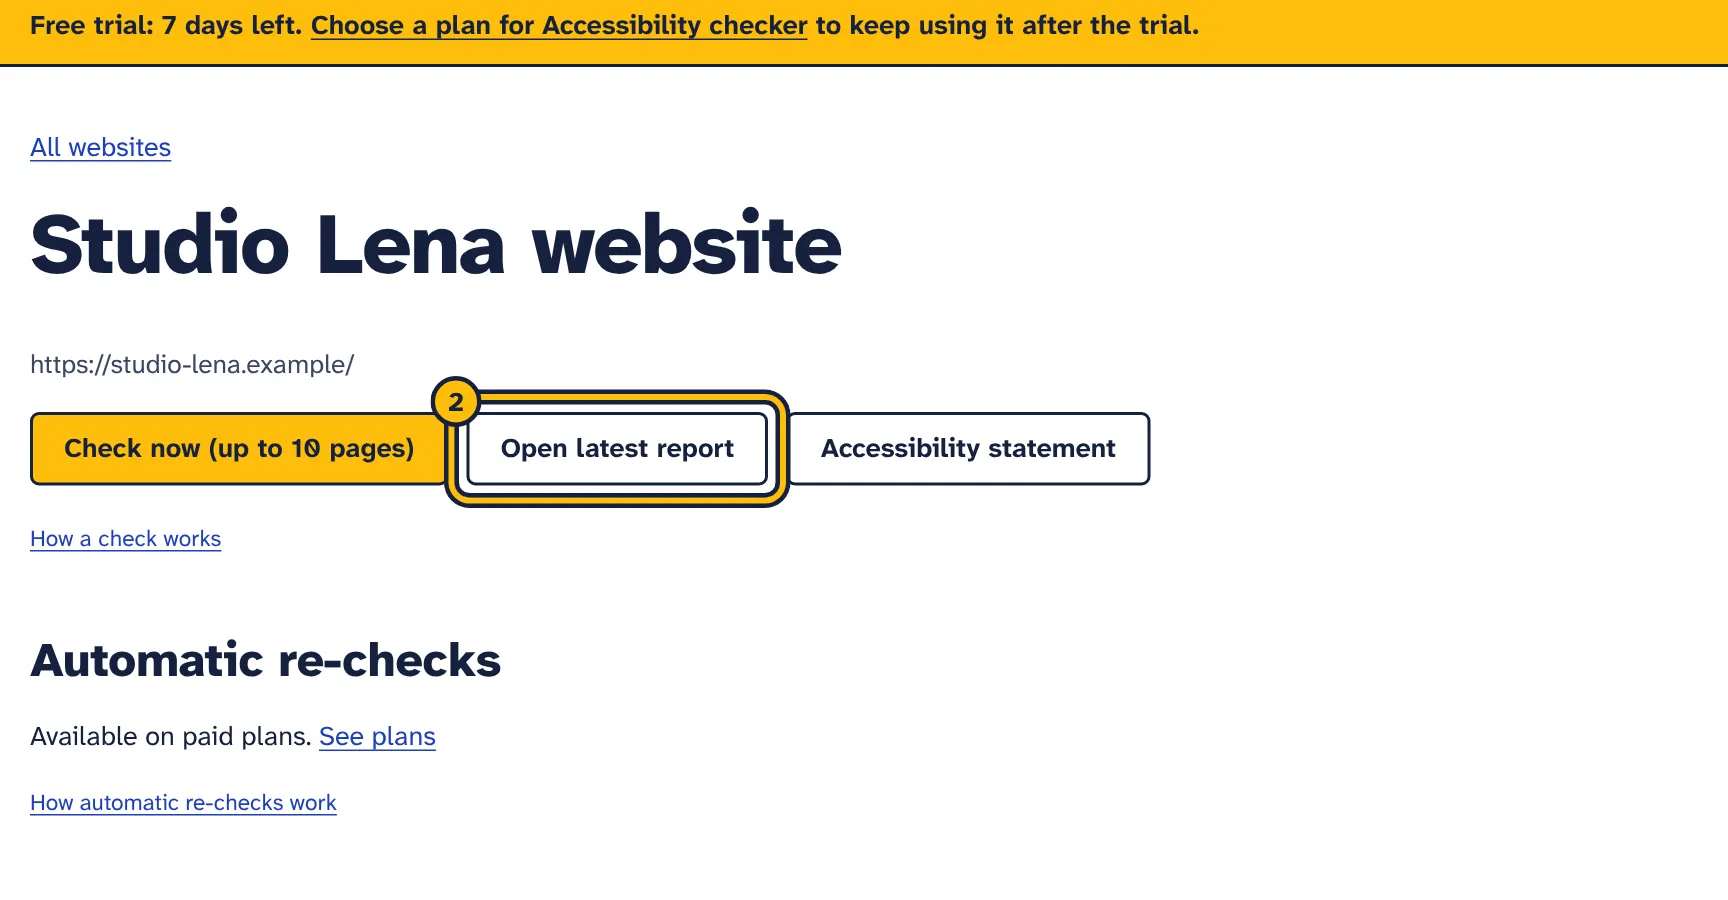
Step 2: Click Open latest report. -
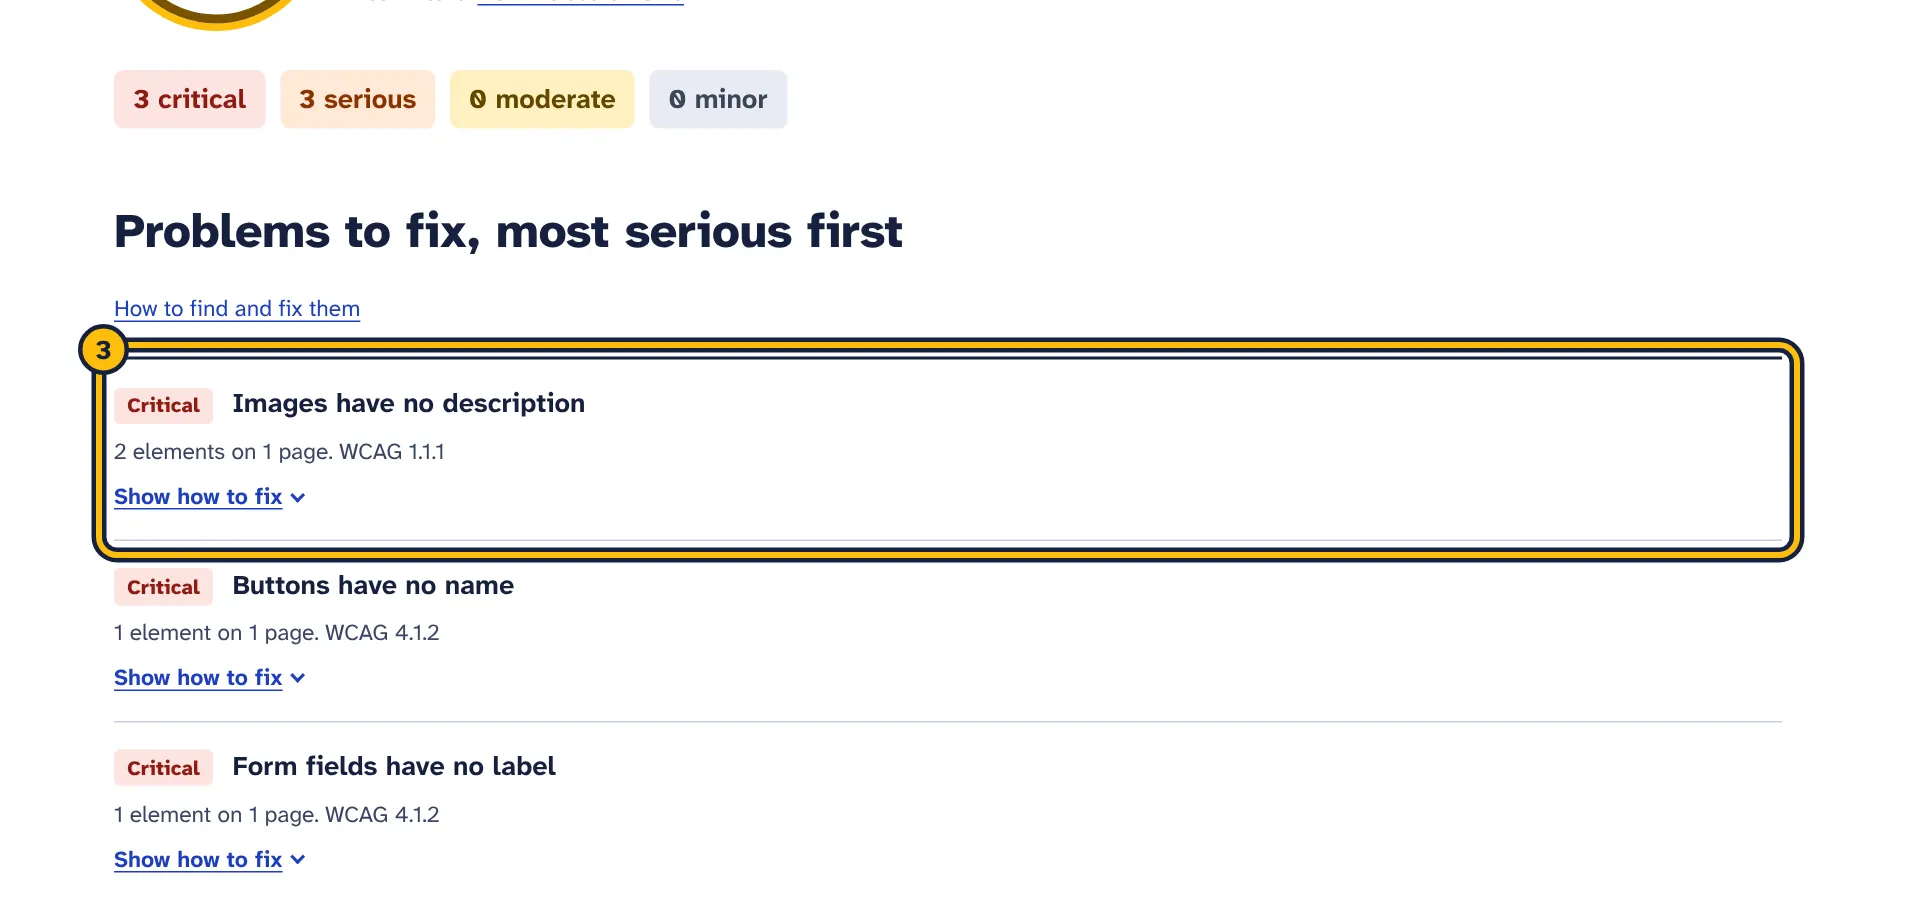
Step 3: Problems are listed most serious first. Click Show how to fix. -
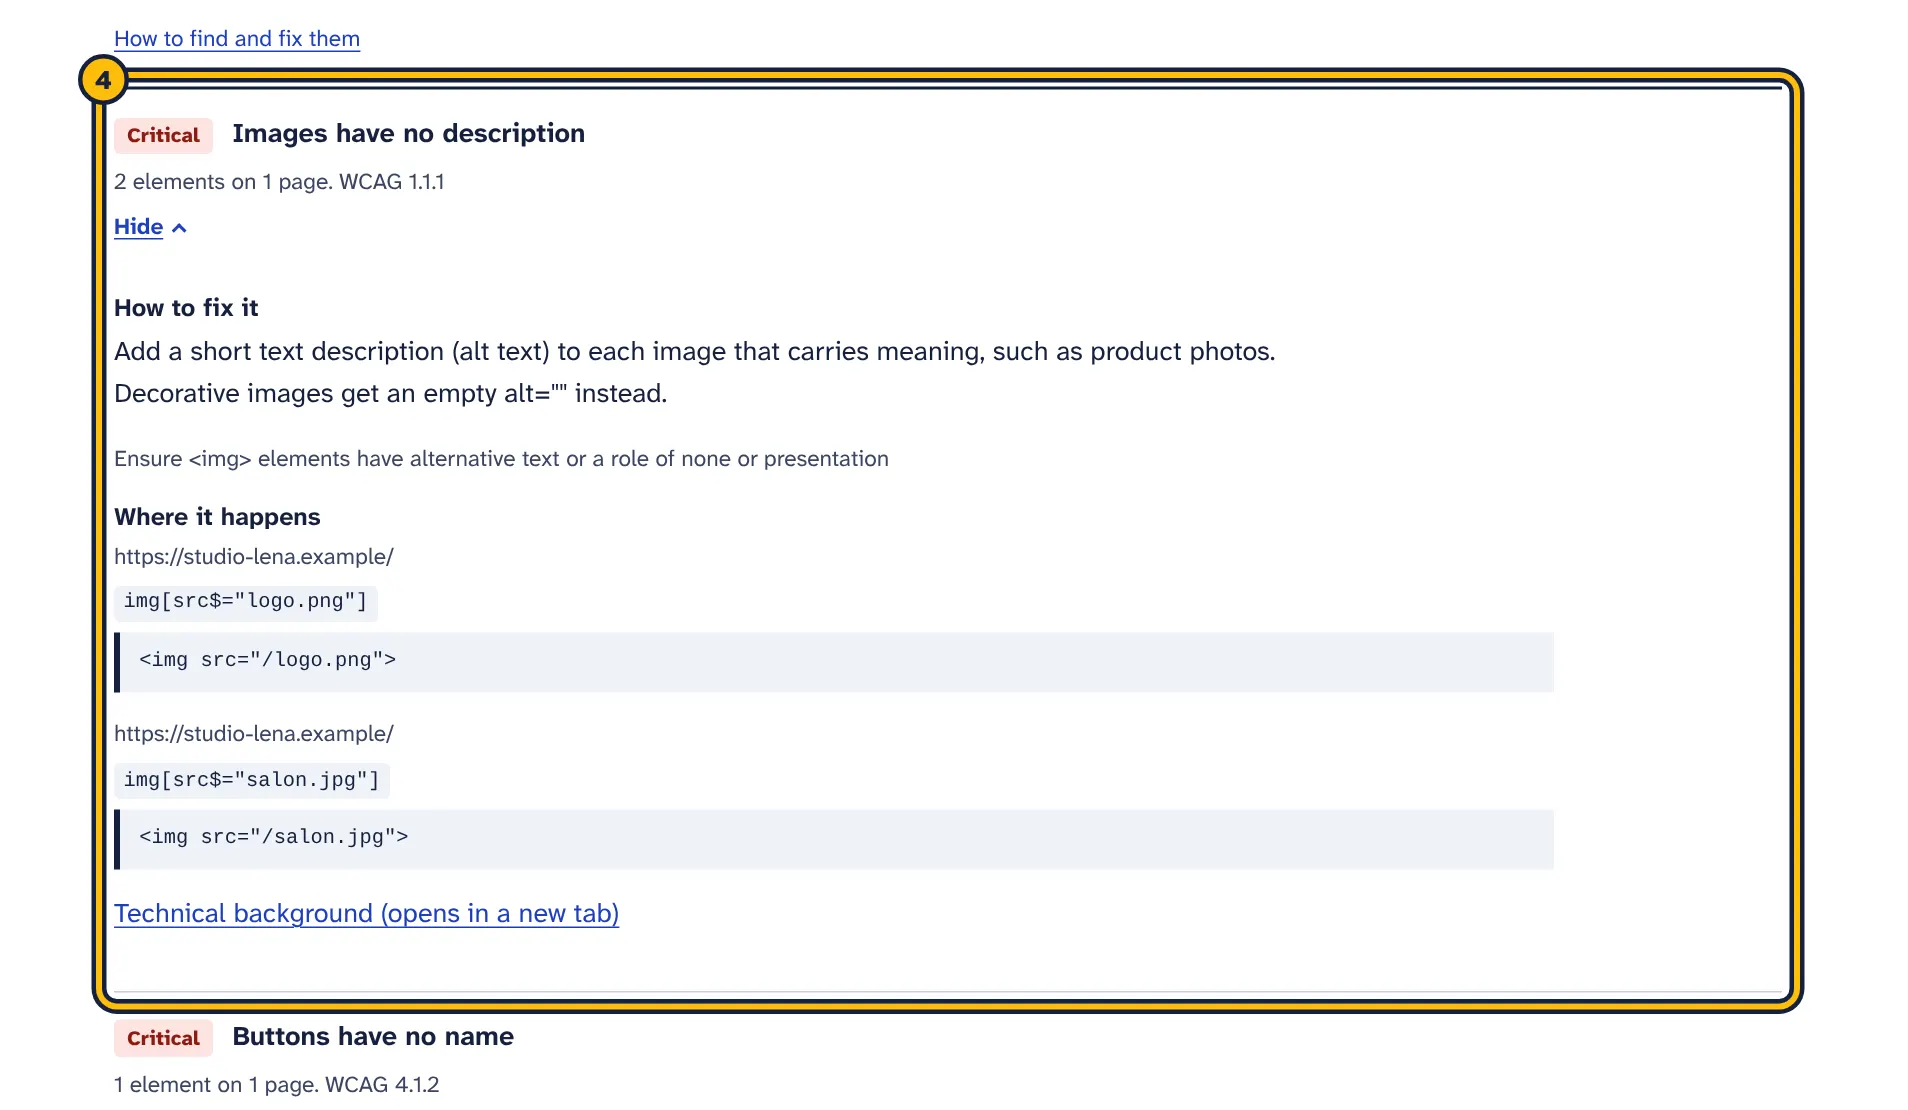
Step 4: You see why it matters, how to fix it and the exact places on your pages. -
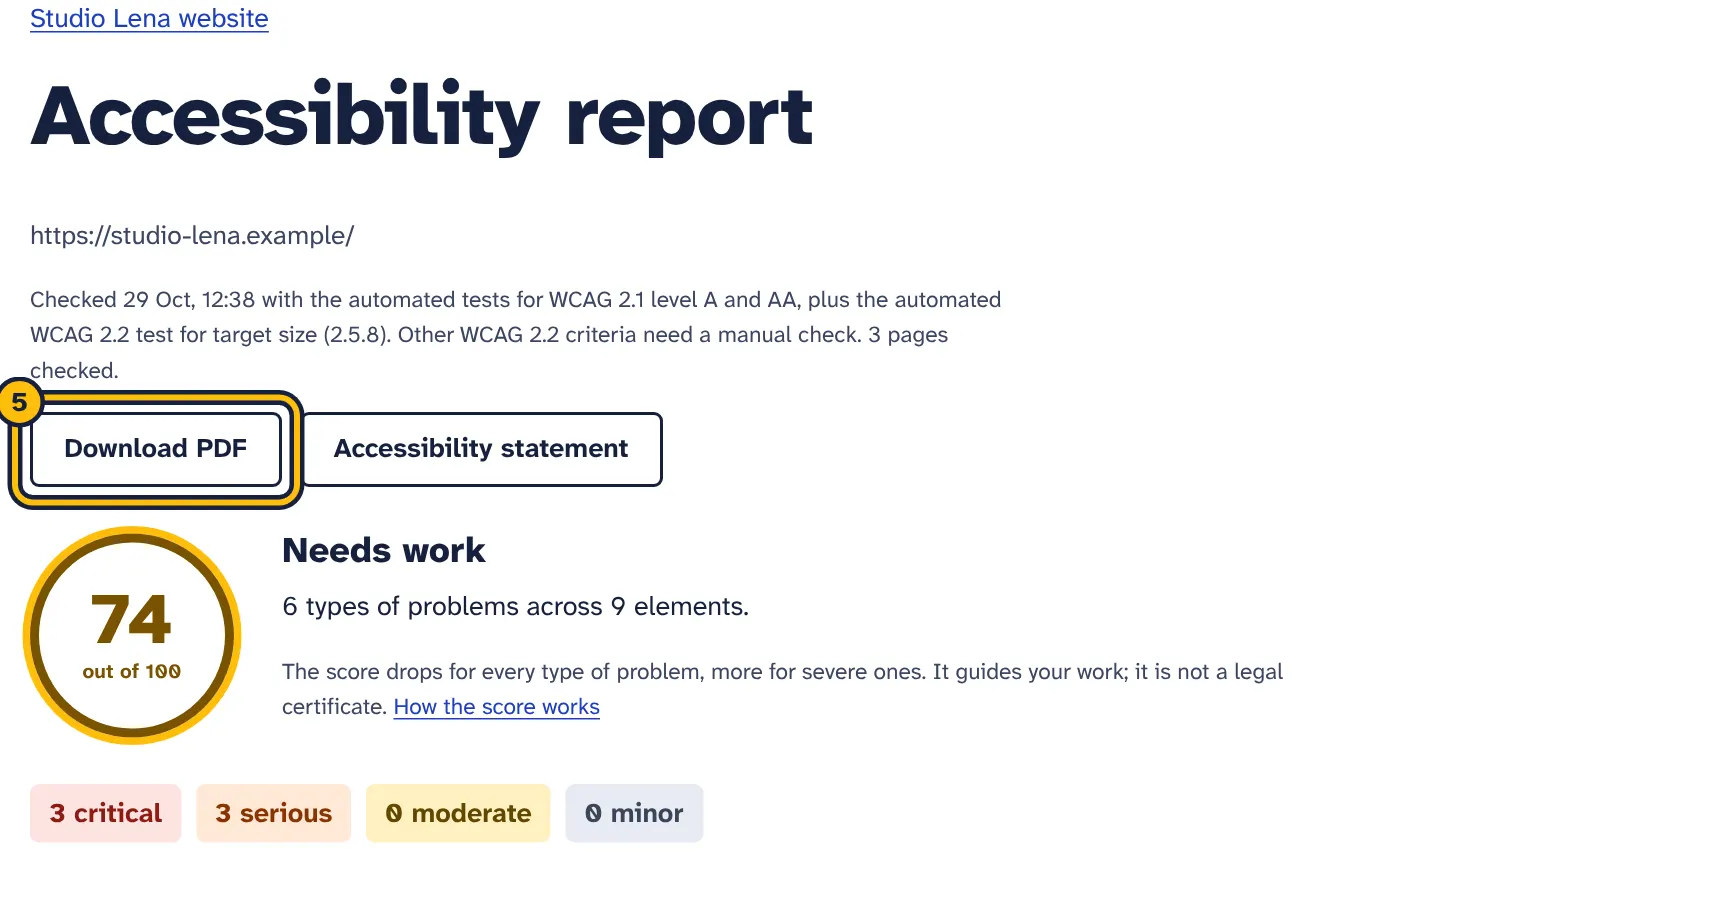
Step 5: Download the report as a PDF to send to your web developer.
Open a problem in the report. You see:
- How to fix it
- What to change, in plain words for the most common problems, with the technical description below it. For less common problems, the technical description from axe-core is shown.
- Where it happens
- Up to six examples, each with the page address, the location of the element on the page (a CSS selector) and the element’s HTML code.
- Technical background (opens in a new tab)
- A detailed explanation of the rule on Deque University, the website of the makers of axe-core, with code examples for developers.
Find the element on your page
- Open the page address from the example in Chrome or Edge.
- Right-click anywhere on the page and choose Inspect.
- In the Elements panel, press Ctrl+F (Cmd+F on a Mac) and paste the location from the report. The browser jumps to the element.
You usually do not need to fix pages one by one. When a problem appears on many pages, it nearly always comes from a shared part such as the header, footer, menu or product template. Fix it there and it is fixed everywhere.
Common problems and their fixes
- Images have no description
- Add short alt text to every image that carries meaning, such as product photos. In most shop systems there is an alt text field in the image or media settings. Decorative images get an empty alt text instead.
- Text is hard to read against its background
- Make the text darker or the background lighter. Normal text needs a contrast ratio of at least 4.5 to 1, large text at least 3 to 1.
- Links do not say where they go
- Every link needs text that says where it goes. Icon-only links, such as social media icons, need a label like “Instagram”.
- Buttons have no name
- Give every button visible text, or a label for icon-only buttons such as the search magnifier, basket or close cross.
- Form fields have no label
- Give each field a visible label linked to it. Placeholder text inside the field is not enough.
- The page does not say which language it is in
- Set the page language in your theme or site settings, for example
lang="en", so screen readers pronounce words correctly. - Zooming is blocked on phones
- Remove
maximum-scale=1anduser-scalable=nofrom the viewport setting of your theme. - Tap targets are too small or too close together
- Make buttons and links at least 24 by 24 pixels, or leave enough space around small ones.
- Embedded frames have no title
- Give each embedded video, map or booking widget a title that says what it is.
- Fix critical and serious problems first.
- Send the PDF report to whoever builds your site.
- Run a new check with Check now when the fixes are live.
- Compare the score in Check history and open the new report to see what is left.
Download the PDF report
On any finished report, click Download PDF. After a few seconds the file downloads, with a name like accessibility-report-your-shop-2026-10-28.pdf.
The PDF is A4 and holds the same report: the score, the counts by impact, every problem opened up with how to fix it and where it happens, and the list of pages checked. Each problem’s title and fix are kept together on one page.
Use it to brief your web developer, to show a client the state of their site, or as a dated record of your accessibility work. To get the PDF of an older check, click View next to it in Check history, then Download PDF. Reports and PDFs stay available after your trial ends.
Create your accessibility statement
The same steps in pictures:
-
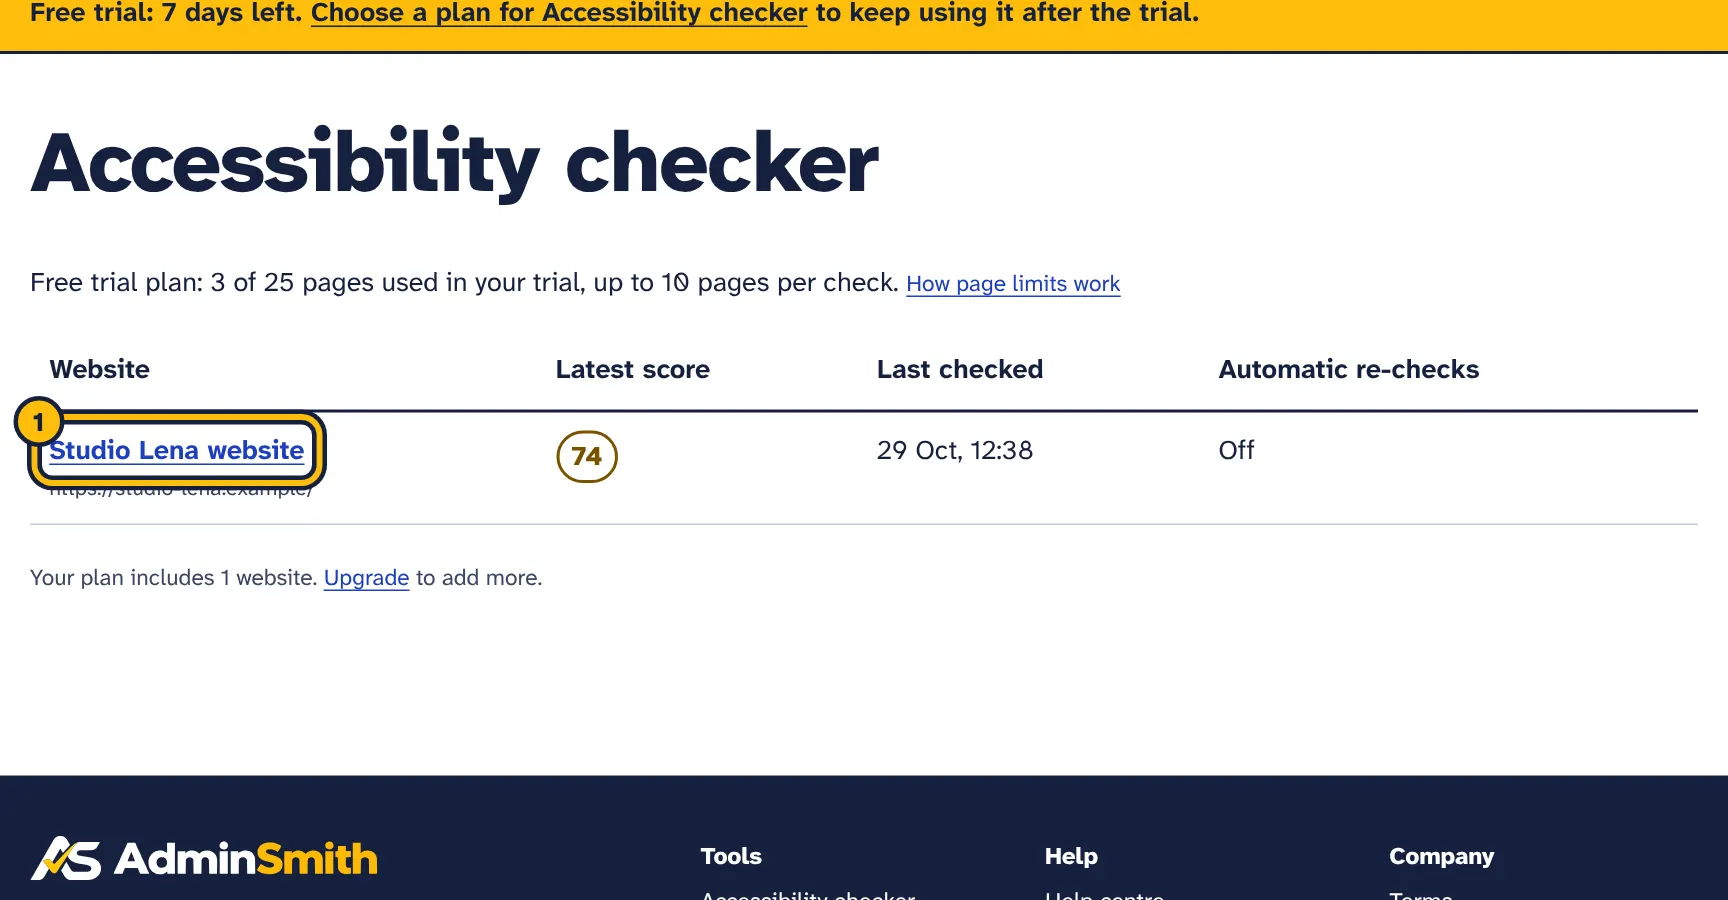
Step 1: Open your website. -
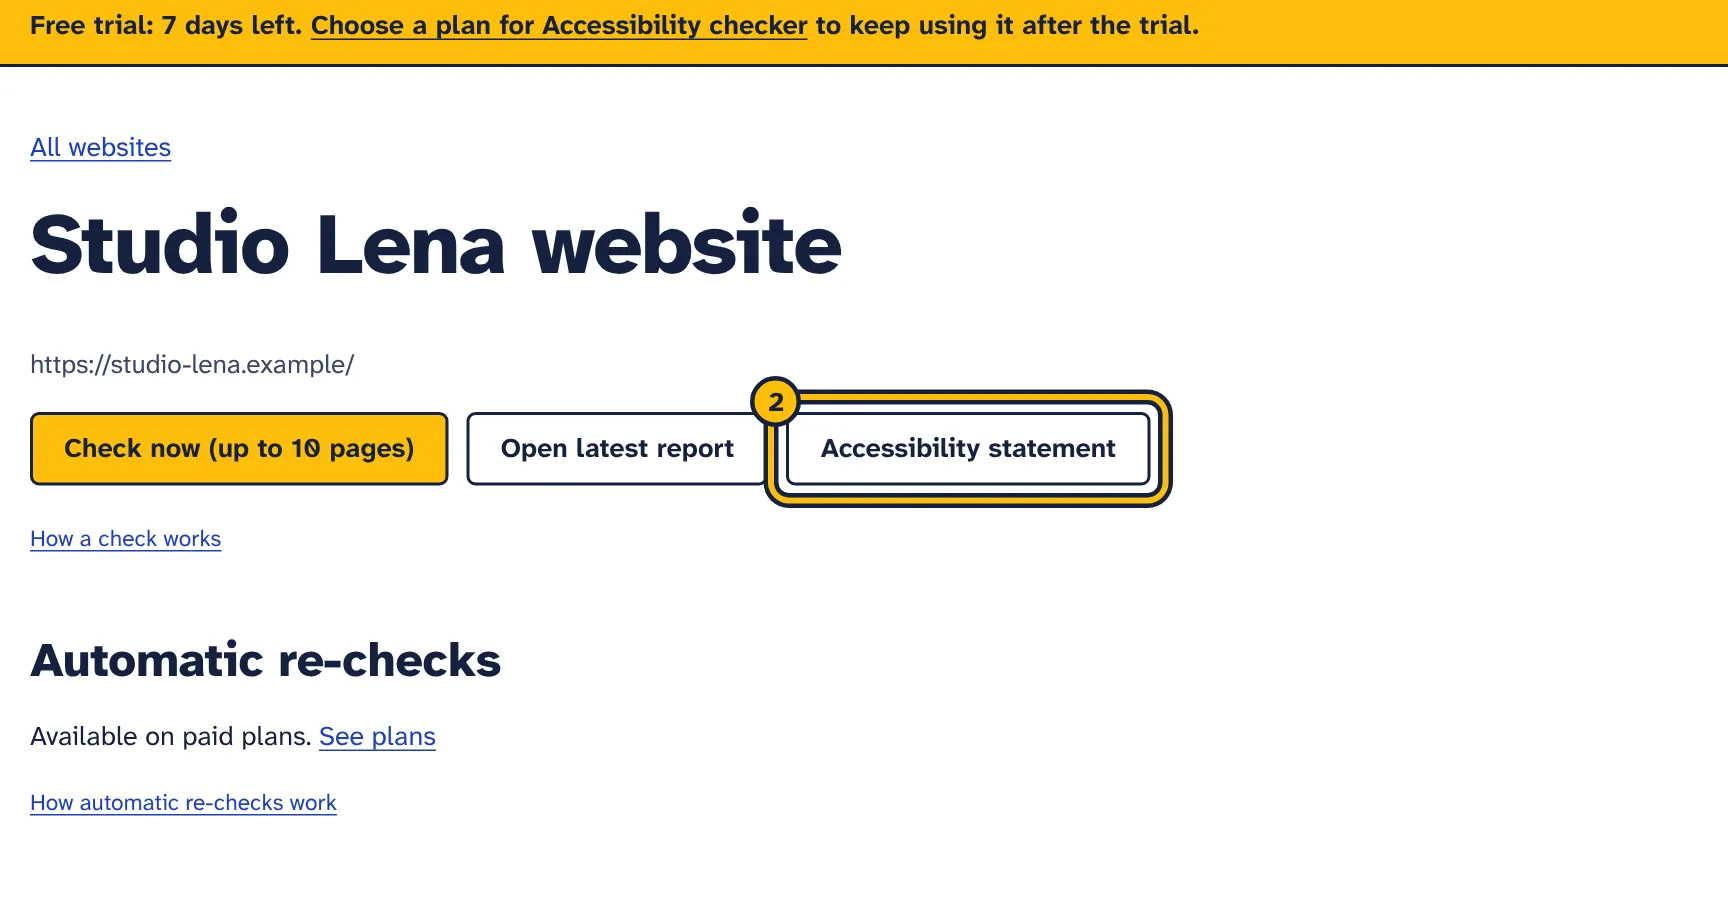
Step 2: Click Accessibility statement. -
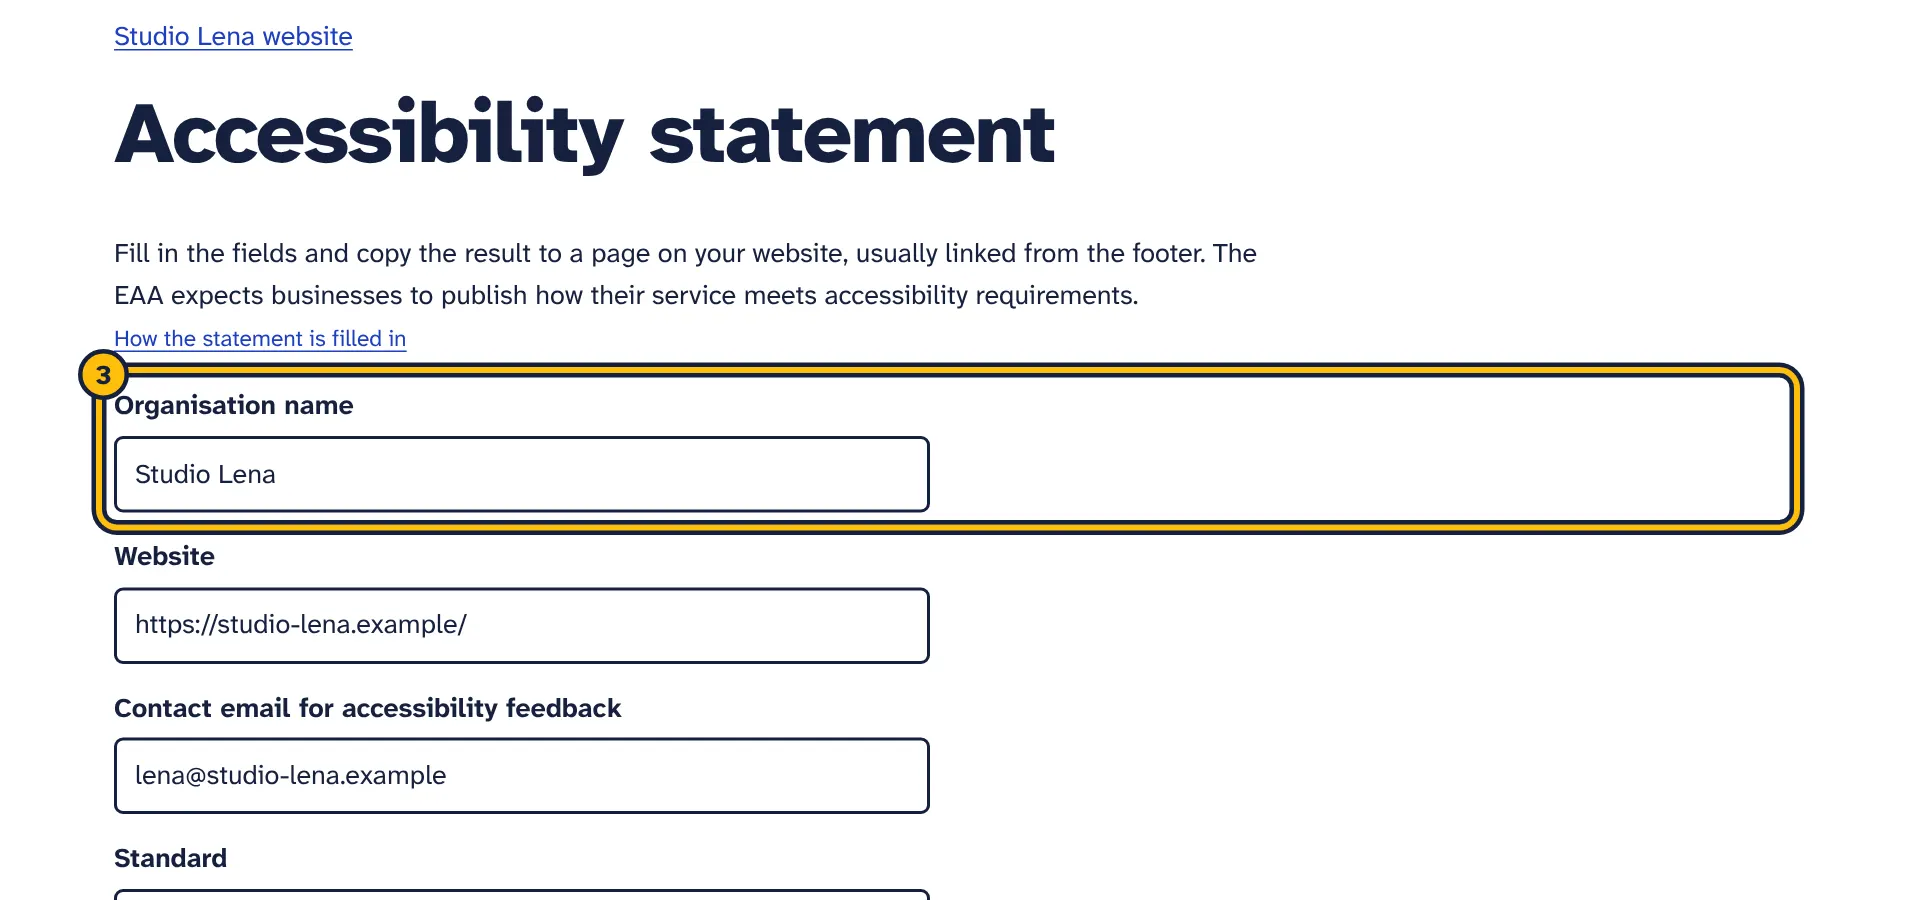
Step 3: Check your organisation name. Known problems are filled in from your latest check. -
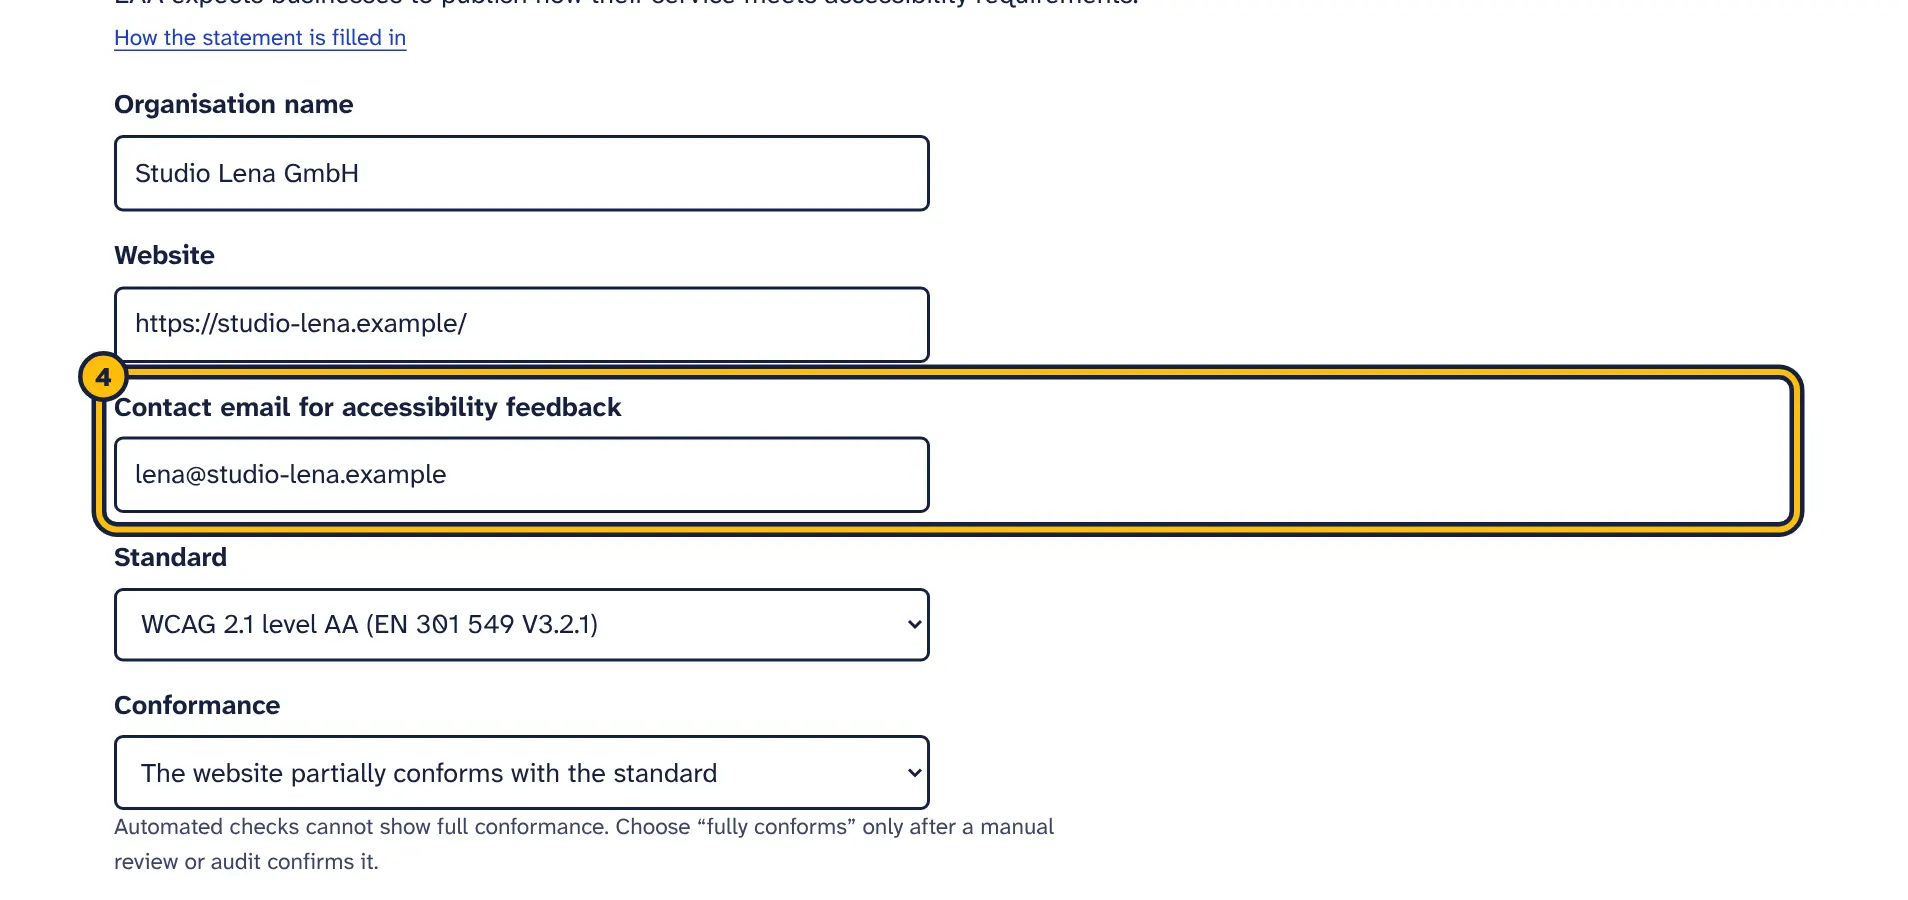
Step 4: Type the email address where people can report accessibility problems. -
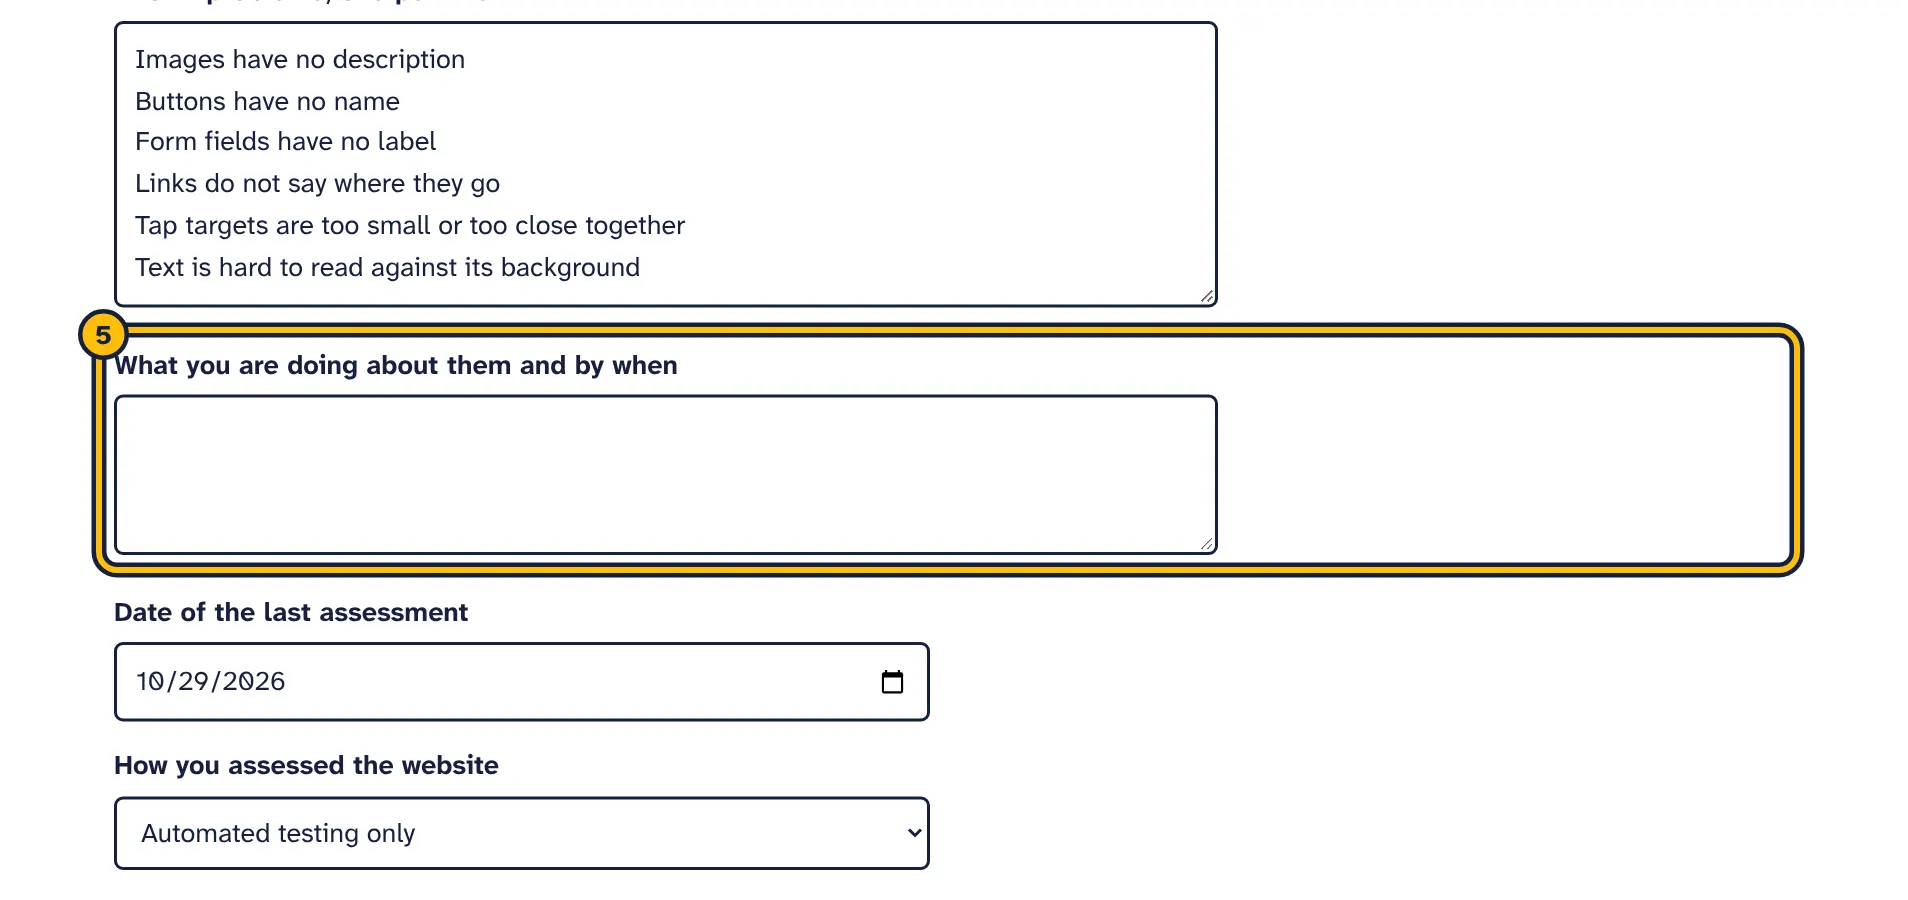
Step 5: Say what you are doing about the problems, and by when. -
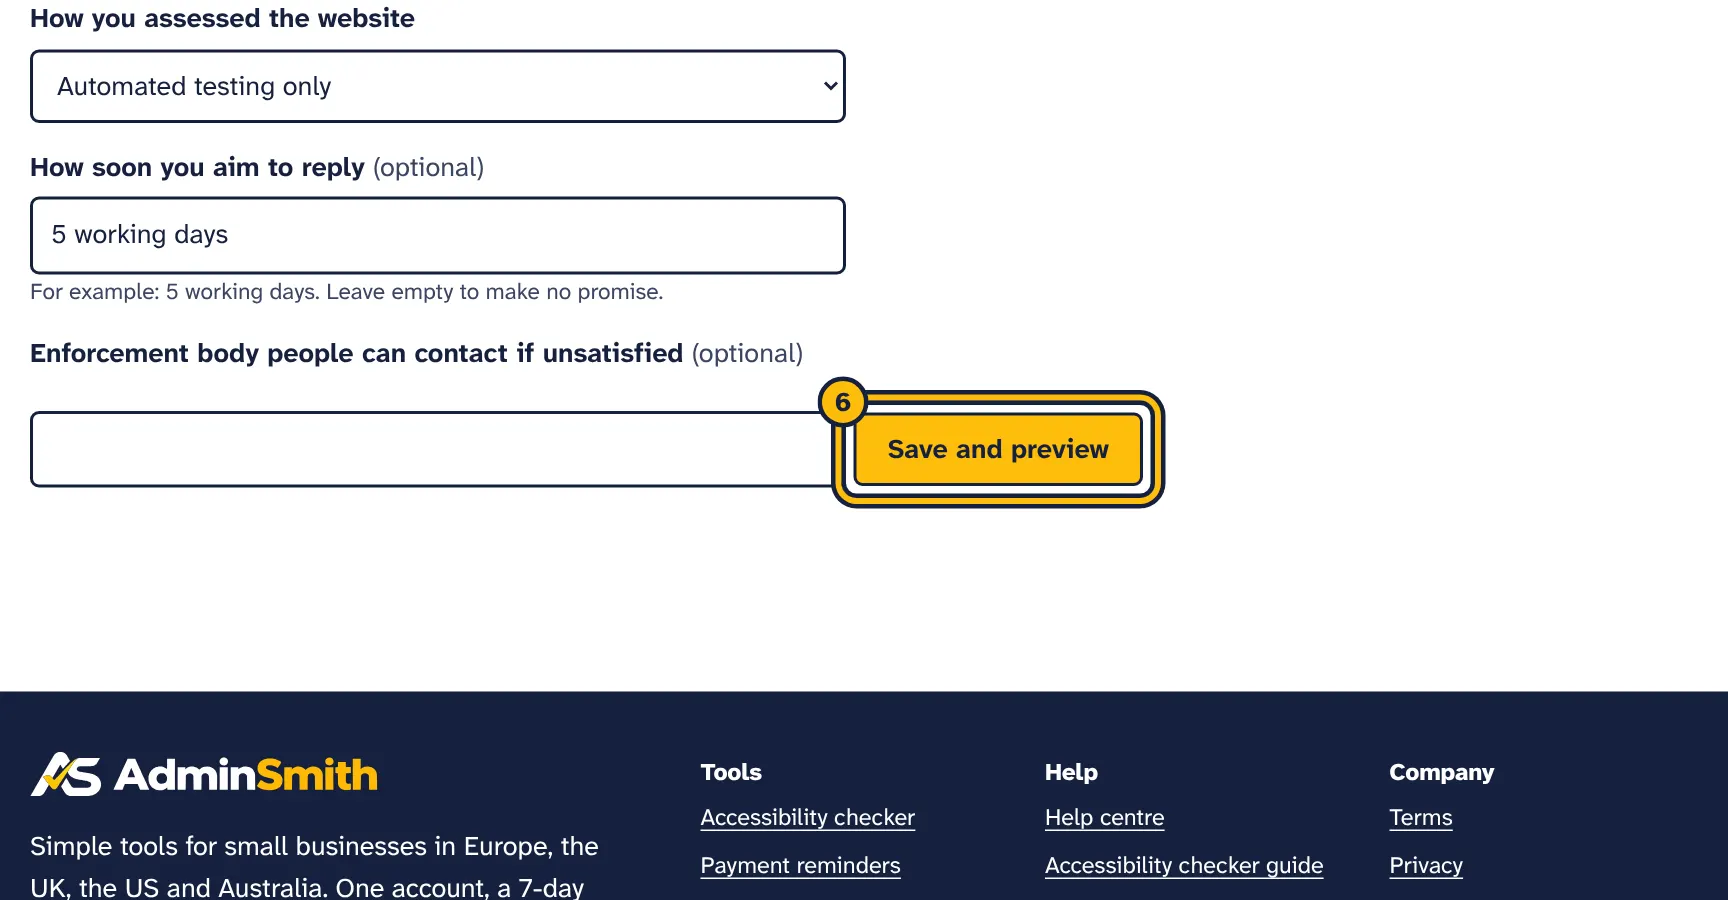
Step 6: Click Save and preview. -
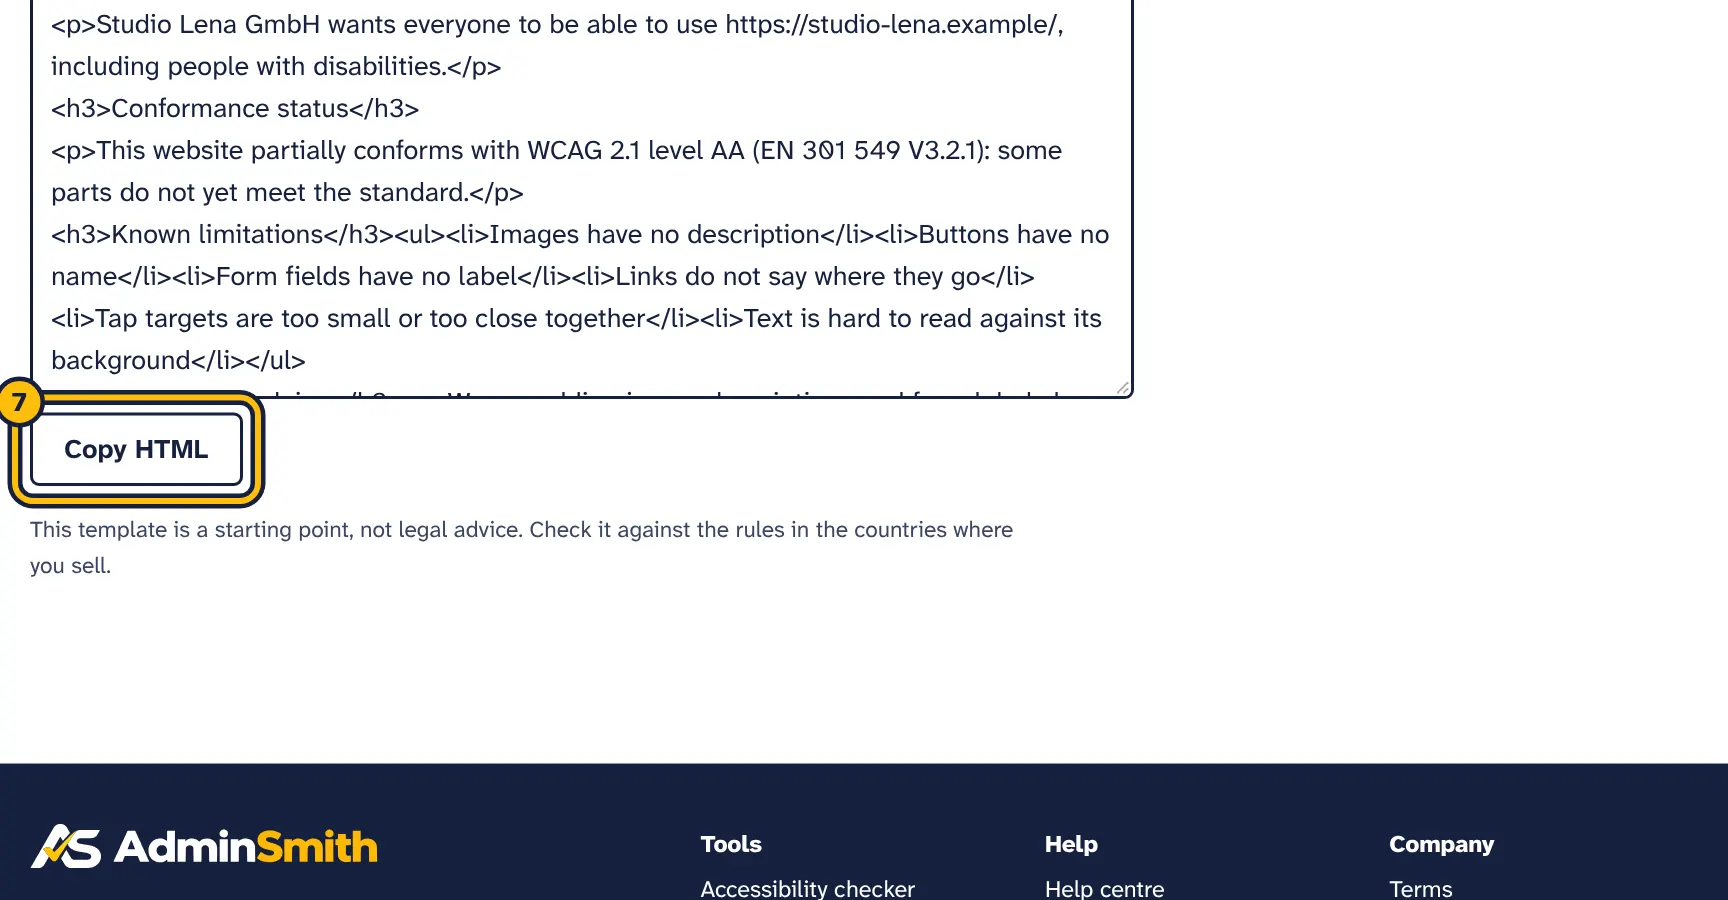
Step 7: Click Copy HTML and paste it into a page on your website, usually linked from the footer.
Click Accessibility statement on the website’s page or on a report. The first time, the form is filled in from your account and your latest finished check. Check every field:
- Organisation name
- Starts with your business name. Use your full legal name if you publish the statement under it.
- Website
- Starts with the website’s address. It is used in the heading and the first sentence.
- Contact email for accessibility feedback
- Starts with your login email. Use an address someone reads every day.
- Standard
- WCAG 2.1 level AA (EN 301 549 V3.2.1), the version most guidance refers to today, or WCAG 2.2 level AA (EN 301 549 V4.1.1), the newer version. It starts at WCAG 2.1. See the EAA guide for which to choose.
- Conformance
- The website fully conforms, partially conforms or does not conform with the standard. It always starts at “partially”, because an automated check cannot show full conformance. Only choose “fully” when a manual review or audit confirms it.
- Known problems, one per line
- Starts with the names of up to eight problems from your latest check, most serious first. Rewrite them so customers understand them and add what they can do instead.
- What you are doing about them and by when
- Your plan and dates. Left out of the statement if empty.
- Date of the last assessment
- Starts with the date your latest check finished.
- How you assessed the website
- Automated testing only (the starting choice), automated testing and our own review, or automated testing, our own review and an external audit. This sets the last sentence of the statement, so choose what you really did.
- How soon you aim to reply (optional)
- Starts with “5 working days”. Change it to a time you can keep, or leave it empty and the statement makes no promise.
- Enforcement body people can contact if unsatisfied (optional)
- The authority people can turn to if your answer does not help them. Left out if empty.
Click Save and preview. You see “Statement saved.”, the finished statement under Your statement, and its code under HTML to paste into your website. Click Copy HTML; the button shows “Copied”.
Publish it
- In your website builder, create a new page called “Accessibility”.
- Add an HTML or custom-code block and paste the HTML.
- Link the page from the footer of every page, and for the EAA, refer to it in your terms and conditions.
What the generator writes
A heading, a sentence about your commitment, the conformance status against the standard you chose, your known problems, what you are doing about them, how to contact you and how soon you reply, the enforcement body if you named one, and the date and way you assessed the site. Empty optional fields are left out.
Refill from latest check
Your saved statement does not change when you run new checks. When a newer check is ready, click Refill from latest check above the form. Known problems, one per line and Date of the last assessment are replaced with those from your latest check; everything else stays as you saved it. Nothing is saved until you click Save and preview, so review the list first, then replace the HTML on your website.
Read more about what belongs in a statement and what the EAA asks for in our accessibility statement guide.
Automatic re-checks and email alerts
Paid plans can re-check each website on their own: weekly on Starter, daily on Pro. In the free trial the website’s page shows “Available on paid plans” with a link to See plans.
- Open the website’s page.
- Under Automatic re-checks, click Turn on. The text changes to “On: we check this site weekly and email you when something gets worse or a check fails.” (or daily on Pro).
- To stop, click Turn off.
When automatic checks run
The first automatic check runs within an hour of turning re-checks on. After that they run on a fixed schedule: a week (Starter) or a day (Pro) after the previous automatic check, within the hour. Checks you start yourself with Check now do not move this schedule. If a check of the website is still running when the next one is due, the automatic check waits for the next hour.
An automatic check works like a manual one: it checks up to your plan’s pages per check and uses pages from your monthly allowance. When no pages are left this month, automatic checks pause and start again next month. They also pause if your paid plan ends; the website list then shows them as Paused.
When you get an email
You only hear from us when something needs your attention. Everyone on your account gets an email when an automatic check:
- Finds types of problems that the previous finished check of the website did not have.
- Gives a lower score than the previous finished check.
- Could not finish, for example because the site was down or blocked the checker.
When nothing got worse, no email is sent; the result is still in Check history. Checks you start yourself never send an email. An email about a worse result looks like this:
Subject: Shirt Shop: accessibility score down 4 to 86

Your automatic accessibility check of https://shirtshop.example/ found a lower score.

Score: 86 out of 100 (down 4)
Pages checked: 48
Problem types found: 2

New since the last check:
- Text is hard to read against its background (serious)

See the full report: (link to the report)
An email about a failed check has the subject “Shirt Shop: automatic accessibility check failed” and gives the reason, a link to the website’s page and a link to troubleshooting.
Plan limits and page counts
- Free trial
- 1 website, 25 pages in total, up to 10 pages per check, no automatic re-checks.
- Starter
- 1 website, 500 pages per month, up to 50 pages per check, weekly automatic re-checks.
- Pro
- 5 websites, 3,000 pages per month, up to 200 pages per check, daily automatic re-checks.
Every plan includes the full report, PDF downloads and the accessibility statement. Paid allowances start again on the first day of each calendar month; pages you used in the trial do not count against them.
How pages are counted
- Each page checked successfully counts as one page. Pages that could not be opened do not count.
- The pages per check are a maximum. A site with 30 pages uses 30 pages, even if the check could use 200.
- While a check runs, its maximum is set aside so two checks cannot overspend; pages it did not use are free again when it finishes.
- Deleting a website does not give back pages already used.
The first page of the checker shows your use, for example “Starter plan: 120 of 500 pages used this month, up to 50 pages per check.”
When pages run out
The website’s page says “You have used all pages in your plan this month.” (or “in your trial”), Check now disappears and automatic re-checks pause. Click Upgrade for a bigger plan, or wait for next month’s allowance.
Plan your pages if your site is large. With daily re-checks of 200 pages, a month of Pro pages lasts about 15 days. There is no setting to check fewer pages or to leave out parts of your site; each check covers as many pages as your site has, up to the limit.
When your trial ends
Your websites, reports, PDFs and statements stay. To run new checks or add websites, click Choose a plan, or go to Plan and billing in the top menu and choose Starter or Pro for the accessibility checker. Your new limits apply as soon as the payment is confirmed. See Your account, plans and billing for payments, invoices and cancelling.
What automated checks cannot tell you
Automated rules find the problems that can be detected reliably in a page’s code: missing descriptions and labels, low contrast, missing page language, zoom blocked, small tap targets and many more. Many WCAG requirements need a person to judge, and the checker only reports clear failures, not guesses. A clean report is a good start, not proof that your site is accessible.
What to check by hand
- Image descriptions: the checker sees whether an image has alt text, not whether it describes the image well.
- Keyboard use: can you reach and use the menu, filters, pop-ups, basket and checkout with the Tab, Enter and arrow keys only, and can you always see where you are?
- Things the checker never sees: opened menus and pop-ups, error messages after sending a form, the basket and checkout steps, pages after login, and your site at phone size. It checks each page once, at desktop size, before anything is clicked.
- Zoom and small screens: zoom to 200 and 400 percent and check that nothing is cut off or overlaps.
- Video and audio: captions, transcripts and audio description. The checker does not play media.
- Clear content: link texts that make sense, headings in a logical order, instructions and error messages that tell people what to do, and no time limits or moving content people cannot stop.
- Documents: PDFs and other files linked from your pages are skipped.
- WCAG 2.2 additions: target size is tested automatically; focus not obscured, dragging movements, consistent help, redundant entry and accessible authentication need a manual check.
A 15-minute manual test
- Put the mouse away and go through your most important journey, such as finding a product and reaching checkout, with the keyboard only.
- Zoom your browser to 200 percent and repeat the first steps.
- Turn on a screen reader (VoiceOver on Mac and iPhone, Narrator or the free NVDA on Windows, TalkBack on Android) and listen to your home page and one product page.
- Send a form with mistakes and check that the error messages say what went wrong.
- Play your videos with the sound off and check the captions.
For important journeys, consider an audit by an accessibility specialist and testing with people with disabilities.
Troubleshooting
The check did not finish
If no page at all could be checked, the check fails and its page says This check did not finish with the reason. Make sure the address opens in a normal browser, then click Check now again. The reasons:
- This website address could not be found.
- The domain does not exist or is not live. Check the spelling.
- The page took too long to load.
- The page did not load within 30 seconds. Try again later; if it keeps happening, your hosting may be slow or overloaded.
- This address cannot be checked. Use the public address of your website.
- The address leads to a private network, such as a local or internal server. Only public websites can be checked.
- The website refused the connection.
- The server is down, or a firewall refused us.
- The website closed the connection without answering.
- The server accepted the connection but sent nothing back. It may be overloaded or misconfigured, or a firewall dropped the request. Try again later.
- The website could not be reached. It may be down.
- There was no answer at all from the server’s address. Check that the website is online.
- The page keeps redirecting to itself, so it never loads. Check the website’s redirect settings.
- The page sends the browser round in a circle of redirects, often between http and https or with and without www. Your hosting or website settings have two rules that undo each other.
- The website has an invalid security certificate.
- The HTTPS certificate has expired or does not match the address, for example with or without
www. Fix the certificate with your hosting provider. - The page answered with error 403.
- The server answered with an error code. 403 or 429 usually means a firewall or bot protection blocked the checker (see below), 404 that the page does not exist, and 500 or higher a server problem.
- This address is not a web page.
- The address leads to a file, such as a PDF or image, instead of a web page.
- The page could not be checked.
- Something else went wrong. Try again; if it keeps failing, email us the address.
Your site blocks automated visitors
Security plugins, firewalls and bot protection services sometimes block the checker or show it a challenge page instead of your site. The checker identifies itself with AccessibilityChecker at the end of its browser identification (user agent). Allow that in your security or bot protection settings. The checker opens one page at a time, so it does not put a heavy load on your site.
If Pages checked lists a page titled something like “Just a moment…” or “Access denied”, the checker saw the challenge page, not your content, and the results for that page are about the challenge page.
Some pages could not be opened
They are listed under Pages checked with the reason, left out of the score, and not counted in your pages. The reasons are the same as above.
Only one page, or very few, was checked
- Your address redirects to another domain or subdomain, such as
shop.yourshop.com. The checker only follows links on the domain you added. The report says so in a note at the top and names the address your visitors end up on: delete the website and add that address instead. - Your menu is built without normal links, for example with buttons that open pages through JavaScript. The checker only follows real links.
- You had few pages left in your plan. The number in Check now (up to … pages) shows how many a check can use.
Pages behind a login, basket and checkout
The checker cannot log in and does not put products in a basket. Customer accounts, members’ areas and checkout steps are not checked; links to them usually lead to your login page, which is checked instead. Test these parts by hand with the manual test.
Cookie banners and pop-ups
The checker sees each page like a first-time visitor, so your cookie banner is on the page and its problems appear in the report. That is useful: the banner is the first thing every visitor has to use.
Very large sites
Each check stops at your plan’s pages per check. Pages closest to your start address are checked first, so your main pages are usually included. Filter and sort addresses with ? parameters count as separate pages, so shops with many filters can use up a check quickly. There is no setting to choose or exclude pages. To check a single deep page, such as one product, use the free check.
The score changed but I did not change anything
- New content, such as new products, images or blog posts, brought new problems.
- A different set of pages was checked, because your site’s links changed or fewer pages were left in your plan.
- Third-party content changed, such as a chat widget, cookie banner or embedded video.
- Some pages could not be opened this time and are left out of the score.
The check stays at 0 pages
Your check is waiting for others to finish and starts by itself. If our service restarts during a check, the check starts again from the beginning on its own.
No email after an automatic check
Automatic checks only send an email when something got worse or the check failed, so no email usually means nothing got worse. Look at Check history to see the latest result. If you expected an email, look in your spam folder, and check that Automatic re-checks shows On, not Paused, and that you have pages left.
My statement still shows old problems
A saved statement does not change with new checks. Open it, click Refill from latest check, review the list and save, as described in Create your accessibility statement.
Still stuck? Email support@adminsmith.com and tell us what you tried. See also Connecting your own accounts and Your account, plans and billing.